Bonding secondary barrier triplex formations plays a vital role in maintaining the structural integrity and operational efficiency of containment systems. This critical process is essential for creating a robust and reliable protective layer that safeguards against potential leaks and environmental hazards. By meticulously adhering multiple layers of specialized materials, technicians establish a formidable defense mechanism that enhances the overall safety and performance of the containment structure.
- Bonding Secondary Barrier Triplex
- General
- Installation Principles
- Extremity and Overlap Principle
- Bonding
- Installation Procedure
- S-Triplex Strip Bonding on Flat Panels
- Bonding of Curve Triplex Between Corner Panel
- Bonding of S-Triplex between Flat Panels and Corner Panels
- Bonding Procedure Qualification Test for S-Triplex
- Checking of Epoxy Glue Depoziting Process
Installation of the secondary barrier triplex involves careful alignment and bonding of the layers, ensuring a seamless and secure fit. Specialized adhesives and techniques are employed to guarantee a strong and durable bond, preventing delamination or separation over time. Proper installation is crucial for maximizing the barrier’s effectiveness and ensuring long-term protection.
Bonding Secondary Barrier Triplex
General
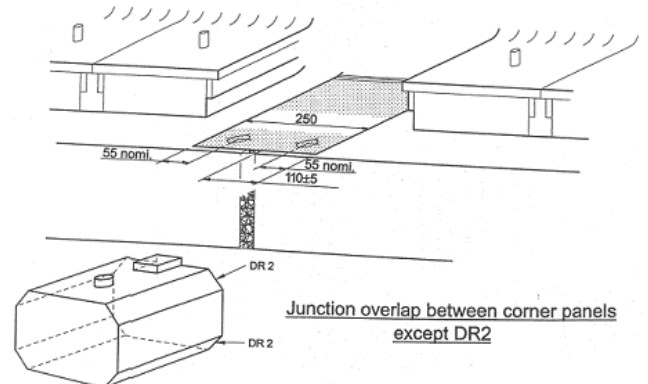
After installation of the filler between panels, it is necessary to ensure the continuity of the secondary barrier. This is done by means of S-triplex (supple/flexible triplex) bonded on the panels. (See Figure 1.)
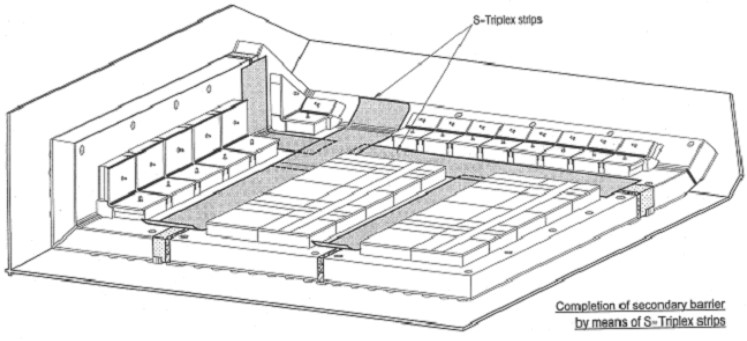
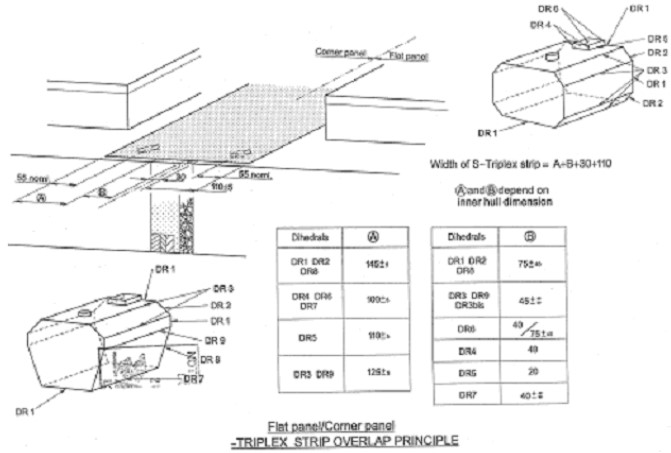
These S-triplex pieces are shaped in long strips sufficiently wide to overlap the secondary barrier on adjacent panels. (See Figures 2, 3 and 4.)
Installation Principles
The sequence of S-triplex strip installation is:
- Installation of S-triplex strips between flat panels.
- Installation of curve S-triplex strips between corner panels.
- Installation of S-triplex strips between flat panels and corner panels.
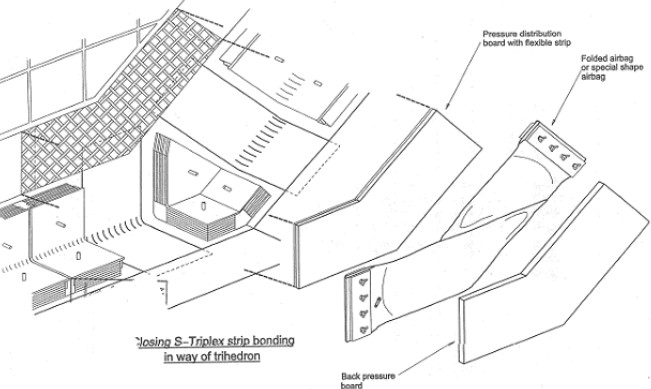
- Installation of S-triplex strips in way of trihedrons.
Extremity and Overlap Principle
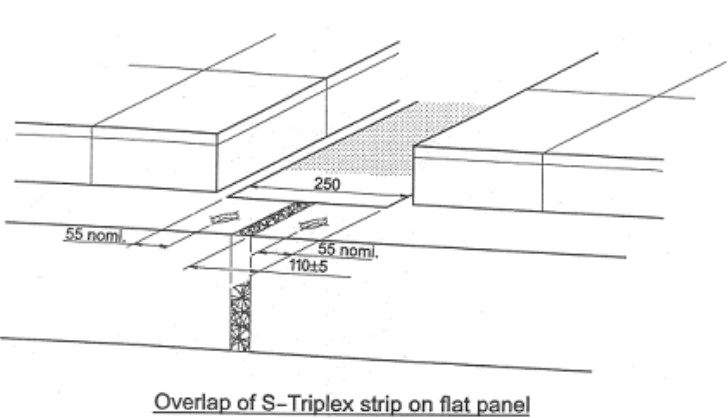
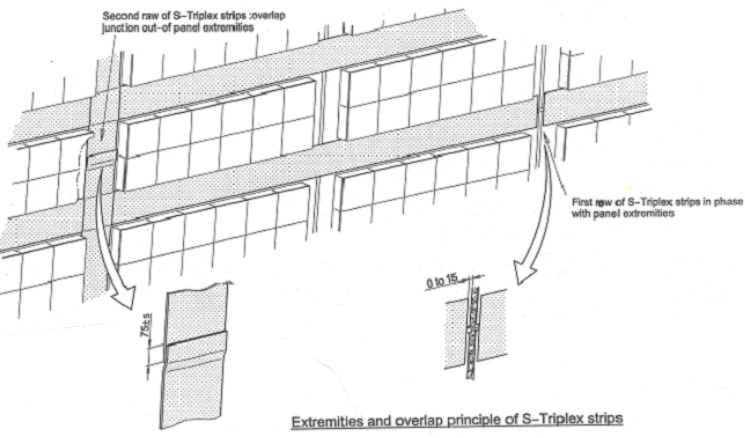
In order to limit the number of overlap junctions between S-triplex strips, it is recommend to install the first row of S-triplex strips in line with panel extremities.
Read also: LNG Panel Erection and Sealing Techniques
In the other direction, the end-to-end overlap of S-triplex will be out of panel extremities. The junction overlap value is 75 mm +/- 5 mm. (See Figure 5.)
Bonding
So far the bonding of S-triplex strips is done with epoxy glue.
Bonding with hot melting glue in under development.
Installation Procedure
While bonding by means of epoxy glue, it needs to maintain the S-triplex strips under pressure during the curing of the glue. The pressure time will be defined according the glue manufacturer specification.
To keep pressure during curing time, different types of jigs will be used depending on the S-triplex strip location.
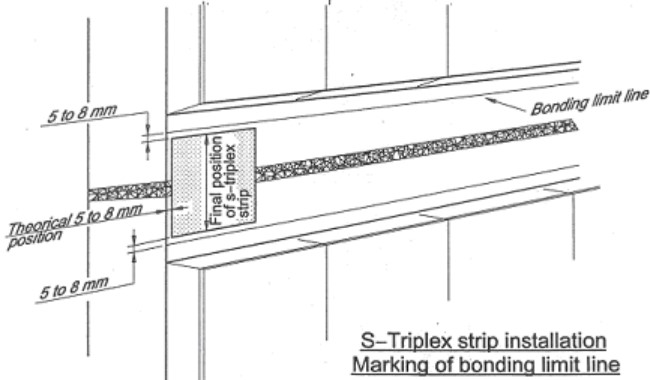
During cutting and conditioning of these S-triplex trips special attention to paid to cleanliness. (See Figures 6 and 7.)
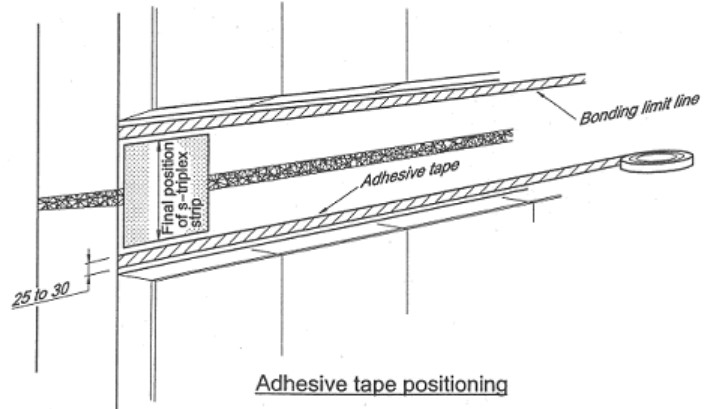
S-Triplex Strip Bonding on Flat Panels
This phase is one of the most delicate of the whole construction. The tightness of the secondary barrier depends of the quality of the bonding.
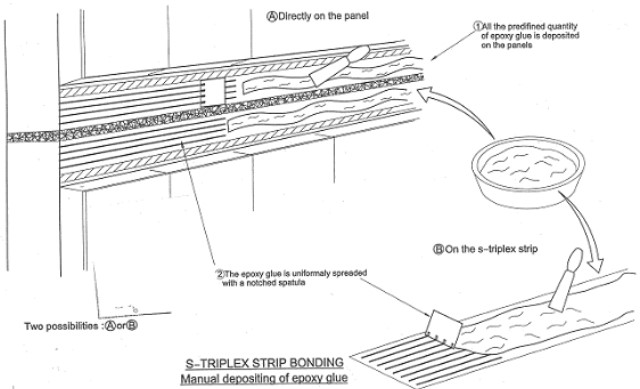
Generally the glue is applied manually on the flat panel. The quantity of glue should be 520 gr/m2, to be confirmed by test. The quantity of the two components is taken with accuracy by using a dosing mixing machine. That may also be done by weighing and then mixed in a bowl.
The application can be done by a depositing machine or manually either on the triplex or on the panel. (See Figure 8.)
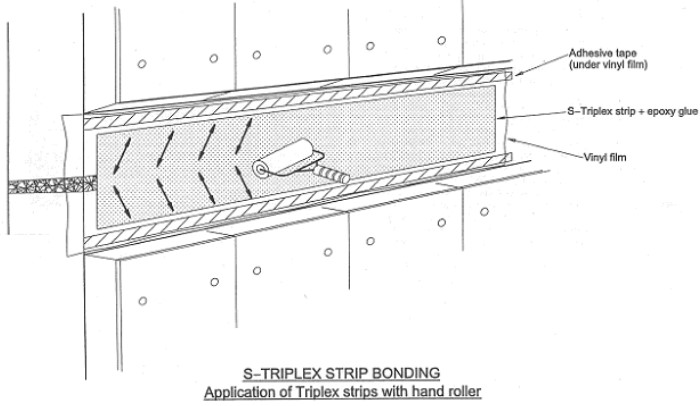
Once the S-triplex strip is adhered to the panel with epoxy glue, a vinyl film is applied over the entire surface and hand roller is used to push out air and to complete the spreading of the glue. (See Figures 9 and 10.)
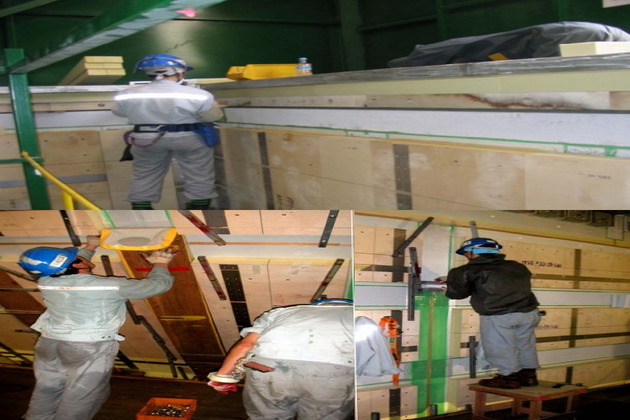
To maintain the joint under pressure during the curing time of the glue, a pressure device is used. (See Figures 11 through 14.)
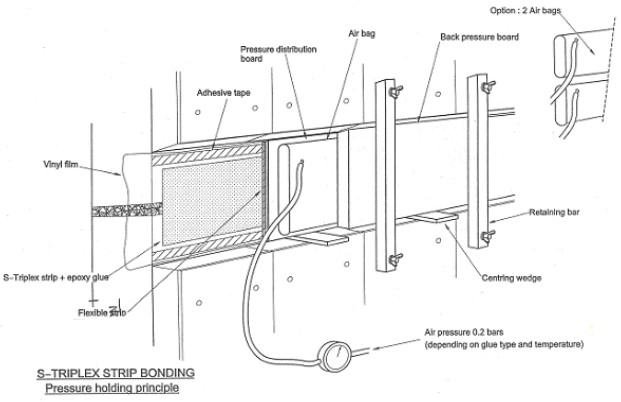
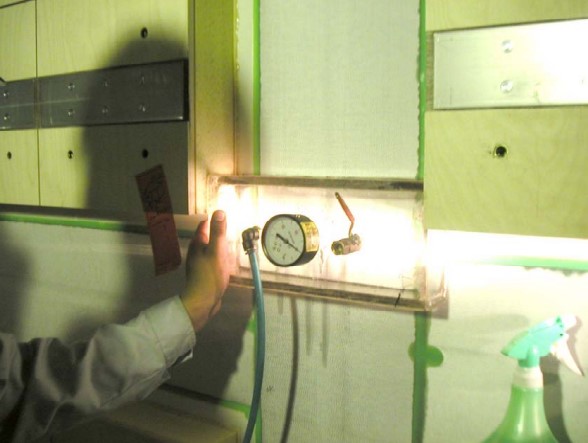
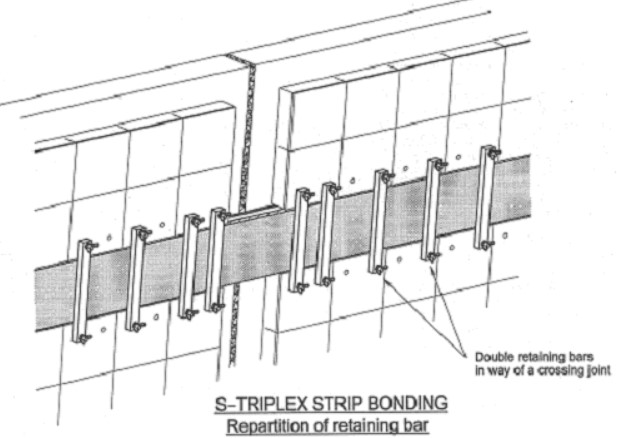
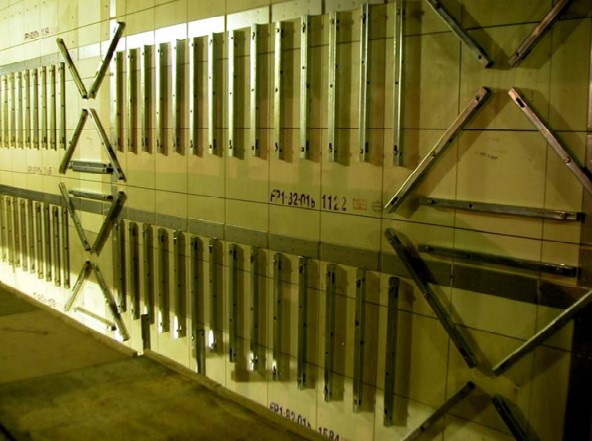
Pressure time is defined according to temperature following epoxy glue maker specification.
After dismantling of the pressure device, the vinyl film is removed and the excess squeezing of glue carefully removed. Removal has to be carefully done to avoid any damage to the lower triplex layer (rigid triplex or S-triplex at the crossing point).
The general normal squeezing of the glue is checked as good adhesion of the S-triplex strip: no air bubble under the surface is allowed.
On the crossing area of S-triplex strips or on overlapping area, epoxy glue will be applied on both surfaces to be bonded or additional thickness of glue will be applied.
Bonding of Curve Triplex Between Corner Panel
Usually the glue is applied on the corner panels.
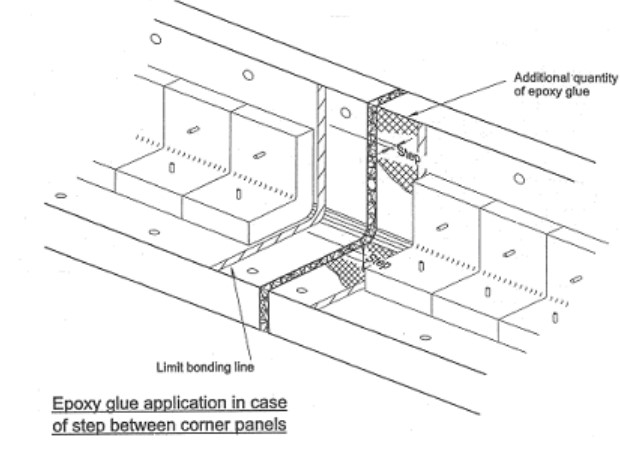
Before bonding a special attention has to be paid to misalignment between corner panels. In case of step, extra quantity of glue will be applied. (See Figure 15.)
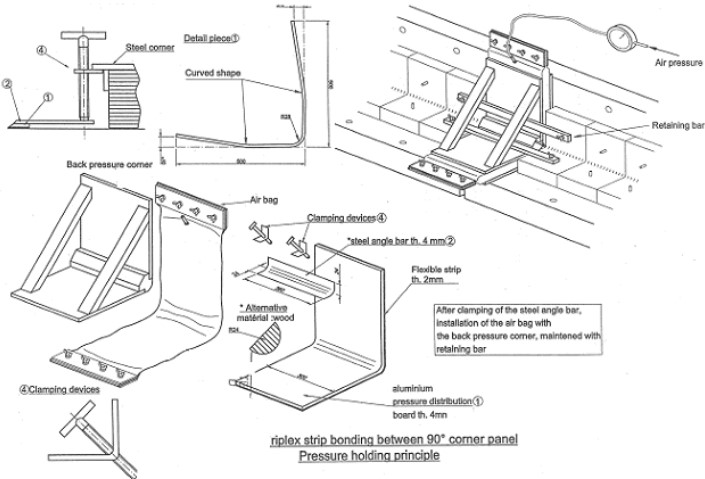
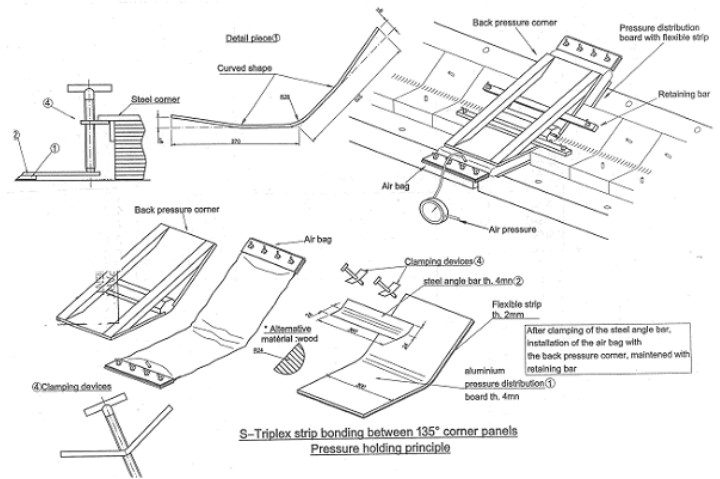
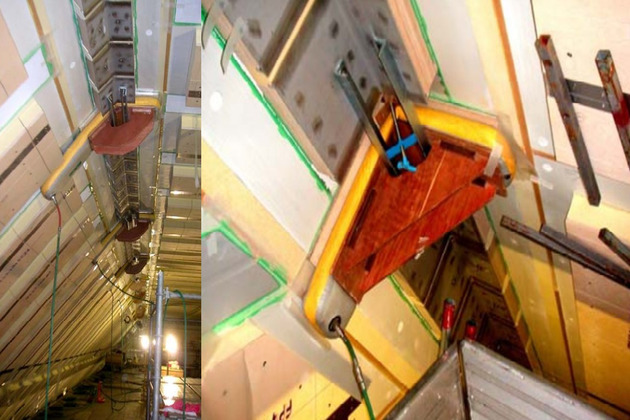
The shape of the pressure devices will be adapted to the type of corner panels. (See Figures 16, 17 and 18.)
Bonding of S-Triplex between Flat Panels and Corner Panels
The same procedure as flat panel will be followed, taking in account the following:
- Adequate pressure device will be used. (See Figure 19.)
- If epoxy glue is deposited on the S-triplex strips, it will be also deposited on the joint filler, which is raw Reinforced Polyurethane Foam (R-PUF) material.
Bonding Procedure Qualification Test for S-Triplex
A bonding procedure qualification test has to be carried out. Following parameter will be defined:
- Specification of the glue given by the manufacturer:
- color;
- density;
- mixing ratio;
- pot life;
- open time;
- curing time.
- Specification of the glue dispenser.
- Manual procedure for preparation of glue.
- Bonding procedure for flat area S-triplex, 90° CP S-triplex, 135° CP S-triplex.
Checking of Epoxy Glue Depoziting Process
1) EVERY DAY PRIOR STARTING THE PRODUCTION
Dosing condition to be checked independently for resin and hardener by weight or volume.
2) EVERY DAY PRIOR STARTING PRODUCTION AND AT EACH EXCHANGE OF COMPONENT DRUM
The mixing process is to be checked visually by homogeneous color of glue. Tiger strips or veining in the deposited glue must be detected. The dosing and mixing is to be checked by keeping a sample in an oven at a temperature and time prescribed by the glue maker and checking the hardness value according to glue manufacturer specification.
3) AT DEPOSITING STAGE USING A DEPOSITING MACHINE
The proper function of the machine will be checked at regular intervals. The characteristic of the glue will be checked from samples taken directly from the machine every hour. The control will include the following items for checking of the characteristics of the glue:
- Mixing ratio between resin and hardener to be checked by the constancy of the color. Variation of color is the result of a wrong dosing.
- Mixing process to be checked by keeping samples, which will have a identification number (with reference to time and temperature) these samples will correspond to a lot of, which numbers will be noted on each concerned S-triplex strip.
- Checking of shape and unitary quantity of depositing glue by weighing and/or by measuring template.
4) AT DEPOSITING STAGE USING MANUAL GLUING PROCESS
Each mixed product quantity will constitute a lot with an identifying number (with reference to time and temperature).
To control the dosing, the weigh of resin and hardener will be noted for each lot.
The mixing will be checked by homogeneous color product.
A sample will be taken for each lot with the identifying number and the curing will be checked 24 hours later. The identifying number will be noted on each S-triplex strip.
5) S-TRIPLEX STRIP BONDING CHECK
S-triplex bonding is one of the most difficult phase if not the most difficult phase of the MARK III System: Hull and Deck Components for Marine VesselsMARK III erection process.
Failure of a good bonding may lead to a defective secondary barrier now or, worse, after several years of service.
There should not be any air bubble or worse any air channel below the triplex. Note an excess of glue may look like an air channel, but is acceptable provided it is solid without air bubble.
100 % visual check including the verification of regular glue squeeze is to be performed (lack of squeeze or irregular squeeze may indicate poor bonding, vacuum test should be applied).
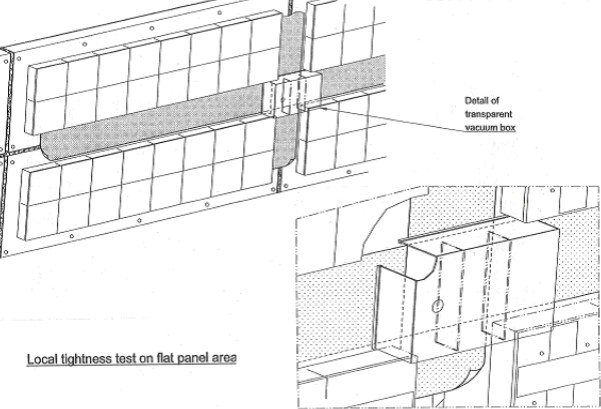
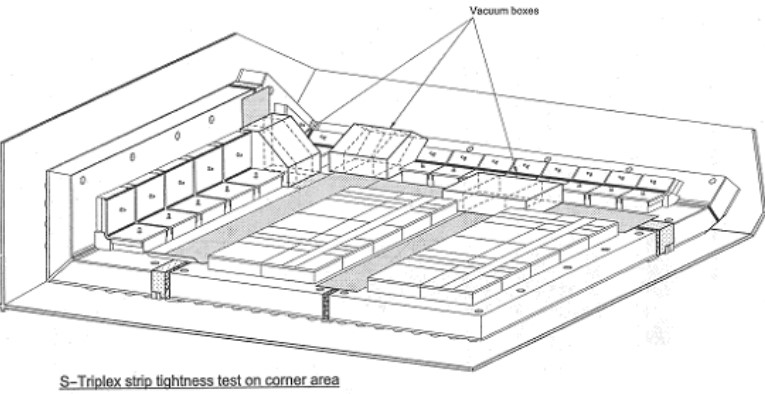
Local tightness test with vacuum box is to be carried out on all singularities, i. e.:
- intersection of S-triplex strips;
- overlapping junctions;
- curve S-triplex strips between corner panels;
- areas where the squeezing of the glue seem insufficient.
Vacuum box test at –200 millibar during 45 seconds. If any bubble is detected, repair to is be carried out and new test carried out. (See Figures 20 and 21.)
