When inspecting your boat, there are many key areas to check. Look for cracks, swelling and signs of damage on the hull and deck and whether parts are secured. Check wiring, lighting and battery condition. It is important to check the engine for leaks, corrosion, and unusual noises. Inspect the steering and controls for smooth operation and responsiveness.
Make sure life jackets, fire extinguishers and warning devices are in good condition. Check hoses, pumps and through fittings for leaks. Inspect tires, brakes, lights and hitch for safe transportation. Regular inspections help maintain the safety, performance and longevity of your boat.
The quality of manufactured boats is usually very good, although errors and oversights will happen. In any business there are always a few, small operations that have not heard of the term, Quality Control. It is always necessary to look at every boat with great care, not overlooking any detail. Responsible builders will have good warranty programs and will usually attend to problems that surface after delivery. Flaws that affect safe operation are reported to the U.S. Coast Guard who require builders to make repairs and changes on all hulls that have been produced. Your boat will have a Hull Identification Number (HIN) molded into the top of the transom (stem). It has letters denoting the manufacturer, the number of the hull, and the model year.
Like any other product, we assume the boat has been well made, but mistakes can happen when a worker quits for the day and forgets a procedure when returning to the job after a long weekend. I will outline some important points to look at before deciding on a particular boat. A boat dealer who tries to influence you into not inspecting the boat is certainly not the dealer who should get your business.
Hull
The bottom of the boat is usually covered with an Antifouling coating that makes it difficult to see the hull surface. However, it can be inspected using the same methods as the portion above the waterline. The exterior gel coat on a glass fiber hull should have a smooth, glossy finish that reflects like a mirror. Small, slightly raised blisters may develop in some areas, and these must be repaired in order to preserve the integrity of the laminate. These blisters normally occur below the waterline and may allow water entry which would result in serious delamination. These blisters are formed by improper materials or by poor laminating procedures. Also, delamination will occur from water entry if through hull fittings are not properly sealed.
Look over the entire hull for any scratches or gouges where the hull has come into contact with the dock or anchor. These can be filled with gel coat or epoxy glue and buffed to a smooth finish.
The line denoting the attachment of the deck to the hull is called the deck to hull joint. It must be sealed with caulking and bolted to form an extremely strong structure. Some configurations of this joint are shown in Figure 1.
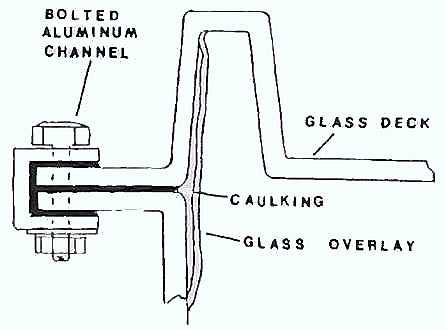
A very important part of this assembly is the rub rail which must project at least 2 to 4 inches from the hull surface for adequate protection when hitting the dock. This rub rail may be made from a plastic extrusion, an aluminum extrusion, or wood. It must be bolted through the hull.

Since the hull laminate has a gel coating on the exterior, it is difficult to inspect the laminate for any possible problems. The interior of the hull can be checked, however, if it is not painted. Light colored, almost white, areas of the glass laminate show where resin has not saturated the glass fibers and where the layers of glass laminate have not adhered to each other. This is a serious situation that allows the layers to flex independently as they are stressed when the hull moves through the water. This condition is called delamination, which may lead to hull failure if not repaired. The repair is made by drilling small, shallow holes into the laminate into which epoxy glue is injected with a glue syringe.
Assuming the boat is out of the water, move the propeller up and down on an outboard motor or inboard/outboard installation. Any excess movement shows wear on the propeller lower shaft bearings. On an inboard engine installation, try to move the propeller shaft up and down at the shaft stmt. This checks for excessive wear on the rubber bearing inside the stmt. The propeller should be without nicks or bent blades. A bronze propeller should not have any pits or spots that appear to be pink in color. This is an indication of galvanic corrosion when the zinc is removed from the bronze alloy of copper, tin, and zinc. Stray electrical currents in the water cause this type of corrosion. Blocks of zinc attached to the shaft strut may decrease this corrosion.
If the boat has a keel, look for any cracks or dips in the bottom surface, especially where the hull is resting on blocks. These may be an indication of insufficient laminate thickness in the keel. The bottom of the keel – or boat hull on centerline if there isn’t a keel – should be a half inch in thickness on boats under 30 feet, three quarter of an inch on boats 30 to 35 feet, and 1 inch in thickness on hulls 35 to 40 feet in length. It is almost impossible to physically check this thickness without drilling a hole, which no one wants to do. But the thickness can be checked with an ultrasonic thickness tester. Some Instant Naval Architecture of Sailboatscruising boats have used epoxy glue or a polysulphide adhesive compound to attach a wood wear strip on a glass fiber hull. This prevents nicks in a glass keel when going aground.
A glass fiber hull will flex when a boat pounds into a seaway, and excessive flexing may lead to cracks. This is prevented by installing glass fiber framing on the inside of the hull. These frames are necessary in all boats, with all materials, and are spaced twenty to thirty inches apart. Check the hull interior to see these frames are in place and are secured to the hull with glass overlay, in a glass fiber hull. They may be installed either transversely or longitudinally. The bulkheads also act as framing to stiffen the hull and they also must be overlaid with glass material on both sides.
Deck
Before you How to Buy the Best Boat? Essential Tipsbuy a boat, you want to be sure of the installed hardware and equipment on board so you know what may be necessary to purchase to meet your individual requirements. Your inspection must note the gear as well as any obvious repairs that are needed. The deck should have a good appearance as well as a nonskid surface to prevent injury. At least six chocks and cleats (three of each on one side) should be available for proper docking. On boats under thirty feet, the cleats can be eight inches long for use with three-eighth inch line, but over thirty feet, they should be twelve inches long to allow at least two turns of half-inch diameter or larger line.
It is important to have storage space on deck for dock lines, fenders, and lifejackets (PFD). On a sailboat, these may be in a cockpit seat locker or in the lazarette.
Flexing
Large areas of the deck must be adequately supported by deck beams in order to prevent excessive flexing. When you step on a large deck area, and you can feel it flex, you know that deck beams should be installed. This deck flexing can be dangerous as an unexpected deck movement can cause a person to lose balance and fall. Life lines must be installed all around the deck edge to keep the crew from falling overboard. They are supported by stainless steel pipe stanchions at least thirty inches in height. These stanchions, and all hardware, must be through bolted to the deck with three or four bolts, nuts, and lock washers. Under the deck, an aluminum backing plate is used around the bolts to evenly distribute the load.
Anchors
Every boat must have an anchor and line to use when you stop for lunch, fishing, or SCUBA diving. When an engine fails, the anchor becomes a vital necessity to keep the boat from drifting out to sea or onto the rocks. I was put into an emergency situation the first time I docked a three hundred foot ship. The ship was about 800 feet from the dock when there was a complete loss of electrical power, including the engineroom telegraph communications. The sound powered phones were jammed with ten people trying to communicate. The only recourse was to anchor the ship until the emergency could be cleared.
A small boat will usually have mechanical or hydraulic engine controls, but this same emergency could possibly happen, and the anchor should be ready to use. When cruising, two anchors are always recommended.
The minimum anchor weight is 10 pounds for a boat under 30 feet, 20 pounds for a boat between 30 and 35 feet and 30 pounds for a boat between 35 and 40 feet. The anchor line can be Nylon of the same diameter as the dock lines:
- 3/8 of an inch in diameter on boats under 30 feet;
- half inch diameter on boats between 30 and 35 feet;
- and 5/8 inch diameter for boats between 35 and 40 feet in length.
Make sure the end of the line is tied or cleated to the boat so it will not be lost while anchoring. A platform with a roller at the bow is installed on many boats to prevent the anchor from banging into the hull. Ten to twenty feet of anchor chain is recommended for boats over thirty feet in order to keep the pull on the anchor more parallel to the contour of the bottom. Always check your anchored position frequently to make sure the anchor has not slid over the bottom.
Anchor windlasses are useful for both raising the anchor and for bringing the boat closer to the dock with the lines when a strong wind is blowing the boat farther away. Windlasses are not usually necessary in a boat under 35 feet in length. When the anchor is snagged on the bottom and will not break loose, it can sometimes be retrieved by running the boat under power towards the anchor until the line is vertical. The anchor line is then cleated and the boat run ahead under power. Repeating this on different headings usually releases the anchor from the bottom. If not, the power of the anchor windlass may be used to maintain a constant strain on the anchor line while the boat engine is reversed under full power. Anchoring is a true test of good seamanship.
Anchor windlasses are manufactured in many sizes and can be manual, electric or hydraulic. They are denoted by their pulling force on the line, which should be at least 500 pounds for a boat 30 to 35 feet in length, and eight hundred pounds on a boat 35 to 40 feet in length. A manual windlass should have a mechanical advantage of at least twenty to one. This means that a six hundred pound force will pull on the line if you push the handle with a thirty pound effort.
Electric winches can be A.C. or D.C. powered. Alternating current is preferable if there is a generator to supply the power. A one horsepower motor may drive a windlass with an eight hundred pound line pull. It would use about 62 amperes of current with a 12 VDC system. It may be better to use a 24 volt system to reduce current requirements and to locate the batteries just below the windlass. They would be charged, when the boat is at the dock. If the windlass used battery power located in the engineroom, the long wire run would result in a drop in voltage and very large diameter, expensive cables.
Climbing Aboard
When swimming, it is hard to climb back aboard over the high hull sides, even on a boat under 25 feet. Flexible ladders are not much help as the steps are pushed under the bottom of the boat when you step on them. Molded steps are good, but you still have to pull yourself up to the lowest step. Some manufactured boarding ladders are double hinged and are usually located at the stem. The rigid lower section provides a strong lower step in the water. The importance of the boarding ladder cannot be overemphasized as a necessary safety feature.
It is always preferable to have a swim platform permanently installed at the stem. Swimmers and SCUBA divers can then get a leg on the platform, about 6 inches above the water, and roll onto the surface. In the worst situation when a person is rescued after ingesting too much water, it is much easier to pull them onto the swim platform rather than trying to pull them up and over the hull side.
Interior
When you first look at the inside of the boat you are considering for purchase, try to visualize your family or crew living aboard overnight. Do you have sufficient privacy with the berthing arrangement? Is the galley adequate for preparing limited meals? Of course, if you are looking at a boat just for day use, the interior will not present a problem. An insulated ice chest for sandwiches and cold sodas is always a good solution for short trips.
Water Leaks
Look around the interior below the deck and portlights. Dark streaks show there is a water leak and a repair is required. If the overhead (underside of the deck) and the hull sides are covered with outdoor carpeting or other material, look for loose material and spots that indicate water leaking. There shouldn’t be any water accumulation in the bilges of a glass fiber boat unless there are leaks and you should lift the floor hatches to check for any problems. Mistakes do happen.
Most boats have berths at the bow, which may be molded of glass fiber or built of plywood and painted. Particle board or flakeboard should never be used on a boat as they absorb moisture and come apart over a period of time. Also, nails and staples are never used on a boat of good quality. The volume of space forward of the berths should be watertight up to the berth height. This is the area most frequently involved in a collision with a dock, boat, or rocks, and any crack in the laminate may allow water to enter. A watertight compartment will prevent flooding the remainder of the hull. The interior floor (cabin sole) should be securely overlaid with glass to the hull and it should have floor hatches so every part of the bilge may be inspected.
The Head
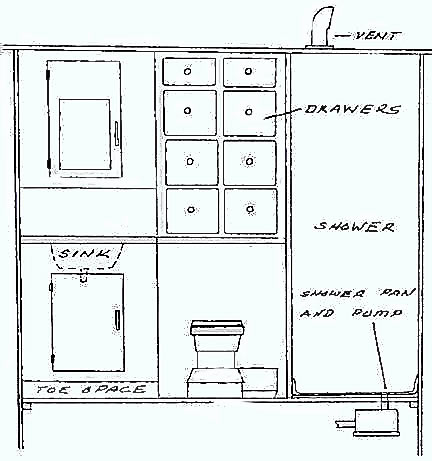
You probably spend the least amount of time in the head, but it must be carefully arranged for convenient use and with some degree of comfort. Even small boats with an open deck and no cooking or sleeping facilities may have a toilet room with just sufficient headroom for sitting. There should be at least 24 inches of width at the toilet and a shower space must have at least 24 inches as a minimum dimension. Preferably, a shower should be 32 inches square. A small drawer for each person is a convenient space for toilet articles as well as one or two drawers for first aid supplies. A water trap type of ventilator over the shower is a true necessity. Figure 3 shows the arrangement of a head in a cruising boat.
The Galley
Cruising boats have cooking facilities that can range from a two-burner alcohol stove and ice chest to an all electric galley, just like home, if there is a generator on board. The range (cooker) can be fueled with alcohol, compressed natural gas (CNG), or propane (LPG). When using gas as a fuel, the bottles must be stored on deck, outside the deck house, with a shut off valve in the gas line. If on a sailboat, the range must be gimballed athwartships so the range remains level as the boat heels with the wind. There are several safety concerns which should be investigated thoroughly, when using CNG or LPG.
Refrigeration is probably the main concern in a galley as we all prefer cold drinks, fresh rather than canned vegetables, and frozen foods of all types. Eating aboard a boat is always much simpler without refrigeration. Without an installed generator, there is a choice of an ice chest, mechanical refrigeration ran from a belt driven compressor mounted on the main engine, or the short term option of using holdover plates inside a household electric refrigerator. This electric refrigerator operates at the dock and the frozen plates keep the contents cold for a few hours while underway. Whatever the system, you should operate the refrigeration to make sure it produces a cold box before buying, refrigeration systems may cost several thousand dollars to replace.
If you have a built-in ice chest, there should be four to 6 inches of urethane foam insulation on all sides, outside of a glass fiber, or molded plastic watertight box. There should be a removable shelf to keep the food away from the wet ice. It is best to remove water from the chest with a pan and sponge. If there is a water drain to the bilges, food particles will accumulate in the bilge and cause a foul odor. The opening should be about 24 inches square on the top. Figure 4 shows a typical galley.
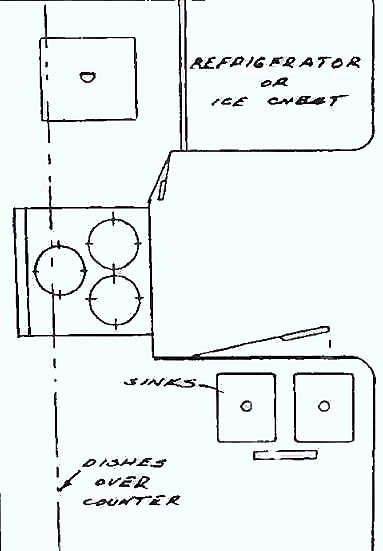
The area in and around the galley is packed with drawers, shelves and cabinets in every available space. Just as in the kitchen at home, you can never have enough storage space for all the utensils and canned foods. Shelves for dishes should have partitions to keep them from banging around with the roll of the boat. Plastic cups should be used for drinks and food should not be bought in glass containers whenever possible. Two stainless steel sinks are always better than one.
Type of Finish
You want to have a good looking interior and one that is easy to keep clean. This can be accomplished by a careful selection of finishing materials, and the use of light shades of color, except for the flooring, which may be dark. Generally, the following are the options for the boat’s interior finish:
- Cover with an outdoor carpet.
- Prime and paint. The edges may be a shaped wood molding, a plastic laminate, or a plastic «U» shaped molding.
- Cover with a plastic laminate.
- Use pre-finished plywood for all bulkheads and joinerwork.
- Sand, seal, and varnish if the underlying plywood has an acceptable finish. This must be renewed every few years.
- Cover with a textured, vinyl wall covering.
- Install fine wood paneling, an expensive alternative.
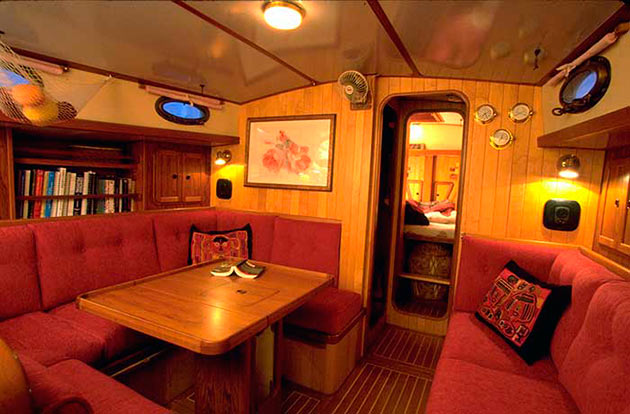
Figure 5 shows a good looking sailboat interior that uses pre-finished plywood and varnished wood moldings.
The comers of the bulkheads and joinerwork should be rounded to avoid bruises when the boat rolls and people lean into the comers. The overhead (underside of the deck) and sides of the hull are often covered with outdoor carpeting by many manufacturers, as an alternative to painting. An expensive option would be to glass wood furring strips to the glass laminate. Many types of decorative panels, in any material, may then be screwed to the wood strips. Electric wiring should be located so it can be easily repaired.
The cabin sole may be molded glass fiber with a nonskid finish. Often, this molding is extended upwards to form a foundation for the interior joinerwork. The sole may also be made from decorative, pre-finished plywood, and outdoor carpeting may be used. Whatever the construction, there should be hatches to all parts of the bilge.
The Engineroom
If you are not mechanically inclined, and don’t like to check the minor points on you car engine, you may be amazed at the amount of complicated equipment located in a boat’s engineroom. It is important, however, to look at a few important points when you first see the boat. The oil dipstick and coolant water fill cap must be within easy reach. The propeller shaft stuffing box (packing gland) keeps water from entering the hull and it should be easily reached for tightening. The hot cooling water is normally injected into the hot exhaust gasses in a cast iron fitting sometimes called an exhaust elbow. This cast iron corrodes quickly due to the sulfur in the exhaust forming sulfuric acid. These fittings should be checked annually as well as all of the exhaust lines.
Whenever there is a hole in the hull for installation of a drain or cooling water inlet, the bronze through hull fitting must have a bronze valve (seacock), this will allow you to close the opening when an emergency occurs, or when repairs are made to the piping. Check these valves semi-annually to make sure they work easily. The sea water piping to the engine, or other equipment, should have a filter in the line to keep weeds out. This filter cannot be assembled with reducing elbows to match the pipe sizes as the elbows will trap weeds and stop the water flow. Reducing pipe fittings should only be used in straight sections of piping. If a permanent fire extinguishing system is not installed, it is highly recommended that a portable extinguisher be located near the engineroom door.
Other equipment in the engineroom may include:
- a generator for complete electric power;
- a watermaker for use on long trips;
- air conditioning;
- hot water heater;
- a pressure water pump;
- and shore power wiring.
You may not need all of this if you plan only trips for a few hours, but whatever is installed, it should be checked for proper operation before buying. You should be able to charge all of the batteries on the boat both when the engine is running and when on shore power from the dock. Charging systems are readily available from reliable marine stores. Never get close to the engine when it is running, and especially keep clear of the propeller shaft and coupling while in operation. If you have to check the water or oil levels when the engine is running, make sure you only touch the equipment with one hand, and keep trouser bottoms away from the equipment.
All compartments of the hull (between bulkheads) should have a Essential Tips for Boat Maintenancebilge pump in case of accident or water entry. These are submersible pumps with float switches and an alarm at the helm station shows when these pumps are operating. When a pump runs continuously, the alarm tells the owner when immediate action is required. The most common cause of excess water in the hull is when a hose clamp loosens. All piping connections should have two hose clamps. Electrical wiring should be supported with plastic clips and located above the waterline, all around the hull.
Windows and Ventilation
Certainly, there should be good visibility from the helm, all around the horizon. In order to better see boats that have the right of way, the helm must be located on the boat’s centerline, or to starboard. At least one section of the windshield should open to allow good ventilation. All windows should have drains so water does not collect at the bottom sill. Usually, the lower window frame is sloped down and outboard so there is a positive drain. Most owners like the steering station to be covered, or located inside the deck house, to keep out the cold, rain, and sun.
It is important to have good air circulation inside the boat. On a cruise, the air can become very stale and the crew will develop headaches if there are not sufficient air intakes. In any humid climate, mildew will grow rapidly on most surfaces if the air is not circulated. When underway, hatches can be opened and the interior becomes pleasant. But, we are mostly concerned with the eighty percent of a boat’s life that is spent at the dock.
There are many water trap type of ventilators on the market that are mounted on deck, the cabin top, or on a hatch. They are a vital part of enjoying boating as any experienced owner will testify. Unfortunately, they are usually ignored by manufacturers and you will not see them in the glossy magazine advertisements. Probably, they don’t want to add to the cost of a boat and they wrongly assume the boat will be operated in a cool climate or have the air conditioning running. Locate these vents over the showers, the passageways, and over the galley range.
It is poor practice to have opening portlights in the hull sides below the sheer. Someone is always leaving one open and unusual waves from other boats have a way of entering your boat when you least expect it. Air circulation should be provided from vents on deck and not from opening portlights. We know of one motor yacht that ran aground and heeled over about seventy degrees. Water entered portlights that were located low on the hull side and the boat sank with one side on the bottom. A fortune was spent in re-floating and rebuilding the boat. The portlights were then welded shut, after the damage had been done.
Good air circulation is a necessity in the engineroom both for good fuel combustion and to keep the temperature of the space below a hundred degrees. If the engine does not get sufficient air for combustion, the engines are operated at less than designed horsepower and the owner wonders why his boat is so much slower than another with the same engines. If an engine space is still very hot after the engines have not been used for ten hours, it is a sure sign there isn’t enough air circulation, and additional air ducts should be installed.
Read also: Boat Outboard Motors
The air supply to the engine should come from outside the deck house, or outside the engine space on a small boat, preferably above the sheer. Air intakes in the hull side below the sheer are poor practice. There have been many cases of low freeboard sportfishermen trolling in the trough of a wave and rolling to the point where water enters the hull side air vent. The minimum air vent opening on each side of the hull, in square inches, is one third the total engine horsepower. For example, if there are two, three hundred horsepower engines, the minimum air vent opening is two hundred square inches. A ten inch by twenty inch opening in the cabin side is not excessive in appearance. A duct takes the air below to the engineroom, which can be concealed under a seat.
Natural air circulation is good, but a continuous duty fan is much better. The capacity of this fan should be three times the total installed horsepower, in cubic feet per minute. It is good to have a smaller exhaust fan installed in the aft bulkhead of any engineroom. This is used for an hour or two to remove engine heat after the engine has been secured for the day. A fan and duct to the main deck can be used but do not use the intake fan in place of an exhaust fan.

- Cruising World, Subscription Service Dept., P. O. Box 953, Farmingdale, NY 11737.
- Motor Boating & Sailing, P. O. Box 10075, Des Moines, IA 50350.
- Multi-hulls, 421 Hancock St., N. Quincy, MA 02171-9981.
- Nautical Quarterly, 373 Park Avenue South, New York, NY 10016.
- Sail Magazine, P. O. Box 10210, Des Moines, IA 50336.
- Sailing, P. O. Box 248, Port Washington, WI 53704.
- Small Boat Journal, P. O. Box 400, Bennington, VT 05201.
- Soundings, Soundings Publications, Inc., Pratt Street, Essex, CT 06426.
- The Practical Sailor, Subscription Dept., P. O. Box 971, Farmingdale, NY 11737.
- Wooden Boat, Subscription Dept., P. O. Box 956, Farming-dale, NY 11737.
- Yacht Racing/Cruising, North American Building, 401 North Broad Street, Philadelphia, PA 19108.
- Yachting, P. O. Box 2704, Boulder, CO 80321.
- Beiser, Arthur. The Proper Yacht, 2nd ed. Camden, Maine: International Publishing Co., 1978.
- Chapman, Charles F. Piloting, Seamanship and Small Boat Handling, 56th ed. New York: Hearst Marine Books, 1983.
- Coles, Adlard. Heavy Weather Sailing, 3rd rev. ed. Clinton Corners, N.Y.: John De Graff, Inc., 1981.
- Pardey, Lin and Larry. Cruising in Seraffyn and Seraffyn’s Mediterranean Adventure (W. W. Norton, 1981).
- Roth, Hal. After 50 000 Miles (W. W. Norton, 1977) and Two Against Cape Horn (W. W. Norton, 1968).
- Royce, Patrick M. Royce’s Sailing Illustrated, 8th ed. Ventura, Calif.: Western Marine Enterprises, Inc., 1979.
- Kinney, Francis S. Skene’s Elements of Yacht Design, 8th ed. New York: Dodd, Mead, 1981.
- Street, Donald M., Jr. The Ocean Sailing Yacht, Vols. I and II. New York: W. W. Norton, 1973, 1978.