Choosing the right boat is a pivotal decision for any prospective boat owner. It’s essential to consider how you’ll use the boat, whether for leisurely sailing, fishing, or long-distance cruising. Understanding various construction methods and keel types can greatly influence performance and stability. Additionally, the design of the deck and cockpit plays a crucial role in comfort and usability.
- Choosing the Right Boat
- How Will She Be Used?
- The Cost of Owning a Boat
- The Right Boat: Construction
- The Right Boat: Keels
- The Right Boat: Decks
- The Right Boat: Cockpits
- Center Cockpit: Yea or Nay?
- The Right Boat: Belowdecks
- The Right Boat: Main Cabins and Galleys
- The Right Boat: Engines
- The Right Boat: Rigs and Rigging
Don’t forget to evaluate below decks spaces, like main cabins and galleys, to ensure they meet your needs. Ultimately, making an informed choice will enhance your boating experience for years to come.
Choosing the Right Boat
Given the thousands of new and used boats available on the market, the prospective buyer faces a bewildering task. How, amid the conflicting claims, can the average buyer come up with the right boat? A cynic might say that it does not really matter what boat you choose. They are all too expensive, they all break, and you are likely to use her so little anyway that it hardly matters which boat you buy, so just buy one and go sailing.
It is possible, however, to determine needs and abilities, weigh the options carefully, and with a little luck and a lot of perseverance come up with a boat that exactly fills the bill.
The two big questions to be answered when buying a boat are: How will she be used, and what will she cost? Implicit in those two questions is an almost endless array of other questions, some of which are easily answered, and some of which will always remain unanswered.
How Will She Be Used?
When choosing a boat, you must be realistic about what you will do with her. Will you day sail with the family, with occasional day racing? Is weekend cruising high on the list of things you want to do? Are you really going to take that trip to Hawaii or Bermuda, or is that a dream for the distant future?
Obviously, a heavy ocean cruiser is out of place on a lake. Less obviously, she may be out of place in many coastal light-weather areas, too. Choose a boat suitable for most of the sailing you do. You will never find a boat that is perfect for all your sailing. If 90 percent of your sailing is day sailing on summer weekends in protected waters, buy a boat that is at her best in those conditions.
This may require considerable down scaling of your dreams. To some extent, almost all of us consider the boat to be a means of escape from our usual routine. Above and beyond the recreational aspects of the boat, she functions as a psychological cushion between the reality of the 40-hour work week and the dream of escape. Too often, perhaps, the dream dominates reality when the time comes to spend hard-earned dollars. This situation is hardly helped by much of the sailing industry’s advertising, which touts every boat over 25 feet as a blue water cruiser, and every boat under 25 feet as an easily handled trailer-sailer with plenty of room for a family of five and two dogs. The industry also gets great mileage by playing on our dreams, so that we frequently end up with a boat more suitable for the type of sailing we would like to do than the sailing we really do.
The Cost of Owning a Boat
The price tag on any boat is only a percentage of the cost of owning a boat. In addition to the cost of equipping the boat, there is the cost of maintenance, insurance, dockage, and storage. For a boat that is used infrequently or a boat larger than what is really needed, the cost per sailing hour can be staggering. If you are only going to use a boat for a few weekends a year, chances are that it makes far more sense to rent or charter than to own a boat.
A major cost of owning a boat that is not always apparent when you buy is what it is going to cost when you sell the boat. Boats are poor investments, even though you may be able to sell your boat for more than you paid for her. While some boats might retain their value relative to inflation, few boats actually appreciate more rapidly than the rate of inflation.
As hard as it may seem, you must consider the boat’s resale value before making the purchase. A boat is not a lifetime investment, no matter how perfect she seems now. Taste changes, your use of a boat changes, your expectations change. If you are a new sailor, the growth in your experience may lead to the desire for another type of boat very quickly.
There is no way to guarantee a high resale value for any boat, but there are simple rules to follow to protect yourself: Buy a boat that is popular in your sailing area. Buy a boat that has a local dealer with a reputation of giving good service. And buy a boat with a proven track record.
A boat that is popular where you sail is likely to be easier to sell when the time comes, and is likely to sell for a higher percentage of her original cost. The Whumpty Dump 25 may be a better boat than the Wham Bam 26, but if you have the only Whumpty Dump in an area where the Wham Bam is popular, you are likely to take a bath when you sell her.
One reason that a particular brand or model may be more popular than another comparable boat is the quality of the local dealer. Some dealers give excellent after-sale service, organize local racing or cruising, and help to find dockage or storage for the boats they sell. In this way, they develop customer loyalty that is translated into future sales. Another dealer may seem helpful before the sale, but give you the cold shoulder after he has your money in hand. The only way to be sure about a dealer is to ask people who have bought boats from him. It pays to talk to more than one of the dealer’s customers, however. The dealer is not always at fault in a transaction that goes sour. If he has a consistently poor reputation, however, there is likely to be more than a grain of truth to the complaints.
A boat that does not have a local dealer is unlikely to have a substantial local following no matter how good a boat she is. Having the only Blue water 45 within 200 miles of your sailing area may garner you admiration at the local yacht club, but she is likely to return less of her original cost when the time comes to sell her.
Unless you are willing to put up with some headaches, it is better not to buy a brand new model, even if she is built by the most reputable builder in the world. Every brand new boat has some teething problems, and if she is a brand new model as well, the problems are likely to be compounded. Every boat evolves during her production life, and this evolution is almost always for the better. Changes in engines, hardware, components of the interior layout, even rig changes are not uncommon. Independent of the actual condition of the boat or her age, where she falls in the production series is quite important. It may be nice to have the newest model, but that boat-show glow can quickly wear off after a long series of warranty claims and factory retrofixes.
Sail the Boat. It goes without saying that you should try to sail the boat before you buy it. If a boat is popular in your area, chances are good that you can find an owner who will take you for a sail. If you show a serious interest, most owners will take the time to talk to you about their boat, even if they are not selling their own boat.
Sailing the boat is even more important if she is a relatively uncommon boat in your area. A short sail may quickly reveal why a boat is not particularly popular. A single sail is not guaranteed to show the boat’s good and bad points, however.
Finding the right boat is more than a matter of luck. It is more than a matter of visiting boat shows or dealer showrooms, although both of these are important. It is a matter of introspection and self-scrutiny, the patience to do your homework and to wait for the right boat rather than jump at the first one that strikes your fancy.
Buy a boat for the type of sailing you want to do now, not the type that you might do in five or ten years. Your taste may change with the growth in your abilities. Unless you are a remarkably single-minded individual with a goal absolutely incapable of being altered by the vagaries of life, buy for today’s needs, not tomorrow’s.
Dreaming is an important part of sailing, one that cannot and should not be ignored. A dream tempered by a healthy dose of realism has a far greater chance of becoming realized. And the fulfilling of dreams, rather than the act of dreaming, is what being a practical sailor is all about.
The Right Boat: Construction
About 30 years ago the wonderful chemical technology of fiber-glass made its debut on the production sailboat scene. Fiberglass was touted as «ending maintenance forever», and «indestructible, impervious to worm, rot, and corrosion». Fiberglass was the material that was going to free sailors from the slavery of annual maintenance.
Fiberglass has indeed revolutionized the boat building industry – in ways both good and bad. The low cost of petroleum-derived polyester and the relatively low level of skill involved in using it to build hulls compared to the skill required to build a conventional wooden hull, made the mass-production What size of boat do you need? What hull material?boat-building industry possible. Without fiberglass, it is safe to say that the phenomenal growth in the popularity of sailing in the last 30 years would not have taken place.
As with any new technology, a whole new set of boat building rules had to be created to take advantage of the wonder material. Seat-of-the-pants engineering has been the rule rather than the exception in fiberglass boat building. Part of the problem has been the properties of the material itself. A fiberglass hull layup consisting of layers of mat and roving has a remarkable combination of properties. However, coupled with these positive characteristics is a big negative one. Thin fiberglass panels, for all their strength, have all the rigidity of an inner tube.
A number of approaches to this problem have been taken over the years. Early fiberglass hulls were massively built, with hull skins almost as thick as the planking on a wooden boat of the same size. This achieved the required panel stiffness, but at the cost of inordinately heavy hulls and consequently, relatively low ballast-to-displacement ratios.
When oil cost three dollars per barrel, it was not too unreasonable to build a boat this way if you were willing to accept the trade-off of a heavy hull and slightly reduced interior volume. The interior volume of a heavy, solid hull layup was still far greater than a wooden boat with its complicated system of internal framing. In this day and age, however, this approach is a little extravagant.
The other approaches to achieving panel stiffness are:
- coring, either with end-grain balsa or lightweight plastic foam (Airex or Klegecell);
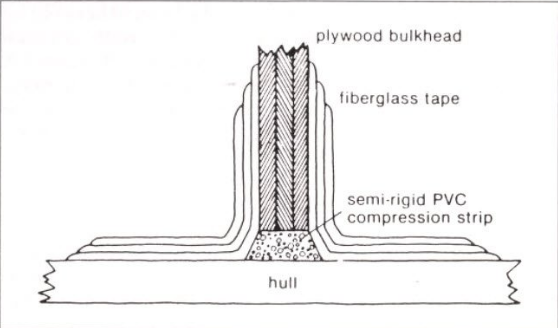
- internal stiffening with stringers or bulkheads;
- or stiffening with an internal molded liner attached to the hull.
All of these methods are used in production sailboats, and all work to achieve panel rigidity. There are, of course, advantages and disadvantages to each method.
Coring provides an insulating barrier between the inner and outer fiberglass skins, greatly reducing the tendency of glass to transmit heat and cold (a cause of condensation inside the hull). For a boat which is used either in the tropics or in a cold climate, a cored hull is highly desirable for its insulating properties.
Cored hulls also deaden the sound transmission of fiberglass and are stiffer for their weight than an uncored hull. They are not, however, without disadvantages. The hull layup is more painstaking and time consuming. Core materials are fairly expensive. In some cases, vacuum bagging must be used to insure a good bond between the core and the surface skins. Quality control in the hull layup is critical. Delamination of cored hulls is rare, but there have been lawsuits against builders alleging this type of structural failure.
The core material is usually cut out where fittings pierce the hull, or where major bulkheads or chain plates are to be bonded. The hours for these jobs add up to increase hull costs. A great deal of debate has centered on whether or not end-grain balsa absorbs water if a hull skin is punctured. For many years Lloyd’s refused to class balsa-cored hulls because of this fear. From our observations, balsa core exposed due to puncture or abrasion of a hull will slowly absorb water, and that water can migrate throughout the core. This means that you must promptly repair damage to a balsa-cored hull, whether the damage is above or below the waterline. It does not mean that balsa coring is unsuited for use below the waterline.
Plastic foam-core materials, notably Airex and Klegecell, are also used in production boat building, although far less frequently than balsa. The polyvinyl-chloride (PVC) foams have excellent structural properties, but are certainly more difficult to handle than a solid glass layup, and they are expensive. The difficulty and extra time spent in laminating the core material further increase the cost of a cored hull. Foam-cored hulls are exceptionally light and stiff, and the core will not absorb water in the event of a puncture of the hull skin.
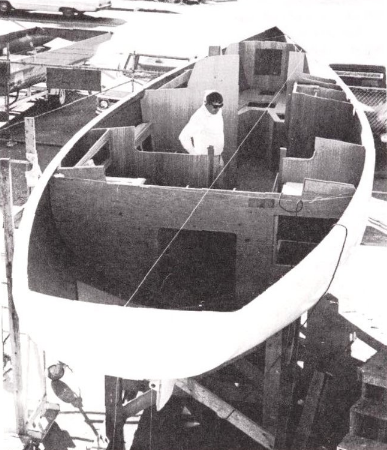
More common in the US boat building industry in modern times has been the use of a relatively thin fiberglass shell with stiffness provided by a molded hull pan or liner,, or the bonding to the hull of internal components such as bulkheads and berth tops. The body pan or hull liner has been extremely popular. Major furniture components – cabin sole, settee fronts and tops, galley cabinets – can be molded outside the boat, greatly reducing labor costs. Good glass lay up is still faster and easier to do than good joiner work.
The body pan or hull liner is dropped into the hull, and is bonded to the hull shell wherever the liner touches the skin. The liner usually does not touch the hull in many places, and it is not possible to verify the degree of bonding of the liner to the hull. No matter how carefully done, attaching the liner to the hull is still a secondary bond, which develops less strength than a primary bond. (A secondary bond is any fiberglassing that is done to another surface after that first surface has cured.)
Bonding of a built-up interior of plywood panels to the hull has the same weaknesses as bonding a hull liner to the shell. Careful surface preparation – grinding and degreasing – is required to get a good bond between a wood bulkhead, its tabbing, and the hull shell. Local distortions of the hull may occur wherever interior components are bonded to it. These are visible from the outside of the hull in the form of «hard spots», subtle ridges that form along the hull where bulkheads or furniture are glassed in. Hard spots are not necessarily indicative of an excessively thin hull shell, but they are aesthetically displeasing and do not inspire confidence in the builder.
Many boat builders glass every internal component to the hull on the theory that the more you attach to the hull shell, the stiffer it will be. This is fine in theory, but in fact you rarely end up with reinforcement in areas that really need it, such as the broad, flat panels of the topsides aft of the bow.
In addition, calling the way in which much interior joiner-work is attached to the hull «bonding» is a misnomer. After the hull flexes for a few years, the «bond» often fails, increasing the unreinforced panel size, which increases flexing causing other secondary bonds to fail. It is not uncommon, on a five- or ten-year-old boat with this type of construction, to find that half of these secondary bonds have failed, even on lightly used boats from builders with a good reputation.
This type of failure does not mean that the hull is necessarily too weak, but it does imply an undesirable degree of hull flexibility. The classic example is the famous production ocean racer of the late 1960s which evoked the following catechism: Question: «How hard can you drive the boat?» Answer: «Until the berths pop out of the forward cabin».
Since we have heard a number of boats used as the object of this criticism, we will delete the names of the accused, not for fear of insulting the innocent, but for fear of neglecting the guilty.
All of these approaches to hull stiffening can work. The most important input in all cases is the care that the builder puts into construction. This frequently comes down to the degree of experience and the level of supervision of the foreman on the production line. Almost no one likes working with fiberglass, and it is not realistic to expect a $ 5-per-hour glass man to take care that all surfaces are neat and clean, that excess air and resin are rolled or squeegeed out, and that all the other steps are fully implemented to produce a light, monolithic hull.
For maximum strength, the resin-to-glass ratio must be carefully controlled. This means not only full saturation of the reinforcing fibers, but removal of excess uncured resin while the hull is being laid up. It is not possible to tell by looking at a completed hull if the layup is resin-rich or resin-starved, neither of which achieves full strength. Ideally, the plugs cut from the hull where through hull fittings are installed should be saved for the surveyor, who can have them analyzed for resin and glass content. Otherwise, you must rely on the skill of the boat builder, or more specifically, the skill of the men in the molding room. One trip into the molding room of a boat builder is enough to convince most people that hull layup is just about the nastiest job in fiberglass boat building.
Decks. Deck and cabin house surfaces are relatively flat. They are also fairly heavily loaded by being walked on, by the installation of gear for sail and ground tackle handling, and by lifeline stanchions and pulpits. A large percentage of the boats built today therefore have balsa-cored decks and cabin-house tops, which result in light, rigid surfaces. Because decks are nearly flat, construction of cored layup for decks and cockpits is far simpler than molding to the compound curves of the hull.
Balsa coring should be removed from the cabin top in the way of a deck-stepped mast to provide better compression resistance. It is also desirable to put solid coring – either solid glass or plywood – in other heavily loaded sections of the deck such as where cleats and winches are mounted.
It is common to see fairly sharp corners in some deck moldings, particularly in the cockpit. These areas should be well radiused, or the hinge effect of repeated flexing of the deck can cause cracking of the gelcoat.
Joining Deck and Hull. Probably no single topic stirs up more partisan response and stubbornness than how the deck molding is attached to the hull molding. In the early years of fiberglass boat building, deck and hull were almost universally fiberglassed together. Although the exact technique varied widely, the general principle was to overlap the hull-to-deck joint with several layers of fiberglass cloth, in effect making the hull and deck one piece. Once again, this is fine in theory, but in practice it is still a secondary bond and therefore suspect. Thousands of hulls and decks have been joined in this manner, and the percentage of failures has probably been very small, but they can occur.
The subsequent variations on chemical bonding are almost infinite. There are inward turning flanges, outward turning flanges, coffee can lid flanges. Some are glassed together with cloth, others use polyester putty between the flanges, some back up the chemical bond with fasteners such as self-tapping screws or through-bolts.
Failure of a chemical bond in the hull-to-deck joint can be catastrophic, with complete failure of the secondary bond resulting. The classic story is of the boat which flexed so badly at sea during a delivery that the hull and deck began to separate. The skipper kept the two halves of the boat together by passing lines around the hull and tightening them with a Spanish windlass. Unfortunately, we have never seen one of those boats – the brand and model varies with the storyteller – that has experienced catastrophic failure in the course of normal use. We have seen hull-to-deck separation as the result of collision with other boats or impact with a dock. In most cases the break has been the result of a fracture of the secondary bond rather than the failure of either the hull or deck molding.
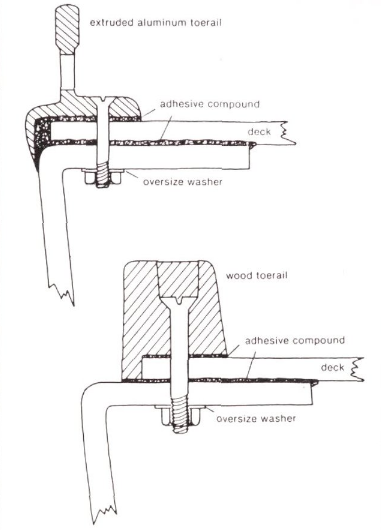
By far the simplest and strongest hull-to-deck joint is the inward-turning hull flange at deck level, with the deck laid over it and the two thoroughly bedded and through-bolted at close intervals. This joint can be covered by a wooden toe rail, whose through fastenings form part of the mechanical hull-to-deck joint, or it can be covered by an aluminum extrusion specifically designed for the purpose.
The use of a powerful adhesive bedding compound such as 3M 5200 gives this joint much of the strength of a chemical bond without its brittleness, and through-bolting at intervals of less than a foot-six inches is reasonable bolt spacing – effectively ties the two moldings together mechanically. Variations on this joint are becoming increasingly popular on everything from the least expensive boats to the most expensive.
It is not reasonable to condemn rigid chemical joints out of hand. Few boats ever find themselves in the position where hull and deck are strained badly enough to cause separation. However, for a boat designed for serious offshore or coastal use, whether racing or cruising, we prefer a through-bolted, flexibly bedded hull-to-deck joint.
Fiberglass hulls have revolutionized the boat building industry in the last 20 years, eliminating many trouble spots, but they are not a complete panacea. Skill and quality control are essential for the production of strong, long-lasting fiberglass hulls. Unfortunately, it is not always possible to judge the quality of the hull simply by looking at it. Builders consider hull layup schedules to be proprietary, and even if he had the schedule in hand, it would mean little to most boat buyers.
It is not normally possible to have a boat surveyed while it is under construction. Usually, you buy the boat off the dealer’s lot. Some builders refuse to have surveyors in their plant. In the case of an expensive custom design, the owner would be foolish not to have a surveyor’s opinion at various stages of construction.
Your best defense as a buyer of a production boat is to educate yourself as much as possible about construction and to ascertain the reputation of a boat or builder by talking to those who own the boats, not just to those who sell them. A survey of the boat at the dealer is always a good idea, before you accept delivery of the boat.
The Right Boat: Keels
A ballast keel keeps the boat upright under a press of sail, takes the boat’s weight when she is hauled out, and is usually the first part to take the ground when the skipper makes a navigational error. This hard-working appendage has caused nightmares for designers and builders since Nathaniel Herreshoff and George Watson began hanging lead on the outside of their boats in the late 19th century. Attaching the ballast to the boat, and keeping it there, is one of the most basic of boat building problems.
There are two basic approaches to ballasting a Manufacturing of Fiberglass Boats and Design Featuresfiberglass boat. Ballast may be an external casting bolted to the hull, or it may be put inside a hollow keel that is part of the hull molding.
External Lead Keels. For a boat with a tall fin keel, the simplest solution is the external ballast casting bolted directly to the hull molding. In the round-bottom light-displacement boat, unfortunately, attaching the keel directly to the hull completely eliminates the bilges. Any quantity of water inside the boat can make life miserable by migrating to and fro as the boat heels or rolls, always out of reach of the bilge pump.
Some builders of fin-keel boats therefore construct a hollow keel stub, perhaps a foot deep or less, which serves as a sump. A shallow, hollow stub, even a very narrow one, can be laid up without too much difficulty.
Traditionally, bronze keel bolts were used with lead keels. In recent years even Hinckley, the ultimate bastion of conservatism, has gone to the use of stainless steel keel bolts. Stainless steel comes in many alloys which have widely varying properties of corrosion resistance. The fact that your boat has stainless steel keel bolts is not a guarantee that your keel will stay attached forever. Stainless steel is subject to several types of corrosion, some alloys more than others. The most insidious type of corrosion is the result of the steel living in a salt-saturated, low-oxygen environment like the underwater structure of a wooden boat. Theoretically this type of corrosion should not exist in a fiber-glass boat as long as the joint between the external ballast keel and the hull remains tight and both the top of the keel and the keel landing on the hull are well bedded.
If the keel-to-hull joint is cracked open or rust stains weep from the top of a lead keel, the stainless steel keel bolts are suspect. For this reason, when purchasing a new boat, it is a good idea to examine sister ships that have seen several seasons of use to check the condition of the keel joint. Corrosion of stainless steel keel bolts is only likely to be a problem in salt water or in heavily polluted fresh water, or if there is an electrical problem aboard the boat.
Most keel bolts consist of cast-in-place threaded stainless steel rods. In principle, when the lead is poured it fills in the threads, just as if the keel bolts had been tapped into a precast keel. In fact, it is unlikely that all the threads will be perfectly filled. To compensate for this, it is best to cast the bolts in place with nuts and washers on the lower ends of the threaded rod, to take the keel load if the poured-in connection between keel and bolt proves to be inadequate.
The hull should be reinforced in the area of attachment of an external keel due to the wracking forces exerted on the hull by a fin keel. This means a thicker laminate, transverse framing members (floor timbers of wood, fiberglass, or metal), or an internal load-bearing structure such as the Triaxial Force grid in Ericson yachts. A fiberglass hull which shows no obvious internal reinforcement in the way of the ballast keel is a boat to be wary of.
Lead keels are frequently delivered with finishes that are too smooth. A lead keel should be thoroughly sanded before the application of either fairing putty or bottom paint. This will remove surface oxidation and provide adequate tooth for the adhesion of paint and putty.
On a boat with a stub fiberglass keel with the lead attached below, the lead should be perfectly faired into the fiberglass stub. There is no excuse for a ridge or shoulder which will create needless drag.
External Iron Keels. Iron keels have problems all their own. Copper-based bottom paints cannot be used on iron keels without extensive barrier coating, which can break down in a few years. The coating can break down much quicker, of course, if the boat runs aground or grounds out at low tide in her slip, leaving you with a badly pitted, inefficient surface. The lower density of iron also means that an iron-keeled boat must have a larger keel volume – and consequently more wetted surface – in order to provide the same stability as a smaller lead keel.
Galvanized steel keel bolts are usually used with iron keels. These bolts are more susceptible to corrosion than more noble metals. Should the bedding compound between the top of an iron keel and a fiberglass hull fail to keep water out, heavy rust can build up on top of the keel, forcing it away from the hull and sometimes shearing the keel bolts or drawing them through the hull shell. Any heavily rusted iron keel is going to cause trouble as long as you own the boat.
New iron keels can be reasonably protected through the use of barrier coats such as epoxy bitumastic and the use of non-copper anti-fouling paints. It will be very difficult even on a new boat to keep a perfectly smooth racing finish on an iron keel in salt water.
Internal Ballasting. Given the difficulty of fairing, attachment, and the prevention of leaking, it would appear to make some sense to put the ballast inside the hull shell rather than outside. This is fairly common practice in boats of more traditional design – ones with relatively long, wide, shallow keels, as opposed to the deep, narrow keel of the modern racer-cruiser.
The modern fin keel sailboat would be extremely difficult to build with a molded fiberglass fin and internal ballast. Without wide, gently radiused garboards, the molders simply could not reach down into the keel cavity to lay up the shell. Functionally, if the keel will be much less than a foot wide and extend much more than two feet below the canoe body of the hull, an external keel presents far fewer hull construction problems than an internal keel.
For boats of traditional design with hollow garboards, the use of ballast inside the hull shell is relatively straightforward. A molded keel cavity can be filled with lead shot, lead pigs, a single lead casting, random blocks of lead, or what have you. The «what have you» can cover a multitude of sins:
- boiler punchings in cement;
- steel reinforcing rod;
- scrap iron.
None of these «what have yous» have anything like the density of lead and can therefore offer only a fraction of the stability of a piece of lead of the same volume. It is fairly easy to tell if ferrous material has been used for ballast. A strong magnet passed over the outside of the keel will quickly answer the question.
Whatever material is used for inside ballast it must be thoroughly fixed in position in the keel shell. This is usually accomplished by filling the voids around the ballast with thickened polyester resin, a process which may need to be done in stages to prevent warping of the keel shell from the heat generated as the resin kicks off. If the keel shell yields at all when pressed on firmly, the ballast may not be firmly held in place.
With the ballast bonded in place, the top of the ballast and the garboard area of the hull shell is usually glassed over, in effect creating a double bottom. This should keep water out of the hull should the keel shell be damaged from grounding. Don’t let this lure you into a false sense of security, however. Frequently a deep keel sump is left in the shell behind the ballast, and if this very vulnerable section of the keel molding is torn open by grounding, the fact that the top of the ballast is sealed in does not mean much in terms of keeping water out of the boat.
Damage from grounding is the real danger of internal ballasting, and is one of the most frequent problems with any sailboat. For all its strength, the abrasion resistance of fiberglass is extremely low, and even an inch-thick fiberglass shell can be ground through after a few hours of pounding on rocks or coral. We have seen keel shells so abraded that the internal ballast has fallen through the bottom of the boat. It may take major damage to cause a single lead casting to fall out, but loose shot or lead pigs can fall through a small hole in the bottom. Repair of a damaged keel shell is covered in Chapter One of Volume III, Maintenance and Repairs.
Despite the potential for problems there are advantages to inside ballast:
- Barring serious grounding, the hull should remain watertight with no keel bolts or ballast seam to leak.
- Thickening the hull shell in the garboard area usually provides adequate support for the keel without additional reinforcement.
- A massive, hard-to-handle ballast casting is not necessary.
Some blue water sailors consider it ironic that many boats touted as world cruisers carry the ballast inside a molded keel shell. The long-distance cruiser may operate in poorly charted waters, under all conditions, and far from haul-out facilities. The cruiser is more likely to run aground, and more than any other boat can take advantage of the external lead keel. Nevertheless, we would probably not turn down an otherwise suitable design that was internally ballasted. Good boats are hard to find; the perfect boat is rarer still.
The Right Boat: Decks
The one-piece molded deck, cockpit, and cabin trunk is one of the great revolutions of modern boat building. The owner of a wooden boat learns to accept the inevitability of water coming through both the bottom and the top of his boat. With a molded fiberglass deck, there is little or no excuse for leaks, and the dream of a dry berth should be a reality.
The decks of early fiberglass boats were solid layups, and the broad, flat deck expanses were frequently as bouncy as a trampoline. The advantage of cored deck construction quickly became obvious, and today the majority of deck moldings on boats over twenty feet or so are cored, either with end-grain balsa or with plywood.
There are advantages to balsa coring, notably good stiffness fora given panel weight, the ability of balsa to follow compound curves, and good sound and thermal insulating properties. The only disadvantage to balsa coring is that a balsa sandwich has slightly less flexural and compression strength than a fir plywood sandwich. At the same time, the balsa sandwich is significantly lighter.
Foam coring is rarely seen in decks except in custom boats. Airex, because of a tendency to soften at fairly low temperatures, is not normally used in deck construction even in custom boats.
Mounting of Hardware. Since balsa is inferior to plywood in compression strength, it is common practice in balsa-cored decks to core the deck with plywood in areas where heavily loaded deck hardware will be mounted. The only time this presents a problem is when you decide to mount new hardware in portions of the deck that are cored with balsa. In a finished boat, it is simply not practical to recore sections of the deck. If large load-distributing plates are used, it is probably reasonably safe to mount hardware on balsa-cored sections of decking. On boats with stainless steel hardware fastenings, these backing plates should be aluminum sheet. On boats with bronze hardware and bronze fastenings, the load-distributing plates would ideally be bronze, although a plate of dense wood such as oak, used with oversized washers, is a reasonable substitute.
When mounting hardware on a deck cored with wood, it is a good practice to drill the bolt holes very slightly oversize, and dribble epoxy or polyester resin through the hole to coat the exposed core. If carefully done, this will help to keep water out of the core in the event of failure of the bedding compound under the hardware.
All deck hardware should be carefully bedded. Too much compound is better than too little. The ideal bedding compound would stay flexible indefinitely but not be so tenacious that removal of the hardware is impossible. This requirement precludes the use of polyurethane sealants, which are such powerful adhesives that you can easily damage the deck while trying to pry off a piece of hardware. Silicone and polysulfide sealing compounds are probably best for bedding deck hardware on fiberglass boats, although polysulfide sealant is also a fairly powerful adhesive.
In production boat building, it is common to mount as much hardware as possible on the deck molding before it is attached to the hull. This saves a lot of time on the production line, but it can create problems for the owner. Access must be provided to the back of every piece of through-fastened hardware on either the deck or the hull. If hardware is mounted after the deck, hull, and liner are joined, this is not usually a problem, but it does require foresight. A surprising number of boat-builders overlook this seemingly obvious requirement.
When buying a boat, note the locations of deck hardware, then go below to see if you can get to the back of each piece. If the nuts are inaccessible, someday that is going to mean trouble. Murphy’s law states that the less accessible a piece of hardware is, the more likely it is to leak or need replacement.
Hardware Quality. Most US boats use hardware of good quality. There is probably little difference between Nicro Fico, Schaefer, Merriman, Harken, or the other standard brands seen on production boats, although there are unquestionably specific pieces of gear made by each company that are superior to those of the competition.
While general quality may not vary greatly between brands, the way it is utilized by different boat builders can vary substantially. It is more likely that stock-boat hardware will be on the smaller and weaker side. The tendency to under size gear is particularly pronounced in choosing winches. Almost invariably, if the builder offers a winch package with more powerful gear as an option, the standard winches will be barely adequate for the boat. It is ironic that the racing boat with her gorilla-sized winch grinders will have winches two or three times as powerful as those on the cruising boat sailed by a middle-aged couple.
Deck hardware on imported boats is frequently inferior to that on boats built in this country. Far-Eastern boats in particular have long had a reputation for using hardware of poor quality, and despite a great improvement in recent years, that criticism is still generally valid. It is becoming more common for Far-Eastern boats to offer name-brand hardware as an option, and it is usually worth paying the price.
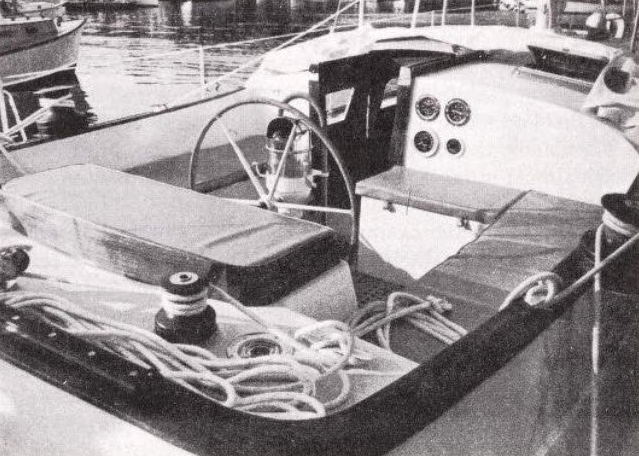
On the typical production sailboat, the quality of the hard-ware is usually less a problem than where or how the item is installed. For example, properly mounted bow chocks have almost disappeared. The closer the chocks are to the stem of the boat, the better they are likely to function in terms of holding the bow of the boat into the wind at anchor. The purpose of bow chocks is to provide a smooth, fair lead for anchor rodes and mooring lines. Without bow chocks – and a surprising number of boats lack them – a modern boat with high free board forward and relatively light displacement is almost guaranteed to sail around on her anchor.
Stern chocks are just as useful as bow chocks, particularly if a boat has wooden toe rails that could be abraded by dock lines. Midships chocks are also handy for spring lines.
Anchor Wells. The fore deck anchor well is one of the great innovations of the modern production boat. While carrying a lot of weight forward will increase a boat’s pitching movement, most boats with moderate forward overhangs can carry a working anchor and rode in a fore deck well without serious problems. Stored in a fore deck well, the working anchor is always close at hand yet out of the way. Spare anchors and rodes can be carried elsewhere, preferably low and toward the middle of the boat.
Large quantities of chain, however, should not be carried-in a fore deck well. While 200 feet of 1/2-inch nylon weighs only 14 pounds, 100 feet of 5/16-inch chain (a reasonable substitute for 200 feet of nylon) weighs 115 pounds.
Foredeck wells should have provision for attachment of the bitter end of the anchor rode. Usually it is not too difficult to mount a heavy eyebolt in the well if the builder has overlooked this item.
Anchor wells should be self-draining with scuppers large enough not to be clogged with mud from the anchor. The well should not drain into the bilge and should be completely sealed off from the interior of the boat. The well’s lid should have strong hinges and a positive provision for latching. Weak hinges and latches are common faults.
Any electrical wiring in the foredeck well – typically for running lights – should be secured under the deck with cable straps to prevent its being damaged when handling ground tackle. Splices and connections should be taped over and sealed with silicone.
While fore deck wells have made ground tackle handling and storage easier, they have complicated the mounting of fore deck cleats. Rather than paired cleats mounted near the centerline, it is more common to see port and starboard bow cleats shifted outboard almost to the rail to clear the lid of the anchor well. This is a reasonable solution, although sometimes leads from the bow chocks will run afoul of the bow pulpit stanchions if cleat placement is not carefully considered.
Pulpits and Lifelines. Bow pulpits are a good place to mount running lights. The simplest running light arrangement is the new international-style bicolor attached to the bow pulpit on the boat’s center line. This minimizes alignment problems, avoiding overlapping port and starboard sectors or blind spots for oncoming vessels. Running lights mounted on the pulpit will, however, be vulnerable to collision damage.
Running lights recessed in the hull are a poor idea. They invariably leak and short out, and their position close to the water almost guarantees that they will be invisible to boats on your leeward side.
Bow and stern pulpits, like lifeline stanchions, should be through-bolted and have substantial backing pads. Frequently, the underside of the deck molding is rough and irregular where stanchion and pulpit fastenings pass through. This creates problems when installing backing plates as it may not be possible to make the backing plate lie flat against the underside of the deck, particularly if the fastenings span the flanges of the hull-to-deck joint. Split plywood backing pads, distorted aluminum plates, and cracked fiberglass backers are frequently seen where an irregular interior surface exists under deck hardware. This can over stress fasteners or unevenly load decks, with gelcoat stress fractures a common result. This particular problem can frequently be remedied by the owner (see pages 134-139 of Volume IV, Do-It-Yourself Improvement Projects).
With boats getting wider, shrouds have moved inboard to keep head sail sheeting angles narrow enough for good upwind performance. This can either complicate or facilitate access to the fore deck. If the shrouds are moved far enough inboard, it is usually easiest to go forward by passing outboard of the shrouds. If, however, the shrouds are close to the lifelines, there may not be enough room outboard to get around that way, but the shrouds may be too far inboard to easily go between the shrouds and the cabin trunk. Easy access to the fore deck is necessary for head sail changing, docking, and the handling of ground tackle.
Handrails. The typical fiberglass sailboat has wood grabrails mounted along the outboard edge of the cabin trunk. These should be more than just an attractive way to visually break up a bleak expanse of white fiberglass. Handrails should be through-bolted to the top of the cabin. Merely screwing up into the rails through the coach roof is not adequate. Screws have relatively little holding power in tension, and the upward and outward pull you put on handrails is largely tension.
While handrails make a convenient lash down point for anchors, boat hooks, or even the dinghy, this is a poor practice. Things lashed to the rail may well interfere with its primary function: something to hang onto in heavy weather.
It is not a bad idea to have handrails running the full length of the cabin trunk. They can then be used as foot braces when working around the base of the mast as well as handholds when moving along the deck.
Head sail Track. Many production boats use an L– or T-shaped aluminum extrusion to serve as both a bolting flange for the hull-to-deck joint and a sheeting location for headsail snatch blocks. The disadvantage of this system is that in order to change headsail leads the snatch block must be unsnapped and shifted to the next hole in the toerail extrusion. With a sliding car on a T-track, headsail leads can be shifted when the block is under load, an important consideration for the racing boat.
A track that follows the sheerline results in a constantly changing sheeting angle relative to the boat’s centerline, making optimum upwind trim difficult to attain. For a cruising boat whose shrouds are at the outboard edge of the deck, this problem is not serious. For the racing boat with shrouds set in from the edge of the deck, an inboard track is a must for good upwind performance. Fortunately, track can frequently be added after construction, provided the deck is strong enough and good load distribution can be attained with oversize backing plates.
Whether you have a toerail-mounted track or an inboard track, be sure that it extends far enough fore and aft to allow effective sheeting of all overlapping headsails. Remember that the height of the jib’s clew off the deck greatly affects the fore and aft sheeting position. By giving your sail maker the length and location of your track, he can design the leech length to accommodate the track for sails of different overlap.
Headsail track must be through-bolted and should have either backing plates or oversize washers. If gelcoat cracks develop around the track, the deck is not strong enough to take the load, and you will either have to put still larger load-distribution pads under the deck or actually reinforce the deck structure. Headsail track fasteners are a common source of deck leaks due to the heavy loads imposed on them. If you develop such a leak, remove the offending bolt and rebed it. If this does not work, the whole track will have to be removed and rebedded. Check the bolts periodically for tightness.
Deck Surface. Secure footing on deck is critical. Most boats have molded-in nonskid, which varies in type and quality. Good nonskid should give secure footing when the decks are wet, be easy to clean, and be reasonably non-abrasive. These demands may be mutually exclusive. The decks of some boats, for example, are just about as nonskid as possible, but they are abrasive enough to wear through foul weather gear or water-softened skin in a short time.
Stark white is not a good color for decks and cabin tops. On sunny days, it is guaranteed to give the helmsman a headache from glare. Light tan, green, or blue are easier on the eyes without absorbing inordinate amounts of heat that might make the cabin below uncomfortable.
The Right Boat: Cockpits
The average sailor probably spends more hours in the cockpit of his boat than he does below. It is therefore ironic that below decks layout and decor have become the main selling points of most production boats, while the cockpit frequently seems to be considered an afterthought.
Like the interior, the design of the cockpit must meet demands that may be mutually exclusive. The cockpit should be roomy and comfortable in port for lounging and entertaining, yet it must be reasonably small if the boat is to do any offshore sailing. It should be laid out efficiently for the racing crew, yet with winches and sheets arranged so that the helmsman can run the boat when sailing shorthanded.
Given the fact that all these things may not be possible to attain in one boat, you must determine how the boat is to be used before deciding what arrangement works best for you. This may require some painful self-examination. The minuscule footwell with deck-level seating may be the right answer for single-handing in the Roaring Forties, but if you are going to be plugged into the dock most of the time, then a large, comfortable cockpit which accommodates six at the cockpit table may be the answer. At the same time, if long-distance cruising is in your future, a cockpit that seats ten people and is so wide that you cannot brace yourself against the leeward seat from the weather side is not the right answer.
The Offshore Cockpit. For serious offshore sailing, the cockpit should meet the standards in the Special Regulations of the Offshore Racing Council for Category 1 racing.
Category 1 racing is defined as: «…races of long distance and well offshore, where yachts must be completely self-sufficient for extended periods of time, capable of withstanding heavy storms and prepared to meet serious emergencies without the expectation of outside assistance». If you substitute the word cruises for races, that sentence is an excellent definition of off-shore cruising.
Seaworthiness is the prime consideration of the offshore cockpit. The concept is to minimize the amount of water that the cockpit could hold in heavy weather, keep that water from getting below decks, and facilitate its return to the sea.
The volume in cubic feet of the cockpit of the ocean-going yacht should be no more than 06L × B × FA according to the Offshore Racing Council. While «L», «B», and «FA» are hull dimensions measured under the IOR, a reasonable approximation for the cruising boat can be derived by substituting your boat’s waterline length for L, her beam for B, and the freeboard at the corners of the transom for FA.
As an example, take a modern cruiser 36 feet on deck with a 29-foot waterline, a beam of 11,5 feet, and freeboard aft of three feet. The formula yields an allowable cockpit volume of 60 cubic feet. Note that this is the volume of the cockpit below the lowest coamings. A cockpit with side coamings but no coaming aft has considerably less volume than the same cockpit which is enclosed by a coaming across its after end.
For coastal or lakes sailing, the ORC-allowable cockpit volume is 50 percent greater. In all cases, the cockpit sole should be at least 02L above the waterline. This amounts to seven inches in our hypothetical 36-footer.
Cockpit Scuppers. Proper cockpit drains are a critical requirement. As a minimum, a cockpit meeting the ORC volume requirements should have two drains with no less than 1-1/4 inches inside diameter each. Grates or screens over drains greatly decrease the water flow, so the size of the drains must be increased if there is any restriction over the opening.
Cockpit scuppers should drain at any angle of heel. Surprisingly, many do not. This problem is most acute where the cockpit extends aft almost to the transom – a typical arrangement in the modern racer-cruiser with little or no after deck. In such boats, the cockpit sole should pitch down toward its forward end, and the drains should be moved to the forward corners of the cockpit.
Since cockpit scuppers inevitably are near the waterline, they should be fitted with sea cocks. Double-clamped, non-collapsing flexible hose is the best material for cockpit drain plumbing. The flexing of hull and cockpit could fracture rigid plastic or fiberglass piping.
The Bridge deck. In an attempt to maximize cockpit size and below decks accessibility, many boat builders have eliminated the bridge deck. Frequently the companionway sill is raised a few inches above the cockpit sole to keep water in the cockpit from getting below. This is a poor arrangement for any boat which contemplates serious cruising. A bridge deck reduces cockpit volume, serves to increase below decks space (usually over galley counters), and is invaluable in keeping water out of the cabin. With a deep companionway, the temptation to leave lower drop boards out for the sake of convenience is simply too great and is an un seaman like practice.
For all categories of racing – coast wise, as well as offshore-the Special Regulations require that companionways extending below the level of the main deck be blocked and secured to at least that level. In many production boats, this means leaving half the drop boards in place when sailing.
Another questionable practice is the use of wide companion-ways with sharply tapered sides. While tapering the sides of the companionway makes it easier to remove and insert drop boards and facilitates getting below, it also makes the boards more likely to fall out in a severe knockdown. In any case, drop boards must be fitted with latching devices such as barrel bolts or slide bolts to positively secure them.
The use of hinged doors rather than drop boards is a poor practice in small boats. Doors require the companionway to be completely opened to get on deck or below, and they are easily torn from their hinges.
Protecting the Companionway. For offshore sailing, a companionway sea hood – basically a box protecting the front of the companionway slide – is a must. Water driving under the forward edge of an unprotected slide can make below decks a rain forest in short order. A serious cruiser, whether sailing coastwise or offshore, will find the sea hood worth its weight in gold.
Sea hoods frequently incorporate a molded spray rail which may extend across the top of the deckhouse to form a dodger coaming. Without some form of coaming, a cockpit or companionway dodger’s efficiency is severely limited. Even if it is pierced for sheets and halyards leading aft along the coachroof, a properly designed coaming will go a long way toward keeping water from driving under the lower edge of the dodger.
Cockpit dodgers are rapidly becoming standard items on boats used in cooler climates. While a dodger limits visibility and adds windage, the trade-off in protection of the forward end of the cockpit may well be worth it. If a boat tends to be wet, has low coamings, and a low cabin trunk, a dodger can make the difference between comfort and misery in bad weather. In a boat whose cabin bulkhead slopes forward, the dodger also makes it possible to leave the companionway open for ventilation when it is raining.
Dodgers should be custom-fitted to the boat to be sure that they do not interfere with winches, sheets, halyards, the main boom, and seating at the forward end of the cockpit.
Cockpit Lockers. Improperly designed cockpit lockers are a common problem. Cavernous, undivided space under the cockpit is practically useless. In boats with a quarterberth, there is frequently a shallow cockpit locker over that berth. This is handy for small items such as spare blocks and sail ties. Usually, the other side of the cockpit will have a huge locker euphemistically dubbed a sail locker. Unless the locker lid is also huge, chances are that nothing larger than a carefully folded storm jib will go through the opening. Chances are also good that screws, exposed bolt heads, and cables lurk inside the locker to rip holes in your new triradial spinnaker.
The cavernous locker may hold large quantities of junk, but whatever item you want is guaranteed to be at the bottom of the heap under the barbecue and the storm anchor. You can make a big locker more useful by subdividing it with plywood or net partitions, installing hooks for spare sheets, generally organizing so that nothing must be piled in. If the cockpit locker provides access to the steering gear or stuffing box, make sure that your partitions are easily removable in an emergency.
An amazing amount of water can get below through leaking cockpit locker lids. The lids should be gasketed, have positive dogs, and have scuppers that will allow water to drain from the leeward cockpit seat with the boat heeled over 30 degrees.
Seating. It is unfortunate that people do not increase and decrease in size depending on the size of their boats. If you want cockpit seats on which you can lie down, they must be six feet long whether your boat is a 25-footer or a 45-footer. The cockpit on a small boat invariably takes up a greater percentage of the boat’s total volume than the cockpit of a larger boat. Seating simply does not scale down.
In order to have coamings high enough to offer any real back support, the cockpit seats must be sunk below the main deck level. The footwell must be lowered correspondingly. This, of course, increases the cockpit volume.
Ideally, the cockpit seats should slope downward outboard, and the coamings should angle outward. This provides more comfortable seating, but it makes it more difficult to use the seats for sleeping, and renders it impossible to have the bridge deck at the same level as the cockpit seats. Therefore, what is gained in comfort is lost in convenience. In any case, a gutter or scupper must be provided at the outboard edge of the seat, or those seated to leeward will suffer from wet-seat syndrome.
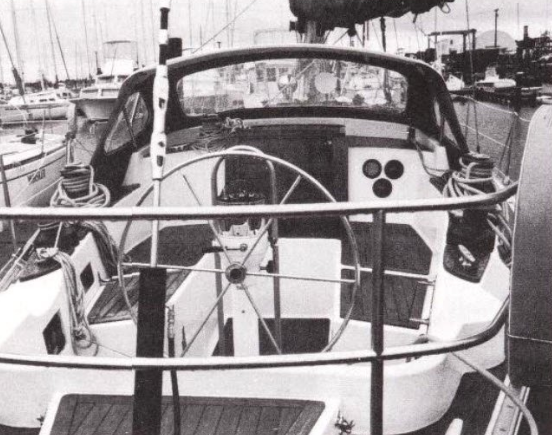
Steering. The pedestal-type wheel has become almost universal in boats over 30 feet. Although this steering system generally creates more room in the cockpit, it is more expensive, less rugged, and more prone to failure than a strong, simple tiller. While a tiller takes up cockpit space, it is generally preferred for its sensitivity by racing sailors graduating up from small boats.
Placement of a wheel steerer can be problematic. Some prefer the forward end of the cockpit for shelter under the dodger and accessibility to sail controls. Others prefer the aft location to free up the forward end of the cockpit for sail trimmers and guests. For shorthanded cruising, the forward location is better. For racing, an aft position is probably preferable.
While you rarely sit directly behind the wheel when sailing, most boats with the wheel aft have a seat across the rear of the cockpit for the helmsman. This seat should be either concave or convex to provide a secure seat with the boat heeled 20 degrees. If the boat has a high cabin trunk, a convex seat may help a short helmsman see forward. With a flat seat, the helmsman invariably slides to leeward.
If you like to steer from the windward or leeward rail, be sure that the wheel is large enough in diameter to be easily reached from the rail. This may require notching out the cockpit sole for the wheel on larger or exceptionally wide boats. Obviously, a wheel well must not extend below the waterline, and must be scuppered overboard.
Unless the cockpit coamings are wide and flat on top, the helmsman may not be able to sit outboard. The best solution to this problem is found on the Tillotson-Pearson Alden 44, which has a concave area in the top of each coaming for the helmsman’s rear end.
Sheet Leads and Sailhandling. Efficiency in sailhandling must be a major consideration of cockpit design. Winches must be placed so that handles can be cranked through 360 degrees without striking the dodger, life-lines, stanchions or pulpit. If the coamings contain molded-in winch islands, be sure they are large enough to accommodate bigger winches. We have never seen winches that were too large for the short-handed sailor.
The placement of the main sheet traveler invariably causes problems. If you put the traveler on the bridge deck, it limits access below. Put it behind the helmsman, and the main sheet loses efficiency by pulling aft as well as down unless the boom is very long. An aft location for the traveler also tends to decapitate the helmsman, and requires putting the main sheet trimmer in the end of the boat, where his weight does the least good.
Put the traveler on a bridge over the companionway, and you may render it impossible to fit the boat with a dodger. Move it forward of the companionway and the sheeting becomes inefficient unless the boom is very short. All things considered, that location on the bridge deck starts to look pretty good.
Engine Controls. With pedestal steering, engine controls should be mounted directly on the pedestal. With a tiller or worm-gear wheel, mounting them on the side of the cockpit makes sense. Since most people are right-handed, the right side of the cockpit is usually the best location.
Throttle and clutch controls are notorious sheet catchers. Some boats therefore move these controls inside a cockpit locker. This can create problems operating under power in rain or heavy weather, compromising the watertight integrity of the cockpit if the locker must be kept open to operate the engine.
The instrument panel should be within sight of the helms-man when seated at the normal under-power steering position. An excellent idea is recessing the panel into the face of the bridge deck. All panels, despite claims of watertightness, should have protection from heavy spray. The panel should not be so close to the cockpit sole that it can be shorted out by a few inches of water in the cockpit.
Sailing Instruments. The aft cabin bulkhead makes a reasonable place to mount instruments, although it means that loungers at the forward end of the cockpit will probably block the instruments just when you need them most. Unless the steering position is very far aft, the ideal location for instruments is in a pod mounted atop the companionway sea hood. The instruments will be just about at eye level, so that the helmsman can see them without having to glance down and no unsightly holes will have to be cut in the main bulkhead.
Center Cockpit: Yea or Nay?
Center cockpits were a highly popular fashion of the early 1970s epitomized by the Morgan Out Island 41 although larger boats, especially those called motorsailers with cockpits well forward, had a measure of popularity for many years before that. Having a cockpit forward offered three claimed advantages over the aft cockpit:
- more appealing interior space, notably the privacy of fully separated cabins;
- a larger engine compartment;
- and a drier, more comfortable location for the crew under sail with better visibility forward under power.
The last argument cites the height of the cockpit above the water for dryness, and its closeness to the center of the boat for less motion as the boat pitches.
Partially offsetting these claimed advantages are several drawbacks of the center cockpit. The weight of both the deck structure and the crew is located comparatively high:
- raising the boat’s center of gravity and reducing stability;
- the broken-up accommodation plan may reduce interior space;
- the need for interior access to the after cabin to avoid having to use the exposed cockpit;
- the lack of visibility under sail;
- and the impression that the high top hamper does indeed make the boat appear top heavy.
It is, of course, an axiom of yacht design that interior space can only be achieved at the expense of sailing performance and traditional aesthetics. Yet virtually since the start of the boom in auxiliary sailboats in the early 1960s it has been the customers’ desire for livability that has dictated the design of production boats. It may or may not be true that designers have first drawn the interior, then wrapped that interior with a hull shape regard-less of what shape that wrap becomes. Certainly headroom, numbers of berths, ample stowage space, a functional galley, an enclosed head (or two) often with a shower, and an eating facility with the proportions of a dining room have all been priorities among buyers enjoying – and supporting – that boom.
Eventually, the demand for center cockpit boats fell off, to some extent paralleling the decline in the threat of an energy crisis that had made sailboats with the amenities of powerboats so popular. By the early 1980s, there were few being built, and of those, almost none that were not optional variations on boats offered with the traditional aft cockpit layout.
There is no better example of the fundamental compromise between sailing qualities and living qualities than the center cockpit boats, at least those below 40 feet or so. Over that size, the compromises can become less, increasingly so with added length. At 50 feet or so, a center cockpit can be incorporated with few of its inherent drawbacks. The cockpit can actually be at or below deck level, the engine needs the space it gets, and fore and aft access below is not a factor. At the same time, though, there are many ways to obtain privacy in larger boats, so the complete division of sleeping units with a divided layout may not be the most feasible answer.
No cockpit layout can solve all the problems of the racer, cruiser, and day sailor. Nonetheless, the needs for safety, comfort, and functionality are universal. The next time you look at a boat, consciously resist the urge to plunge below into the world of teak and plush upholstery; sit for a while in the cockpit. Imagine the boat rail-down going to weather in a fresh breeze. Imagine half a dozen friends gathered in the cockpit for a party. Imagine yourself and your spouse alone on a thousand-mile passage. Forget the interior decor until you find out if the cockpit works for your kind of sailing.
The Right Boat: Belowdecks
In the last 30 years, few aspects of the small cruising boat have changed more than the interior volume. When the Triton first appeared in the late 1950s, the fact that a 28-footer could have full headroom was seen as a major breakthrough. The Paul Coble-designed Corsair of a few years later brought full headroom to 24-footers. Ever since, interior design has loomed larger in importance in boat building and design.
Part of the gain in interior volume is due to the change from wooden construction to fiberglass. A wooden boat with a beam of 10 feet will sacrifice at least six inches of interior beam to the thickness of her planking, frames, and ceiling. A fiberglass boat of the same beam could lose less than an inch. Considering the small volume of the interior of a boat, those few inches add up to an amazing amount of space.
The same analogy applies to headroom. The wooden boat, with its deep floor timbers and deck beams overhead, sacrifices a lot of headroom to accommodate the basic components of the boat’s structure.
In addition, for a given overall length, sailboats have grown wider and longer on the waterline. For example, take the Bristol 27, a popular small cruiser of the late 1960s. On a length overall of 27 feet, two inches, the Bristol has a beam of eight feet and a waterline length of 19 feet, nine inches. Displacement is about 6 500 pounds.
While those dimensions were pretty reasonable 15 years ago, they look pretty skimpy today. Compare the Bristol 27 to the Tanzer 27, a typical small racer-cruiser of today. On a length overall of 26 feet, seven inches, the Tanzer has a beam of nine feet, six inches and a water line length of 22 feet, 6 inches. Her displacement is about the same as that of the Bristol.
The Tanzer is a dramatically larger boat in interior volume, and typifies what has happened to boat design since the 1970s. For a boat of the same length, today’s buyer demands—and gets – more interior volume. Despite the gain in volume, the interior layout has changed relatively little. In boats from 25 to 40 feet, the most common interior arrangement still consists of a double cabin forward, the head next aft with lockers opposite, a main cabin with settees parallel to the center line, a galley, and perhaps a quarterberth aft.
Obviously, the amount of headroom, elbow room, and leg room varies dramatically when you have the same general arrangement on boats that range from as little as 5 000 pounds to to as much as 20 000 pounds of displacement.
Privacy. When there is more than one person aboard a boat, privacy rapidly becomes an issue. Whether it is dressing, using the head, or sleeping, most sailors have the occasional desire to separate themselves physically and psychologically from their fellow crew members. This issue is not critical, of course, in a boat used for day sailing. Most of us are capable of putting up with almost anything for a few hours. Granted, a cedar bucket in the middle of an open boat has little to recommend it when sailing with a mixed crew, but generations have managed with little permanent loss of dignity.
However, when cruising for any period longer than overnight, some privacy is almost essential. When you look at a boat, think what it will be like aboard her for a long weekend or a week’s cruise in the rain. Then think about those six berths in a 30-footer and see if you really want to cruise with them all filled. Then you may find the flaw in the question, «How many does she sleep?»
Down the Hatch. With that in mind, it is time to go below. Is there anything to grab on to when coming down the companionway ladder? Is the ladder so steep that you must go down facing the ladder or can it safely be descended like a stairway?
Steep ladders are not necessarily bad, but they must have provision for something to grab onto in a seaway such as handholds cut into the sides of the ladder, or grab rails on the inside face of the companionway. Needless to say, the ladder should be positively attached to the boat. At the same time, if it is necessary to remove it in order to get to the engine for service, there must be a simple way to unlatch the ladder and move it out of the way.
The Forward Cabin. Having negotiated the companionway, move all the way forward to the forward cabin. Every boat from 22 feet up has a «V-berth in the forward stateroom». Some of the worst travesties of design are foisted on boat buyers in the name of that private forward cabin.
First of all, let it be understood that a V-berth is not a sea berth. If you intend to do sailing that requires sleeping aboard while underway, pretend that the forward berth does not exist; it will be unusable in any weather other than a flat calm. In fact, consider everything forward of the mast to be a bit of a twilight zone at sea, the part of the boat that you don’t venture into unless you have to. The motion in the forward third of any boat much smaller than 50 feet when beating into a head sea has to be experienced to be believed. You quickly learn that only the toughest sailors sleep forward except in port.
For cruising, you may find it better to have storage forward than sleeping accommodations. This will run you right up against the layout of almost every production sailboat. That is why unusual interior arrangements, such as that of the Nonsuch 30, really catch our eye. In a boat designed for two people, you just don’t need to waste that space forward for sleeping. If you want a double berth, it is usually possible to modify a main-cabin settee to serve the purpose.
For occasional cruising with children or another couple, the forward cabin may be the right answer. Most sleeping, after all, is done at anchor or at the dock when the forward location is perfectly acceptable.
Given the reality of the forward V-berth, what should you look for? Inevitably, the berth is wide at the top and narrow at the bottom. Lie in it with someone else and see if the two of you can really be comfortable with your legs entwined.
Until a few years ago, there was inevitably a space at the forward end of the V-berth labeled an anchor locker. Unfortunately,in order to use any ground tackle stored there, you had to drag it out over the berth and up the forward hatch, knocking mud all over your cushions. The smell and mess of ground tackle stowed forward did little to make that cabin more comfortable.
Somewhere along the way someone came up with the idea of the fore deck anchor well. Whoever put the first fore deck anchor well on a production sailboat will, if he can be discovered, be awarded The Practical Sailor’s award for «Best Invention of the Last 20 Years».
There is likely to be a large empty space under the V-berth. Since space on any boat is at a premium, something must be done to utilize it. One thing that is frequently done, but which really has little to recommend it, is to install a large water tank in the space. Unfortunately, under the V-berth forward is one of the least desirable locations for a water tank. If a boat pounds in seaway, much of that impact is going to be taken on the section of the hull directly under the V-berth. Any tank mounted there must be absolutely rigidly attached to the hull and must be extraordinarily strong. Many forward water tanks have either split or come adrift when a boat pounds her way to weather. It is most unpleasant to discover that your fresh water supply has been transformed into bilge water.
More serious than the installation difficulty is the effect on the trim and handling of the boat with a large weight far forward. A gallon of fresh water weighs nearly ten pounds. Put even a 20-gallon tank forward on a 30-footer, and the boat’s trim will be noticeably altered. Worse yet, the boat’s pitching moment is likely to be amplified, making her less comfortable in a seaway. To further confuse matters, as the fuel or water in the tank is used up, trim and balance continually change.
Although it may be slightly inconvenient, the space under the V-berths is best given over to dry storage such as bedding and clothing. Although drawers waste space, they are more convenient to use, and eliminate the need to lift the cushions to gain access to the space.
A forward cabin should have ventilation. This is most likely to consist of a hatch over the head of the berth in the deck or top of the cabin trunk. The aluminum-framed translucent hatch is another great modern invention. In all but the smallest boat, there should be a light at the head of each side of the V-berth. (Just remember that with transparent hatches, strollers on the dock can usually stare into your forward cabin if the lights are on at night.)
To improve privacy, some means of shutting off the forward cabin is desirable. In a small boat whose forward cabin merely consists of a V-berth, this could be something as simple as a curtain or a sliding panel. In a larger boat with real standing space in the forward cabin, a sliding or folding doors preferable. Louvers in the door will aid ventilation but at the sacrifice of some privacy. Again, compromise is a way of life in boats.
Storage can be augmented by shelves under the deck head. These are most useful if they have high fiddles and are subdivided into smaller sections. If you mount too many things on the bulkhead at the head of the berth, there may be no comfortable place to lean while reading.
Few things are less attractive than the bare inside of a fiberglass hull. We have never gotten over the insecure feeling of seeing the sun stream through translucent topsides. For both aesthetics and function, some form of hull ceiling is desirable. More and more boats are sealing the interior of the hull with thin wood strips, the rebirth of a practice that makes the inside of a wooden yacht so enjoyable.
Teak is not the wood to use here, being heavy, dark and expensive. A wonderful alternative is eastern white cedar or western red cedar, both of which are highly aromatic and beautiful when varnished. We have not found anyone who enjoys the smell of fiberglass so much that a little aromatic cedar cannot warm his soul. Vinyl and carpet liners, while functional, make the boat look like an airplane or a house trailer. They may also be subject to mildew if they are not kept dry and clean.
Some form of hull liner will also help reduce the condensation that can make the interior of an uncored hull uncomfortable. Ceiling may not be necessary on a foam- or balsa-cored hull, but for pure aesthetics, few things dress up a boat so quickly. Since forward cabins are inevitably cave like, anything you do to brighten the decor is likely to be an improvement.
The Head. Except in very small Cruising in Comfort on a Sailboatcruising boats where the head may be located under the V-berths forward, the head is usually located in a compartment immediately aft of the forward cabin. The degree of privacy attainable in the head is largely a function of the size of the boat.
In boats under 30 feet, it is usually desirable to have a head arrangement that can span the full width of the boat. While a cramped head compartment is hardly the end of the world, if it must be used for dressing and showering, a little extra elbow room is nice.
The primary fixture of any head is the water closet, the basic design of which has not changed in this century. Most stock boats come equipped with the cheapest toilets available, most frequently the Wilcox-Crittenden Head-Mate. While these toilets are readily serviceable, their small cylinders make them harder to pump and more likely to clog than a more expensive unit. Boat builders use cheap toilets simply to keep prices down. A Head-Mate or comparable Jabsco or Raritan toilet sells for about $ 125, while a top of the line head such as the Wilcox-Crittenden Skipper costs three or four times as much.
To clear the air once and for all, unless a boat operates in an enclosed body of fresh water, we do not believe in holding tanks. The well-intentioned but poorly thought-out MSD laws are no more than a Band-Aid on the gaping wound of water pollution. In tidal saltwater areas, we have absolutely no guilt about pumping the toilet directly over the side. We seriously doubt if as many as 20 percent of the boats in existence conscientiously abide by the head regulations.
Manufacturers, of course, must comply, so new boats are invariably equipped with holding tanks. Do yourself a favor; install a diverter valve and forget you even have a holding tank.
The head compartment must have grab rails which give you something to hold onto when using the head underway. There should also be ventilation in the form of opening ports for use in fair weather, and one or two large cowl vents for bad weather. An unventilated head compartment will be a misery forever.
While a sink may not be necessary in the head, it is a useful addition if there is room. Small, round-bottom sinks are less than useless; water runs out of them if the boat is heeled more than a few degrees, and it is impossible to wash your face over one without soaking the counter. The sink need not be as deep as the galley sink, but make sure it is more than a toy.
If the head has a shower, it should drain into a sump, not into the bilge. This is one of the most common faults in production sailboats. Hair, soap, and scum will clog the bilge pump and render the bilges as pleasant as a sewer. The only thing that belongs in the bilge is bilge water – not shower water, not icebox water, and certainly not engine oil.
The head should contain lockers for toiletries. Small cubbyholes or drawers which can be labelled with each crew member’s name are ideal. Linen or hanging lockers, depending on the size of the boat, may be desirable.
If the boat lacks standing headroom in the head compartment, the head should be compact enough so that everything can be reached when the toilet is used as a seat. This means that counters, grabrails, and mirrors will be a little lower than in the compartment with standing headroom. Towel racks should be strong enough to double as grabrails. Nothing in a boat that looks like something to grab onto should come off in your hands when you grab it.
The door to the head should be large enough to accommodate the largest member of the crew. While this may seem an obvious requirement, you would be surprised how often this simple thing is overlooked. The door should also have a positive means of latching, so that if you are thrown against it you don’t fall out head first onto the cabin sole.
One head is perfectly adequate for almost any boat up to about 45 feet unless the boat has a center cockpit layout. With a center cockpit, a separate head for the aft owner’s cabin borders on the essential, even if it is nothing more than a toilet under a settee and a sink mounted in a corner.
Privacy, ventilation, security, and comfort are key words for the head. You will not necessarily be spending much time in the head while cruising, but a certain degree of comfort can help make the difference between cruising and camping out.
The Right Boat: Main Cabins and Galleys
A cruising boat’s main cabin must serve the multiple functions of living room, dining room, kitchen, and bedroom. And it must serve these functions when heeled 25 degrees bashing to weather as well as it does sitting tied to the dock or at anchor.
Because the main cabin is used for so many purposes and because it is usually the first part of the boat you see when going below, probably more time is put into the layout of this small space than any other part of the boat. Builders are quite aware that the first impression is critical, and usually try to make the main cabin as attractive as possible. Unfortunately, attractive and functional are frequently two different things. What looks good may not work well, and what works well in port may be perfectly miserable at sea.
Settees and Berths. Main-cabin settees often double as berths. Unfortunately, a good settee usually makes a poor berth. The most comfortable settee width is about 15 inches. There should be a back rest for the settee, and it should be angled slightly outboard for greatest comfort. The height of the backrest is not critical, but it should be high enough to offer some support. For reading, there should be a light at each end of the settee – preferably one that can be adjusted to provide light where it is needed most.
Now that we have created a comfortable 15-inch wide settee, how do you change it into a comfortable 24-inch wide berth? The simplest way is to have the back fold up and latch out of the way for sleeping. The space between the settee back and the side of the hull can usually be used to store bedding when the backrest is folded down for sitting. If the settee back latches up for sleeping, be sure that the latches are strong enough to retain the back when the settee is used for sleeping in rough weather.
On a boat equipped with pilot berths outboard of the settees, the settees frequently extend to form berths of the proper width. Positive latches should be provided to hold the settee in both sitting and sleeping positions. Pilot berths make great sea berths, but they are usually used more for storage than for sleeping. They are also frequently too narrow, poorly ventilated, and hard to get into. Unless a boat is used for extensive offshore cruising or racing with a large crew, the space given over to pilot berths might be better utilized for storage, which always seems to be in short supply.
Berths should be a minimum of six feet, four inches long. A shorter berth may be fine for you, but what about the tall sailor who wants to buy your boat five years from now? If a berth extends under a counter or into a footwell to get the necessary length, be sure there is plenty of clearance over your feet and enough room for you to roll over in the middle of the night.
While the space under the settees is usually given over to storage, this part of the modern bilgeless racer-cruiser is easily contaminated by bilge water when the boat heels. The space under the settees is far better suited for tankage, keeping the heavy weights of water and fuel in the center of boat where they will have the least effect on trim and pitching moment.
Deeply tufted settee cushions are popular items supposed to convey the idea that your settees are really expensive sofas fit for the living room of your house. Remember that if you have to use the settee for sleeping as well as seating, that elegant tufted upholstery is going to make an awfully lumpy mattress. Smooth cushions of dense foam may not look as elegant, but they are a lot more comfortable when the time comes to lay down your weary head.
Cabin Tables. On boats under about 35 feet, space is frequently so limited that the main cabin table must fold out of the way when not in use. Most folding tables eliminate a fair amount of bulkhead space. Although many such tables have a storage compartment built behind them on the bulkhead, this storage space is relatively impractical since the table must be folded down to retrieve whatever is stowed behind.
The primary weaknesses of folding cabin tables are poor latches for securing the table in the up position and inadequate lateral support of the table in use. We have rarely seen a folding cabin table that was strongly enough supported for use when sailing offshore. Offshore, having no table is frequently better than having a table that cannot be leaned on and must be folded up after dinner.
Any table that will be used underway, whether folding or fixed, should be capable of absorbing the force of a crew member falling against it. Check the drop leaves of the cabin table to make sure they will bear the weight of several crew members who forget their table manners and put their elbows on the table. A minimum of two square feet of table area is required for each person at the table. This should include an absolute minimum of 15 inches of table length per setting. Even this will be crowded if there is no elbowroom at each end of the table.
Dinette arrangements have been in vogue from time to time and have their own advantages and disadvantages. A dinette moves people out of the traffic flow, so that if someone has to use the head in the middle of dinner, major maneuvers are not necessary. Frequently, a U-shaped dinette replaces the settee and pilot berth on one side of the boat. Make sure that the fore and aft portion of the dinette is long enough to convert to a comfortable berth, because you don’t want to lose all the berths on one side of the main cabin.
One disadvantage of the dinette is that it usually eliminates symmetrical sleeping arrangements in the main cabin. For racing or cruising, a symmetrical sleeping setup allows optimum weight placement for performance or comfort.
In some boats, a dinette to one side is coupled with a galley opposite. This is a poor arrangement in most cases. The cook is placed directly in the traffic flow. Usually, the most comfortable eating position offshore is bracing yourself in the leeward settee. If the galley replaces one settee in the cabin, half the time there will not be a leeward bunk to sit on.
The Galley. The basic components of the galley are the means of cooking food, a place to wash dishes, a box to keep things cold, storage areas for food and utensils, water, and counter space. Seemingly simple, galley design may well be the most difficult part of designing the boat.
The galley frequently gets short-changed. Berths and settees cannot be scaled down, but galleys can and frequently are in the small boat. Sometimes it seems that the requisite number of berths are put in the boat, and the leftover space, no matter how cramped, becomes the galley.
The modern cruising sailor is rarely content to live off canned stew, and the modern offshore cook has every right to expect comfort, convenience, and function in the cruising boat’s galley. A great deal of the difference between cruising in comfort and camping out is in how you eat and how difficult it is for the cook to perform the tasks of cooking and cleaning up.
The galley stove is probably one of the most consistently overpriced and poorly designed pieces of equipment aboard the typical production boat. The alcohol stove makes cooking one of the least pleasant jobs aboard since it will take two or three times as long to cook anything as your stove at home will.
Most small boat galleys simply do not have enough room for a proper stove. The installation of any gas stove requires so much plumbing and so many expensive components—bottles, bottle storage, solenoids – that they are rarely seen on boats under 30 feet. If your boat is equipped with one of those alcohol wonders and there is no possibility for change, be sure that there is some bulkhead space available somewhere to mount a single-burner, self-contained stove of the Sea Swing type if you plan to do any cooking underway.
Gas – either CNG or propane – is by far the best fuel for cooking. Propane is both more compact and more readily avail-able, but the cost of installation of a propane system can be Staggering. On the few boats under 35 feet that offer gas stoves as options, the cost generally ranges from $ 750 to $ 1 000 more than that of the stock two-burner alcohol stove. This assumes, of course, that the galley has room for the stove.

If the stove is to be gimballed, it must be mounted along the fore and aft axis of the boat. There are a few stoves designed for athwartships mounting, but they are custom made, outrageously expensive, and are to be resorted to only when all else fails.
Be sure that the stove is not recessed too far under the sidedeck of the boat, and be sure that there are no curtains close enough to the stove to catch fire in the event of an alcohol flareup. A stove recessed under the sidedeck is likely to overheat the deck. If at all possible, the stove should not be mounted next to the icebox. Most iceboxes are so poorly insulated that they hardly need help in turning a 25-pound block of ice into 25 pounds of lukewarm water overnight.
The proper design and construction of iceboxes has eluded boat builders since Day One. An icebox placed under a counter beneath the companionway will heat up from the sun. An icebox that drains into the bilge will stink up the bilge. An icebox with no insulation in the top will not keep ice very well. An icebox with an ungasketed, poorly insulated lid will not, either. An excessively deep icebox is likely to become a swamp if the cook can’t reach the bottom to keep it clean.
The lid of any icebox should be large enough to accept a 25-pound block of ice. There should be adjustable internal racks or shelves to keep food out of the bottom of the box. If the box drains into the bilge, it may be possible to redirect the drain into the manual bilge pump with a Y-valve, allowing you to pump the box daily with little trouble and keeping your bilges free of icebox scum.
Sinks on small production boats are rarely deep enough to be really useful. The sink need not be large – a foot square will do – but it should be deep. Nine inches deep is a good round number for sink depth. If the boat has a pressure water system, there must be a manual backup pump. Foot pumps are more efficient than hand pumps, since they allow you to use both hands when washing dishes. Be sure the foot pump is not located in a position that will make it a hazard to cabin navigation.
Almost no boat has enough counter space or storage space in the galley. These are the first things to go in smaller boats. A small drop-leaf table can be fitted to almost any galley counter to create additional work space. Creating extra storage space maybe more difficult. It may be possible to add bulkhead-mounted racks or storage compartments or even build in shelves or bins in dead spaces, but making useful storage space in the galley is likely to be quite a task.
It is almost impossible to visualize how a galley will work until you try it out. The sink may be tucked so far under the bridge deck that washing dishes is impossible. You may have to lean over a hot stove to get to the food storage. A short person may not be able to reach the bottom of bins or the back of cabinets. Drawers may not latch properly. There may be no toe space under the counters, making it difficult to get close enough to anything in the galley. The galley pump location may make it difficult for a left-handed person to do the dishes.
When trying out a boat, the cook should walk through every stage of preparing a meal from thinking out where things are to be stored to cooking and cleaning up. If the galley does not present obstacles to any of these activities, wonderful. If it does, you will have to decide how difficult it will be to modify the galley, or how much inconvenience you are willing to live with.
A basic question to consider is how much the galley will really be used. For day sailing or weekending, inconvenience and lack of space may be minor considerations. If, however, you want to cruise for weeks at a time, a functional galley is a must.
Ventilation. Opening ports are more expensive than fixed ports, but they can aid immensely to the livability of any boat. Some form of opening hatch over the main cabin is also highly desirable. A medium-sized, aluminum-framed hatch is ideal for this.
A hatch that is reversible – one that can be modified to open either fore or aft – is the best type for ventilation. In good weather the forward opening position is used. Any breeze at all will force a tremendous volume of air through the boat. In foul weather, the aft edge of the hatch can be lifted. If side curtains or a miniature dodger are fitted over the hatch, it can be left open in any weather at anchor and almost any weather when sailing. If the boat does not come with a ventilation hatch, determine if there is room to install one forward of the companionway. Even a small hatch adds significantly to ventilation.
Read also: Basic Elements of Boat Hull Design
Dorade vents placed at the after end of the main cabin will also be a great help. Be sure, however, that these do not preclude the installation of a companionway dodger. Dorades placed at the forward end of the main cabin do almost nothing for the ventilation of that cabin.
A companionway dodger both protects those in the cockpit and is a real boon to below decks comfort. By sheltering the companionway, it allows the drop boards to be left out and the hatch left open in almost any weather.
The Navigation Station. For years, navigators on boats up to 50 feet struggled along using whatever surface was available for their tasks. The top of the icebox, the main cabin table, or a piece of plywood held in your lap comprised the navigation station.
With the proliferation of low-priced electronics, an incredible growth in interest in cruising, and the big boat feeling of having a separate office for the navigator, the navigation station has emerged as an important part of the interior of any boat over 30 feet. However, a navigation station that looks like a workplace for the navigator and one that really works are frequently two different things.
Unless a boat is to be used for serious cruising or racing, a navigation station may be a luxury that wastes space. If your navigation equipment consists of a VHF radio, tide tables, and a couple of charts, and if your sailing consists of day sailing and weekending in familiar waters, chances are that you can get by with a piece of plywood which can mount out of the way over a berth. If, however, you plan on cruising for a few weeks at a time far from home, you plan on racing, and you have:
- Loran;
- repeaters for instrumentation;
- a sextant;
- depth-sounder;
- RDF;
- piles of charts;
- and tons of navigation books,
you are going to need some place to put them.
A standard 13 000-series chart folded in quarters is about 18 by 22 inches. Any chart stowage space smaller than that is useless. Charts that have been rolled rather than folded are almost impossible to use, so chart stowage tubes or built-in tubular chart stowage is a waste of space.
To be of any real value, the chart table working surface should be about the size of half a chart. The quartered chart rarely has a compass rose in the right place for plotting, and you often discover that where you want to go is in another quarter when the time comes to lay a course.
If the chart table has fiddles, they should be removable to allow you to drape that chart over the edge. Ideally, there should be a drawer for:
- pencils;
- erasers;
- dividers;
- parallel rules;
- stop-watches,
and the other assorted small items that end up lost under the charts in the chart table. Ideally, the inside of the chart table would be used only for chart storage.
Mounting of instruments also presents a challenge. Usually, you end up sacrificing what little shelf space is available to mount radios and Loran, then try to figure out where to put your books and sextant. We have never seen a production sailboat with proper sextant stowage, but being realistic about it, that is not really a consideration for 99 sailors out of 100.
On boats under 40 feet, the seat for the chart table is almost inevitably the head of a quarterberth. This is fine as long as the boat is upright, but the minute it starts to heel you are either sliding onto the cabin sole or sliding into your electronics – tough on your body, and tough on the instruments. As odd as it may sound, some sort of seat belt may be the answer.
Navigation stations are usually located next to the companionway, opposite the galley. While this is good for communicating with the cockpit, it is also vulnerable to weather. In bad weather, off-watch crew members also have the habit of hanging around the navigation station, dripping on your charts. If the navigation station is located next to the companionway, make sure that it will be possible to rig a drip curtain – to keep the navigation station, instruments, switch panel, and navigator dry. Charts turn to pulp, electronics turn to green grunge, and navigators get cranky when they are wet.
Quarterberths. The quarterberth is frequently the best berth in the boat. If poorly designed, however, it can be cramped, claustrophobic, and wet.
It is becoming increasingly popular to install opening ports in the cockpit footwell to provide light and ventilation for quarterberths. Even if the builder does not provide them, they can usually be installed by the owner. They are an excellent idea.
Many quarterberths lack adequate headroom and footroom. If you cannot sit up in the berth, it is no good for reading. If there is not enough clearance for your feet, you will not be able to turn over comfortably. Double quarterberths that extend under the cockpit are the worst offenders. The person stuck in the inboard berth position of a double berth frequently stares up at the cockpit sole a few inches above his or her face. Double quarterberths are a great innovation, but be sure they have enough room for real comfort.
There should be a light at the head of each quarterberth for reading, and there should be a shelf for the stowage of small items. Make sure there is room to install nets, zip-up bulkhead bags, or shelves for storage of clothes.
The quarterberth should be separated from the space under the cockpit footwell. This can be done with a plywood bulkhead, provided it is removable in order to get at the engine for service, or by heavy canvas panels with zip-out panels for engine access.
Like the navigation station, the quarterberth should be kept dry. Once again, a dacron curtain can be installed for real protection. Make sure it is easily removable to help circulate air in hot weather.
As obvious as it may sound, make sure that the positioning of the quarterberth gives some room for the berths in the main cabin. While perfect symmetry – two berths to starboard and two to port, for example – is not necessary, a surprising number of boats have all the good sleeping places on one side of the boat, and nothing on the other. By definition, you will probably be on the wrong tack for sleeping comfortably half the time at sea.
Odds and Ends. Unvarnished solid teak makes the best ofall possible cabin soles. The so-called teak and holly soles on most boats are 1/4-inch plywood with a thin teak veneer. These must be kept varnished to keep the veneer from disappearing, and a varnished cabin sole is like an skating rink when it is wet. Putting nonskid compound in your varnish is not really a good solution, since it makes the cabin sole hard to clean up.
Carpet is fine when you are not sailing, but usually manages to slide around when you are walking on it with the boat heeled over. Either overhead handrails or vertical posts should be provided to give you something to grab onto when moving around below underway. Bruises will also be minimized if all corners are rounded off. Sharp corners have no place on a boat, on deck or below.
Decor is a matter of taste. We prefer light, airy main cabins to those resembling the inside of a teak cigar box. A number of other woods—butternut, ash, and cedar, for example – cost less, weigh less, and are lighter in color than teak. They are likely to require more upkeep, and the initial cost of varnishing or sealing these woods is likely to bring the cost to the builder up to the cost of teak plywood. No wood other than teak is likely to maintain a good appearance without fairly extensive finishing, although varnish on interior surfaces should last almost indefinitely.
A boat’s main cabin should be comfortable, functional, and pleasing to the eye. Avoid oddball interior layouts or you may have a white elephant on your hands when the time comes to sell. Don’t be afraid to personalize the interior, but realize the risks you run from over-customizing. Will the next person really like your zebra-striped cushions and baby-blue bulkheads?
Spend plenty of time in the main cabin of any boat you are considering buying. Think of how comfortable it will be with six people below on a hot, rainy day. Think of how functional it will be on a two-day beat to windward offshore. Think of how you will cook, sleep, eat, navigate, and entertain. Thinking and imagining is the major part of the boat-buying process.
The Right Boat: Engines
Whether inboard or outboard, the most expensive mechanical installation in any cruising boat is likely to be the engine. A few years ago, relatively few boats under 28 feet were equipped with inboard engines. One- and two-cylinder gasoline engines had a terrible reputation. Since the mid-1970s, however, numerous compact, lightweight diesels have appeared on the marine market. It is now feasible to equip even the smallest cruising boat with inboard power.
Outboards continue to be the primary mechanical power on boats under 25 feet. There have been relatively few innovations in outboard design in many years, although it is now possible to have outboard power equipped with electric starters and an alternator to provide electrical power for the small boat.
Inboard Engines. The inboard gasoline engine has virtually disappeared from the new boat market. This is a startling change in the boat building industry in the last 10 years. In 1972, the overwhelming majority of inboard powered, American-built production boats under 40-feet had gasoline engines. The safety and efficiency of diesels and the less stringent (hence less expensive) ventilation requirements for diesel engines have combined with the proliferation of small diesels to virtually eliminate the gas engine as auxiliary power in new boats. The real revolution has been the development of small diesels. There has been, unfortunately, no revolution in price. The modern small diesel may be compact in size and light in weight, but it is heavy in price. The Yanmar 1 GM, at 6,5 horsepower and 154 pounds, is about as small as inboards come, and costs more than $ 2 500. Its larger brother, the 19 horsepower, three-cylinder 3 GM, retails for more than $ 4 000.
Small diesels are far more costly per horsepower than larger engines. In addition, the cost of a diesel engine in a 25-footer may represent almost ten percent of the total price of the boat. The Yanmar 3 GM, however, could be installed in a boat up to about 35 feet and represent perhaps five to seven percent of the price of the larger boat.
The auxiliary components of an inboard engine installation are largely the same in cost whether the boat is a 25-footer or a 35-footer. Props, shafts, and tanks will be smaller in the small boat, but the cost—including both materials and installation—will not be significantly different. For example, an 11-inch Martec prop retails for about $ 300, while a 16-inch prop of the same style sells for just over $ 400.
Given that the new cruising boat you will buy will be equipped with a diesel inboard, what are the characteristics of a good engine installation?
Fuel Tanks. The fuel tank is a major part of the power train. Diesel tanks may be made of:
- aluminum;
- stainless steel;
- Monel;
- black iron;
- or fiberglass.
Integral fiberglass tanks, which enjoyed brief popularity, are not a good idea as they are sometimes slightly permeable to diesel oil. Like any other tank, a fiberglass fuel tank should be a separate component, which can be removed from the hull without major disassembly in the event of a problem.
Black iron tanks are sometimes seen in Far-Eastern boats, but rarely on American boats. Their life span is likely to be less than that of the stainless steel or aluminum tanks that are commonly installed in boats built in this country. Monel is rare because of the cost, and Monel has no real advantage over stainless steel. Beware of an older boat that has been repowered with diesel while retaining the copper fuel tank that was used with the gasoline engine. Diesel oil and copper do not make a good long-term partnership.
The fuel capacity required depends on the size of the engine and the intended use of the boat. The small modern diesel is incredibly fuel efficient. One- and two-cylinder engines may burn from about a quarter to a half gallon of fuel an hour.
For coastal cruising, a range of about 125 miles under power is usually adequate. Assume that a 25-footer will cruise at about 4-1/2 knots, a 30-footer at five knots, and a 35-footer at 5-1/2 knots. Cruising 125 miles should therefore take from 23 to 27 hours. A 30-footer powered by a two-cylinder diesel of about 13 horsepower should therefore find a fuel capacity of 15 gallons more than adequate for most purposes.
In the typical sailboat, the engine is mounted at the after end of the main cabin under the bridgedeck. The fuel tank is likely to be located under the cockpit, aft of the engine. If the tank is small – under 20 gallons – the location of the tank aft is unlikely to dramatically affect the boat’s trim. Careful consideration must be given to the location of larger fuel tanks to minimize trim changes. Tanks located in the ends of the boat have much greater effect on trim than tanks mounted amidships and are thus to be avoided as much as possible.
Fuel tanks must be securely mounted. They should be incapable of shifting in any conditions including a full knockdown or rollover. The tank should rest on padded chocks which are securely glassed to the hull. Stainless steel bands are often used to hold the tank down in its chocks. These bands should be padded – dense neoprene does a good job – wherever they bear against the tank to prevent damage.
There should be a fuel shutoff valve at or near the tank which is accessible without major disassembly of the boat’s interior. There should be water and particle filters in the fuel delivery line near the engine. It is imperative that these filters be readily accessible for draining and changing elements.
If a dipstick is to be used to check the fuel level, there must be a straight run from the fuel fill to the bottom of the fuel tank. If this is not possible, a fuel gauge should be provided.
Most fuel tank installations use a non-metallic filler pipe and a metal deck plate. A copper jumper wire or strap should be clamped to both the metal nipple of the deck fitting and the metal neck of the filler pipe at the tank. American Boat and Yacht Council safety standards do not distinguish between gasoline and diesel fuel-tank installation in requiring a metallic jumper in the fuel-fill system.
The fuel fill, incidentally, should be located on the main deck, rather than in the cockpit sole, to prevent spilled fuel from turning the cockpit into a skating rink. The cap should be marked «fuel» or «diesel».
Drip Pans. There should be a drip pan under the engine. This may be integral with the engine bed moldings, or it may be a separate fabrication of stainless steel or fiberglass. The pan must be deep enough to contain a fair amount of oil with the boat heeled over. The deepest part of the pan must be accessible for cleaning. Leaving out a drip pan is an open invitation to dirty bilges. Even if the engine is absolutely tight – and few are – it is almost impossible to change oil and filters without spilling something.
Shaft Installations. The modern lightweight diesel has caused some problems in shaft installation. The high compression of diesels usually means that the engines vibrate more than a comparable gasoline engine. To prevent transmitting this vibration to the hull, diesels are equipped with flexible engine mounts. This is great for reducing hull resonance, but it can be tough on the drive shaft components if proper care is not taken.
If the boat is a modern fin-keel type, the shaft system usually consists of prop, shaft, an external strut fitted with a bearing, a shaft log with stuffing box, and the shaft coupling. The shaft is held fairly rigidly by the strut and cutless bearing. In most installations, the strut is far enough away from the engine that the shaft vibration inherent in a flex-mounted engine will only cause accelerated wear of the bearing.
Problems can develop, however, if the boat is not equipped with a flexible shaft log. A flexible shaft log is easily recognized by the short piece of heavy rubber hose connecting the neck of the shaft log to the stuffing box just inside the hull. A flex-mounted diesel whose shaft exits the hull through a non-flexible shaft log is more likely to have:
- stuffing box leaks;
- excessive shaft wear;
- leaking transmission seals,
or a shaft that simply will not stay seated in the shaft coupling. This is particularly true where the distance from the stuffing box to the engine is short.
A traditional full-keel auxiliary with the shaft exiting the hull through the sternpost may be even more likely to have shaft problems with a flex-mounted engine. Part of the shaft vibration can be absorbed by the use of a flexible shaft coupling.
The Engine. The proliferation of small diesels means that boat builders have a tremendous variety to choose from when deciding which powerplant to put in a particular boat. This can cause headaches for the owner.
When the Atomic Four was just about the only small boat engine, you could always count on any mechanic at any good yard being able to service your engine. If, however, you have a 13- to 18-horsepower diesel in your 32-footer, you may have a Yanmar, a Volvo, a Renault, or a Universal. Or you might have a Beacon-Sole, a Westerbeke, or a Sabb. In any case, the chances of a mechanic having the parts in stock are greatly reduced by the sheer variety of engines available. Check with a good local mechanic to see what engines he likes or dislikes, services or does not service, and can get parts for before Buying a Boat – The Ten Minute Surveybuying a boat. Remember that the engine manufacturer or importer—not the boat-builder—is responsible for warranty service on the engine.
Aside from brand proliferation and model confusion, you must decide how much power you really need. Unlike the situation 15 years ago, when the Atomic Four was shoehorned into almost every small boat, today’s production auxiliaries tend to be slightly underpowered. In the current competitive market, a builder may be able to save $ 500 or more by putting in a 13-horsepower engine rather than a 19-horsepower engine, leaving your $ 50 000 boat underpowered for punching into a head sea or a strong current.
Rules of thumb regarding necessary horsepower are risky at best since they ignore differences in wetted surface, hull shape, and windage. Nevertheless, for the modern racer-cruiser, it is not completely out of line to say that for adequate power in anything other than a flat calm, about 1-1/2 horsepower – at the engine’s normal cruising RPM – per thousand pounds of displacement is necessary. Some purists may scream that this is far too much power, but we would always rather be overpowered than underpowered.
Instruments. Instrument panels vary dramatically in quality. No instrument panel is truly weatherproof, so some form of protection should be provided. A panel recessed into the bridgedeck with either a lifting clear plastic cover ora fixed shield with a cutout to accept the ignition key will do nicely. If a fixed cover is utilized, it should be scuppered to allow incidental spray to drain.
The panel should be located within view of the helmsman, and should not be so close to the bottom of the cockpit that it can be easily washed out.
At a minimum, the panel should include a tachometer plus oil-pressure and water-temperature warning lights and audible alarms. A proper panel will also include oil-pressure and water-temperature gauges, plus an ammeter to monitor alternator output. A engine hour meter is also handy for determining service intervals.
Engine Controls. Throttle and shift controls can be either of the single-lever or dual-lever type. There seems to be little difference in reliability or ease of use of either system.
In a step backwards, most controls are now made of a diecast zinc alloy, which invariably crumbles away after a few years of use in salt water. The aluminum housings used in some controls fare little better. The best defense is to keep them clean and well lubricated.
The engine controls should be so mounted that the helms-man can reach them without major contortions. This may be a problem in some boats that have optional wheel steering without an optional location for the engine controls.
The Engine Box. Access to the engine is a critical consideration. If you can not get to the engine to tighten belts, change oil and filters, and check the oil level, your engine is going to be neglected. If the engine-box design lets water pour onto the engine when the main hatch is open, your engine will turn into an unsightly pile of rust.
If there is no soundproofing in the engine box, the boat will resonate like a drum. To be reasonably effective, the soundproofing should thoroughly line the engine compartment. The material used should be a fire-resistant foil/foam sandwich.
Forced ventilation of the engine compartment is not required with diesel engines. Nevertheless, it must be possible for adequate fresh air to reach the engine for best performance. A cowl vent with a hose leading near the air intake of the engine is a reasonable ventilation arrangement as long as there is adequate air flow through the vent.
Plumbing and Exhaust Systems. The raw-water intake for engine cooling should be equipped with a seacock. The intake line should be double clamped at both the seacock and the water pump. An in-line strainer – which must be readily accessible for cleaning – is far more efficient than an external strainer on the intake. An external strainer clogs easily with no simple means of cleaning, and creates unnecessary drag.
Exhaust systems are a wonderful bugaboo. Waterlift-type exhausts are infinitely cheaper and easier to install than water-jacketed exhausts. Care is required, however, to be sure that water cannot siphon back into the engine. The waterlift should be close to the engine. The top of the muffler should be well below the level of the manifold. If the cooling water is injected into the exhaust near or below the waterline, the cooling water must be looped well above the waterline and must include a siphon break. The exhaust line itself must loop above the waterline, but not so high as to exceed the lifting capacity of the engine.
Long exhaust runs should be avoided as they can hold large amounts of water. Even if the exhaust discharge is well above the waterline when the boat is at rest, it may be underwater when the boat heels or squats underway. For this reason, a gate valve in the exhaust line is a good feature. It can be placed anywhere in the exhaust line that provides good access, but it requires a conscious act of will to remember to open and shut the valve. Failure to open a closed exhaust valve will result in an expensive lesson.
An exhaust system is a hard component to evaluate intuitively. Its operation is subject to mechanical and fluid laws which may not be immediately obvious. If you have doubts about the exhaust system installation, consult a good mechanic.
Props. If efficiency under power is the only consideration, a fixed-blade prop is the proper answer. Since we are talking about sailboats, however, other considerations come into play; specifically, how does the propeller installation affect the boat’s performance under sail?
Ina traditional long-keel boat with the prop in an aperture in the rudder post, a two-blade fixed prop is a reasonable answer. A three-blade prop is more of a headache, A three-blade prop is impossible to hide behind the boat’s deadwood to reduce drag under sail. A three-blade feathering prop – no production boat we are aware of comes with this as standard – is the only answer to this problem.
If the boat has a two-blade prop in an aperture, is it possible to reach the shaft behind the engine to line up the blades behind the deadwood? For passagemaking or racing, this exercise is well worth the effort. An installation which does not allow you to line up the prop will always be a compromise.
With an exposed shaft, strut, and prop installation, the choices are more complex. Even a two-blade prop mounted in an exposed location adds considerable drag under sail. According to PHRF, a two-blade fixed prop in an exposed installation is six seconds per mile slower than a folding prop in the same installation. If you are cruising, this may not seem like much, but remember that the drag is even greater in light air.
A fixed prop in an exposed location is also much more susceptible to picking up floating objects such as lobster pot lines. A folding prop in this type of installation has the advantage of being less prone to damage from debris as well as reducing drag under sail.
Folding props are not without disadvantages, however. Folding props are frequently recalcitrant when operating in reverse, and they may be less smooth under power, particularly as the pivot pins wear over time. They are also expensive to replace, although normally only the blades should require replacement rather than the entire prop.
A feathering prop may be used in an exposed installation, although it may be more expensive than a folding prop and can still catch lines like a solid prop.
Reducing prop drag may seem like an unnecessary refinement for the cruising boat, but nothing could be further from the truth. The cruising boat will usually carry less canvas than the racer, she will not be driven as hard, and probably will not have as good a bottom. Don’t further handicap the boat with a slow prop installation.
Outboard Auxiliaries. Outboard engines are mediocre auxiliaries at best for a cruising sailboat. They are not fuel efficient, plus they are noisy, awkward to stow, and have the bad habit of failing to start just when you need them.
A motor well may seem like the logical solution to using an outboard. However, an outboard mounted in a well produces a great deal of drag under sail. Not only do you have the drag of the entire lower unit of the engine, you have the considerable drag of the well opening itself. The advantages of the well are that it provides permanent storage for the engine and tanks and shifts the engine far enough forward to keep the prop in the water in most conditions.
A transom-mounted engine bracket has its own set of problems. The engine shaft must be long enough to reach the water even with the boat pitching. How many small outboards have you seen with the prop racing away in the air as someone went on the foredeck to drop a sail or pick up the mooring?
Unless the engine has an integral tank, you have to figure out where the tank will be carried when operating the boat under power. No outboard with an integral tank has enough capacity to be used as a serious cruising auxiliary, and few activities are more dangerous than trying to refill an integral gasoline tank on a hot engine.
Admittedly, the equipping of outboards designed for use as auxiliaries with such features as electric starting and alternators for battery charging has removed some of the onus from the use of outboards. Still, they remain a serious compromise, to be used only in boats that are too small for inboards or which were not designed for the complexity of an inboard installation.
The biggest revolution in auxiliary power for the small cruising sailboat in the last 20 years has been the development of the small diesel engine. Inboard engine installations, however, are relatively complex and expensive, adding greatly to the cost of the small cruising sailboat. Used boat prices for inboard-equipped small cruisers indicate that much of the extra initial cost over an outboard-equipped boat is returned at the time of resale.
Our discussions with boatowners indicate that an amazing percentage of the problems they report with their boats have to do with engine installations. Sometimes it is the engine itself, but just as frequently it is a problem either with the components of the installation or its actual mechanics.
An inboard is not something that can be neglected and then be expected to perform without hesitation at the push of a button. Perhaps more than any other component of the cruising sailboat, the engine needs loving attention, not only at the time of its installation but through its life. That is the way you protect your investment, and that is the way the engine can protect you when you really need it.
The Right Boat: Rigs and Rigging
Most boat buyers consider the Self-Survey Criteria for the Rigboat’s rig sometime after checking out the cabin sole, the toilet-paper holder in the head, and the color of the upholstery in the main cabin. After all, the rig has only to stand up and hold up the sails, which most rigs manage to do with almost monotonous regularity. Fortunately, most production-boat rigs are overbuilt to allow for the vagaries of inexperience, abuse, and neglect.
This conservatism has negative as well as positive aspects, however. In the quest for a strong rig, the designer or builder may specify an excessively heavy spar, reducing the boat’s stability. Or the rig may be too small or too inefficient to move the boat in less than a gale. Or the boat may be afflicted with unacceptable lee helm or weather helm.
There is no substitute for sailing a boat to evaluate the characteristics of the rig. At the same time, a careful visual examination of the components of the rig can serve the valuable function of eliminating boats with grossly inadequate or inappropriate rigs, as well as giving you clues to the general quality of the boat. Close your eyes to the four-burner stove and the teak cabin sole for a while and give some thought to the part of the boat that makes it go when the wind blows.
Which Rig Is Right? The simplicity of the single-spreader, masthead sloop rig makes it the overwhelming choice on production boats under 40 feet. In this size range, the divided rig adds excess windage and cost. The theoretical gains in handling ease from a divided rig are relatively insignificant until the boat exceeds 40 feet. A couple can easily handle a mainsail of 350 square feet and headsails of even greater area.
It is ironic that low, inefficient split rigs are usually seen on «traditional» designs or «serious» cruising boats which frequently have excess wetted surface, inordinately heavy displacement, and poorly faired underwater form – the very characteristics that demand a relatively high performance rig in order to have any performance at all. With modern sailhandling equipment such as self-tailing winches, there is no reason for a cruising boat to be saddled with an inefficient rig for the sake of ease of handling.
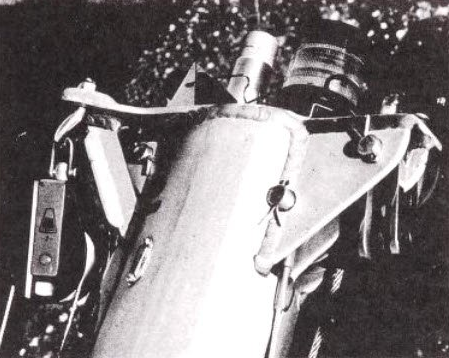
In general, the more performance-oriented the rig, the more suitable the boat is as a cruiser. Obviously, there are limits; it makes no sense to put a bendy, triple-spreader rig in a cruising boat that will have one person on watch. At the other extreme, however, excessively heavy spars, long spreaders, and a wide shroud base can compromise performance so severely that the pleasure of cruising can be greatly diminished.
Freestanding rigs have developed beyond the point of novelty and are constantly being improved. Because the quality and performance of a freestanding rig are tied so closely to the experience of the builder and designer, we would be reluctant to choose a boat with a freestanding rig unless it was built by a company with a lot of experience. Even companies such as Tillotson-Pearson, which has probably built more modern free-standing rigs than anyone else, are constantly gaining experience and modifying their rigs to suit new spar materials and mast designs.
It may be that freestanding rigs are the wave of the future. The road to the future is likely to be paved with failures as well as successes, however. If you want a freestanding rig, stick with a manufacturer with a long track record.

All current boats with freestanding rigs are cat-rigged, as the freestanding spars currently used cannot support headsail loads. No cat-rigged boat will go upwind with an efficient sloop-rigged boat of the same size and type. The cat-rigged boat with freestanding spars is an off-wind boat, although the most efficient cat rigs will certainly go upwind as well as a poor sloop rig on a poorly-designed hull.
The cutter or double-headsail sloop rig offers advantages in larger single-masted vessels. Headsail area is broken into smaller units. Area forward can quickly be reduced by removing the jib topsail and leaving the staysail in place. There is little reason, however, to go to a double headsail rig on a boat much less than 35 feet, as the headsails on the typical boat smaller than that are hardly big enough to cause a handling problem.
Some cruising boats are available with either a cutter rig or a ketch rig. Since the addition of a mizzen will substantially shift the center of effort of the sail plan, you should try if possible to sail the boat with both rigs before making a decision. At least talk with the owners of both rigs to determine whether any balance problems exist with either rig.
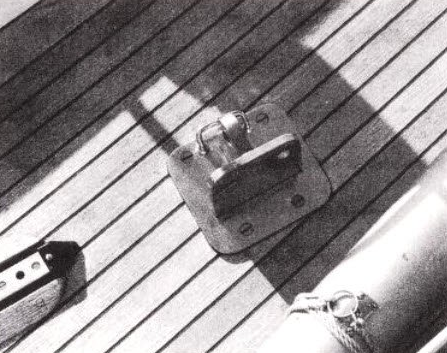
Mast Steps and Chainplates. The strongest mast will not stand up if the mast step and chainplates are not strong enough. The majority of production boats under 35 feet that are available on the US market are equipped with deck-stepped masts.
How the mast is supported is far more important than whether the mast is stepped on deck or stepped through to the keel. The boat with a deck-stepped mast should have a support system that transfers the majority of the rig’s compression load to a wide area of the hull. This usually takes the form of a compression column under the mast. The column should be strongly tied to both hull and deck. If you cannot see how the post is attached, ask for a drawing or a statement from the builder’s engineering department. Unfortunately, compression posts come adrift all too frequently.
Bulkheads can serve to support a deck-stepped mast in small boats, but they, too, must be rigidly tied to the deckhead and the hull. It is rare for a bulkhead to fall at exactly the right place to properly support the mast.
The mast step of a keel-stepped mast must also be properly supported and strongly tied to the hull. The hull must be reinforced in the area of the mast step for proper distribution of load either through increased laminate thickness or a system of floor timbers or both.

The wide beam of most modern boats requires some serious decision-making about the placement of chain plates. In wooden-boat construction, chain plates were either bolted to the outside or the inside of the hull, backed by a frame and some-times by diagonal strapping attached to frames and floors.
Some fiberglass boats have similar installations, with the chain plates bolted to the inside or outside of a hull that has been locally reinforced. Unfortunately, mounting the chain plates at the edge of the deck in the typical be a my modern boat can measurably compromise the boat’s windward ability.
It is therefore often desirable, even on a cruising boat, to move the shrouds inboard from the edge of the deck. The attachment of chain plates can then become a problem. With a boat heeled 35 degrees hard on the wind, shroud loading can approach the displacement of the boat. To withstand this load, the shrouds must be firmly tied to the boat.
The most frequent arrangement with inboard shrouds is to use flat-bar chain plates which pierce the deck and bolt to a major structural member such as the main bulkhead. This bulkhead must be firmly tied to the hull, obviously, but not quite so obviously, it should be firmly tied to the deck. If it is not, the deck is likely to shift as the boat works, and the chainplates are likely to leak. Chainplate leaks are difficult to fix, as they often result from a basic flaw in design that cannot be remedied with a little bedding compound.
Another popular type of chainplate uses a padeye or U-bolt on deck which connects to a tie-rod inside the boat. The tie-rod must then be strongly connected to the boat’s structure. This type of chainplate is generally more leak resistant than the normal flat bar chainplate, but it is more expensive and generally more difficult to install.
Cape Dory, Camper and Nicholson, Hunter, and some other builders use another variation, a U-bolt or padeye which bolts through the hull-to-deck flange, which must be strongly reinforced to take the kind of loads to which it will be exposed. With this type of chainplate, not only should the hull-to-deck flange be extraordinarily strong, but the joint should be reinforced by bulkheads or hanging knees which are thoroughly tied to hull and deck immediately adjacent to the chainplates.
Backstay and forestay chainplates are relatively straightforward. They should be through-bolted and backed with either extra-large washers or a solid metal backing plate. The stem and transom should be strongly reinforced. This is not usually a problem with the stem, where the layup is likely to be quite thick. A large, flat transom, however, may need to be cored with plywood in order to be stiff enough not to distort under load.
Spars. The modern extruded aluminum spar is a wonderful thing; strong, relatively inexpensive, light, and capable of surviving almost complete neglect for long periods of time. It is not, however, immune to neglect and should be cared for as part of the boat’s regular maintenance program.
The typical production boat has a mast which consists of an untapered aluminum tube capped with a welded stainless steel masthead fitting. Tangs are likely to be made of formed stainless steel bolted to the tube. While the untapered mast is cheaper by far, a considerable amount of weight and windage aloft can be saved by tapering the upper part of the mast tube, and by using a welded aluminum masthead fitting instead of a bolt-on stainless steel fitting. While the few pounds of weight saved may seem insignificant, remember that the effect of weight aloft on the boat’s stability is a function of the distance of that weight from the boat’s vertical center of gravity. Five pounds saved 50 feet above the center of gravity has the same effect on stability as adding 50 pounds of lead on the bottom of the keel if the keel is five feet below the vertical center of gravity.
While this may seem unimportant on the cruising boat, remember that most cruising boats have relatively low ballast to displacement ratios in the first place. Weight saved aloft makes a boat stiffer, and a stiffer boat can carry more sail. Not only does this mean a faster boat, it means a boat that goes longer before reefing or making a headsail change – important considerations for shorthanded cruising. Of course, saving weight in the mast tube may be even more important if you plan to cover the masthead with:
- antennas;
- strobes;
- radar reflectors, and the like.
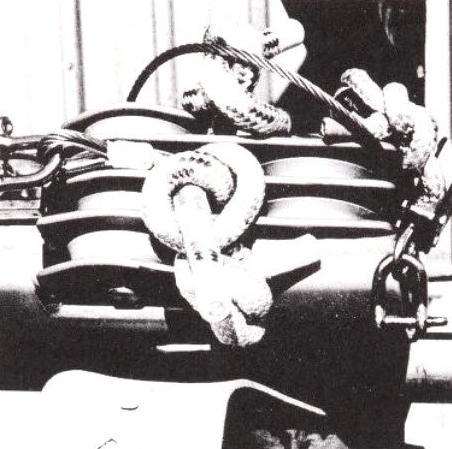
Windage aloft can further be reduced by the use of airfoil section spreaders instead of aluminum pipe spreaders or wooden spreaders. Internal halyards are just about essential on racing boats. For a cruising boat, the savings in windage are offset by the difficulty in reeving new halyards should one of the internal halyards break. If internal halyards are used on a cruising boat, some form of external halyard is necessary as a backup. A topping lift can usually serve as an emergency main halyard; spare spinnaker halyard can serve as a jib halyard.
The exit boxes for internal halyards must be staggered both vertically and horizontally to prevent weakening of the mast. Even in a mast with properly staggered exit boxes, the mast tube usually folds up at an exit box if it goes over the side. There should also be fairleads from the exit boxes to the halyard winches or turning blocks.
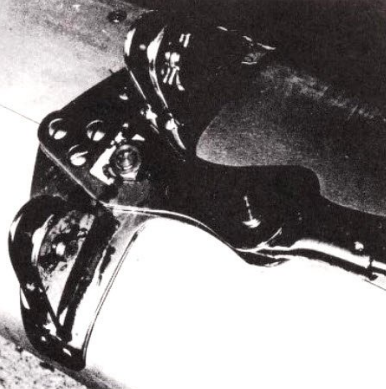
While internal running rigging may be a mixed blessing on a mast, it is a definite plus on a boom. The outside of the boom should be as uncluttered as possible; internal reefing, internal outhaul, and internal topping lift are highly desirable. The boom is perhaps the most dangerous piece of gear on any boat. If it hits you in the head when tacking or jibbing, you may be knocked overboard, in which case the question of whether the blow kills you or merely stuns you so that you drown is academic. Nevertheless, a boom covered with cheek blocks, cleats, and winches is likely to do more damage even in the event of a glancing blow. Keep the boom as clean as possible.
A main sheet traveler is highly desirable whether a boat is used for racing or cruising. Be sure that its mounting does not preclude the use of a companionway dodger if the boat is to be used for cruising offshore.
Note that no mention has been made of wooden spars. The reason is simple. Unless the boat is truly traditional – an older boat or a modern boat of traditional design – there is absolutely no reason to have wooden spars. They require more maintenance, they are likely to be heavier, and they are likely to be generally inferior in quality to the typical aluminum spar. Wooden spars on new boats are usually seen on character boats imported from the Far East. Asa rule, the masts in these boats are unnecessarily heavy in both section and wall thickness, while the booms are often light and flexible.
The wooden spars turned out by the best European and American yards before the advent of aluminum were things of beauty; tapered, streamlined, and no heavier than necessary. The typical modern wooden spar on a production boat is more likely to be a caricature of the sparmaker’s art. If you want a spar that looks different from the typical uninspiring grey aluminum spar, paint it with buff-colored polyurethane paint. From a hundred feet away, few people will know the difference. (Just don’t let the halyards bang on it at the dock or on the mooring. That, they will notice.)
Shrouds and Stays, Turnbuckles and Toggles. Wire rope is one of the most reliable structural materials in existence. Weakness in standing rigging usually is the result of improperly applied end fittings or poor leads rather than defective material.
It is rare to see a production boat with under size rigging. Most builders err in the opposite direction. As long as tangs, toggles, turnbuckles, and chain plates are heavy enough to accept the larger pin diameters of slightly oversize rigging, there is no particular disadvantage to an extra margin of safety. Oversize rigging in it self is useless unless it is combined with other over-strength components in the rigging system. It makes no sense to put a 5/8-inch clevis pin through a 1/8-inch-thick chain plate.
Poor terminal swaging and improper shroud leads are probably the greatest cause of rigging failures. Most swaging in production boat building shops is done with manual equipment in cable sizes up to 5/16 inch. While it is possible to do a good job with this type of equipment, it is also easy to do a poor job.
Swaged terminal bodies should be perfectly straight. A fitting that has even a slight banana-shaped curve to it should be discarded. Likewise, if the swaged fitting is compressed to an oval shape where the cable exits the body, or if there are pronounced ridges along the body, the fitting is suspect. A rotary-swaged fitting should have no ridges and should be perfectly round in cross section. A rotary-swaged fitting is not necessarily stronger than one done with a revolving die, but the extra peace of mind makes it worthwhile.
Any crack in a swaged fitting is totally unacceptable. Surprisingly, a fair amount of new rigging may have cracks in the fittings. You should carefully examine every swaged fitting ona new boat for these cracks, which may be minuscule. Cracks are a sign of overswaging: running the fitting through the dies more than once, fatiguing the metal of the fitting.
It is important that all clevis pins match the size of turnbuckles, tangs, toggles, and rigging. If the pins are not all interchangeable, some part of the rig is not properly sized. This does not mean that every piece of standing rigging should be the same size. They may be the same size, but headstay, backstay, and lower shrouds may also be heavier than intermediate or upper shrouds to reflect the greater loads carried.
There should be a toggle at the lower end of every piece of standing rigging. This may be integral with the turnbuckle or it may be a separate component. In addition, it is a good idea to have a toggle at the upper end of the headstay to allow for the substantial amount of side loading applied to that piece of wire.
Turnbuckles should be of the open-body type, so that the amount of travel left on the adjusting screws can be examined. The turnbuckles should be drilled for cotter pins rather than fitted with lock nuts.
Although the rig is usually the last thing you look at when buying a boat, you can’t really afford to ignore it. Fortunately, most defective rigging components can be replaced if necessary.
While there is not much you can do about a poorly designed hull-to-deck joint or an inadequate hull layup, it would be possible to upgrade a rig if that were the only thing wrong with the boat.
As long as the chainplates and mast step are adequate, you can change almost anything else. This can be an expensive proposition, however, and should only be considered in extreme cases. Asa rule, a boat with a poorly designed rig is likely to have other problems as well. The best rig in the world will not turn an overweight slug into an upwind machine. A good rig can, however, improve performance, give you peace of mind, and turn a good boat into a great sailer.