Proper performance of boat trailers is essential to safely and efficiently transporting boats. The performance of these trailers plays a critical role in load-bearing capacity and smooth towing. One of the most important factors is the trailer’s load capacity. It is essential that the trailer’s maximum load capacity matches or exceeds the weight of the boat, including any gear and accessories. This ensures that the trailer can support the boat without the risk of structural failure.
The construction material of the trailer also significantly impacts its performance. Steel and aluminum are the most commonly used materials. Steel trailers are known for their strength and durability, but they can be prone to rust and corrosion, especially in saltwater environments. Aluminum trailers, on the other hand, are lightweight and resistant to corrosion, making them a popular choice for boaters who frequently use their trailers in marine settings.
The design and engineering of the trailer are other critical performance aspects. Features such as the frame design, axle configuration, and suspension system all contribute to the trailer’s stability and ease of towing. A well-designed frame provides structural integrity, while a properly configured axle and suspension system ensure a smooth ride, reducing the wear and tear on both the trailer and the boat.
Trailers
Boat trailers come in a few different types, with plenty of minor variations. These are the four basic models:
- Skid-type trailers.
- Roller-supporting trailers.
- Float-on trailers.
- Screw-pad trailers
What type of trailer is the most common?
The most common type of trailer is skid. These have long, carpet-covered «bunks» running the length of the trailer that support the bottom of the boat. This is the type of trailer you’ll find under most 15-foot motorboats. They’re designed for boats with a relatively flat bottom; the boat slides along the skids until it’s in place.
The second type of trailer has supporting rollers instead of carpet-covered bunks. The rollers make it easier to position the boat while launching or retrieving. A variation is the tilt trailer, which has a hinge mechanism somewhere along the trailer tongue. In some cases the tilting mechanism does make things go more smoothly, but this depends on the boat. Many owners of tilt trailers report that while the tilting mechanism itself doesn’t help much, the rollers have less friction than carpetcovered bunks and thus make launching and retrieval easier. However, the boat can also shift during transport. Extra support straps, tie-downs, and safety chains are important with this type of trailer.
The third type of trailer is similar to the skid type, with long, carpet-covered bunks, but is designed to be completely immersed in the water while the boat is floated on or off the trailer. You’ll find float-on trailers under larger boats (about 20 feet or more) or sailboats with curvy displacement hulls.
A fourth type of trailer specifically used with sailboats is the screw-pad design. The hull is supported not by long bunks but by individual pads adjusted by screws. Depending on the Types of Sailboats and Their Managementtype of boat and depth of the keel, these trailers can be used at the ramp as a float-on trailer, but some require a crane to lift the boat on and off the trailer.
Matching Vehicle to Trailer and Boat
An important part of the trailerable sailboat package is the vehicle used to pull the boat. Lots of cars and trucks can pull at least some kind of sailboat safely, but don’t make the mistake I did of assuming that vehicle size or number of cylinders equals towing ability. (For an interesting comparison of towing capacity and gas mileage, see the section «Tow Ratings versus Gas Mileage» below.)
Lots of variables affect a car’s towing ability, like engine size, transmission type, vehicle weight, and so on. In general, bigger, heavier cars make better tow vehicles, but it takes more gas to move them around. You’ll want an automatic transmission, and you’ll want the factory-installed towing package, which usually consists of a transmission fluid cooler and maybe a larger engine oil reservoir. (A manual transmission can work – it’s what I have in my Frontier – but pulling a boat up a steep ramp with a manual transmission can be a real clutch-burner.)
The fluid cooler and oil reservoir help keep the engine and transmission from overheating under the extra load of pulling a boat, and they can save you the cost of replacing your transmission. Many auto manufacturers do not recommend towing anything without their factory-installed towing package. If you don’t have it installed and then damage your engine or transmission, you’ll probably find the damage is not covered under warranty or insurance. Often a tow vehicle will require heavier brakes or a heavier suspension to properly handle the additional load of a trailer. Follow the factory recommendations for your particular car or truck.
If you’ve never done a lot of towing, hauling a sailboat can be a bit daunting. In fact, I can never really relax when I’m towing my boat – it always makes me a little nervous, as I’m constantly on the lookout for what might happen. While this attitude might be unnecessary, I have been lucky enough not to have experienced any accidents when towing my boat (knock on lots of wood), and I like to think this is partly the result of diligence and conservative driving practices. Of course, part of the equation is just plain luck, but by being careful, you can stack the cards in your favor. I have heard that the top four causes of trailering accidents are driver error, failure to match speed with weather and road conditions, trailer sway caused by incorrect loading, and failure to perform routine maintenance. An accident can happen to anyone at anytime, but being careful rarely makes them worse.
Tow Ratings Versus Gas Mileage. An interesting comparison that is not readily available is towing capacity versus fuel economy. As a vehicle’s ability to pull a heavy load goes up, the mileage naturally goes down, but it’s important to note that we pull a boat for a very small percentage of the time we use a car or truck. Still, there are some big diffs in the fuel economy of various cars and trucks. Here is a look at a few selected models.
| Brand | Model | Towing Range | EPA Mileage (HWY/CTY) |
| 3 500-pound towing range | |||
| Volvo S60 | 5-cyl sedan | 3 300 | 20/27 |
| Saab 9-5 | 4-cyl sedan | 3 500 | 19/28 |
| Nissan Quest | 6-cyl minivan | 3 500 | 19/26 |
| Toyota Sienna | 6-cyl minivan | 3 500 | 19/26 |
| Chevrolet Equinox | 6-cyl SUV | 3 500 | 19/25 |
| Saturn Vue | 6-cyl SUV | 3 500 | 19/25 |
| Dodge Caravan/GC | 4/6-cyl minivan | 3 800 | 18/25 |
| Audi A8 | 8-cyl sedan | 3 500 | 18/24 |
| Chevrolet Uplander | 6-cyl SUV | 3 500 | 18/24 |
| Lexus RX330 | 6-cyl SUV | 3 500 | 18/24 |
| Mercury Mariner | 4/6-cyl SUV | 3 500 | 18/23 |
| Ford Escape | 6-cyl SUV | 3 500 | 18/22 |
| Mazda Tribute | 6-cyl SUV | 3 500 | 18/22 |
| Accura MDX | 6-cyl SUV | 3 500 | 17/23 |
| Honda Pilot | 6-cyl SUV | 3 500 | 17/22 |
| Infiniti FX | 6/8-cyl SUV | 3 500 | 16/22 |
| Kia Sedona | 6-cyl minivan | 3 500 | 16/22 |
| Ford Explorer | 6/8-cyl SUV | 3 500 | 14/20 |
| 5 000-pound towing range | |||
| BMW X5 | 8-cyl SUV | 5 000 | 16/21 |
| Honda Ridgeline | 6-cyl pickup | 5 000 | 16/21 |
| Isuzu Ascender | 6/8-cyl SUV | 5 500 | 16/21 |
| Nissan Xterra | 6-cyl SUV | 5 000 | 16/21 |
| Chevrolet Trailblazer | 6/8-cyl SUV | 5 300 | 15/21 |
| Volvo XC90 | 5/6/8-cyl SUV | 5 000 | 15/20 |
| Mercedes-Benz M-Class | 6/8-cyl SUV | 5 000 | 15/18 |
| 7 500-pound-plus towing range | |||
| Volkswagen Touareg | 6/8-cyl SUV | 7 700 | 16/21 |
| Chev Silverado/GMC Sierra | 6/8-cyl pickup | 7 500 | 15/18 |
| Chevrolet Avalanche | 8-cyl pickup | 8 100 | 14/18 |
| Chev Suburban/GMC Yukon XL | 8-cyl SUV | 8 500 | 14/18 |
| Ford F150 | 6/8-cyl pickup | 8 200 | 14/18 |
| Land Rover LR3 | 8-cyl SUV | 7 700 | 14/18 |
| Nissan Titan | 8-cyl pickup | 9 400 | 14/18 |
| Dodge Durango | 6/8-cyl SUV | 8 700 | 13/18 |
| Infiniti QX56 | 8-cyl SUV | 8 900 | 13/18 |
| Nissan Armada | 8-cyl SUV | 9 100 | 13/18 |
| Cadallac Escalade | 8-cyl SUV | 7 800 | 13/17 |
| Ford Expedition | 8-cyl SUV | 8 700 | 13/17 |
| Lincoln Navigator | 8-cyl SUV | 8 700 | 11/16 |
| Note. Actual results will vary; data is for comparison purposes only | |||
Parts of Your Trailer
You’ve figured out what sort of trailer is appropriate for your vehicle, so you’re ready to go, right? Not quite – your trailer is a system with several components, and a number of variables should be considered in order to tow your investment safely.
Trailer Hitches. Before you hook up your trailer, there are a few things you need to take care of beyond having the factory towing package installed on your car or truck. The first priority is having a hitch installed if it isn’t included in the factory towing package.
There are several hitch systems available these days, but in order to select the right one, you need to know the total weight of the load you’re going to pull. The weight of the boat, trailer, fuel and water, and all your personal gear makes up the gross trailer weight, and this number is used to select the hitch system for your car. The weight of your gear adds up quickly. For instance, I installed a big, brand-new, deep-cycle battery so I have an extra reserve of electrical power aboard my boat. It weighs close to 70 pounds, and the weight of the batteries isn’t usually included in the boat manufacturer’s displacement figure. Electrical systems are often optional (even though the Coast Guard may require navigation lights on board see section «Equipment of a Sailboat: What You Need to Have on Board While SailingUSCG-Required Equipment»). Hitch systems are divided into specific classes:
- Class 1 – Maximum capacity 2 000 pounds gross trailer weight and 200 pounds tongue weight.
- Class 2 – Maximum capacity 3 500 pounds gross trailer weight and 300-350 pounds tongue weight.
- Class 3 – Maximum capacity 5 000 pounds gross trailer weight and 500 pounds tongue weight. Sometimes used to refer to a hitch with any 2-inch receiver, regardless of rating.
- Class 4 – Maximum capacity 10 000 pounds gross trailer weight and 1 000-1 200 pounds tongue weight. Often any hitch with a capacity greater than 5 000 pounds gross weight is referred to as a Class 4.
Each of the hitch systems in these classes is made up of several parts. The receiver is a specially fitted part that bolts directly to the frame of the tow vehicle. The drawbar slides into the receiver and is where the hitch ball is mounted. Some trucks, like my Frontier, have a tow bumper, which is designed to have a hitch ball mounted directly to the bumper. These are usually for fairly small loads – mine is rated up to 2 000 pounds. This was too small for my MacGregor, which displaces 1 950 pounds for the boat alone, not including the weight of the trailer or gear. My Monty comes a little closer, as it displaces only 1 600 pounds, but with the trailer weight and gear probably exceeds the capacity of my bumper hitch, so I have a receiver mounted to my truck as well. The coupler is a part of the trailer that fits and locks over the hitch ball.
It goes without saying that all these parts must be matched. You should never try to put a Class 2 drawbar into a Class 4 receiver and expect to pull a 6 000-pound boat. While matching a drawbar and receiver is fairly straightforward, properly fitting the hitch ball and coupler is harder. It’s imperative that the hitch ball and coupler match.
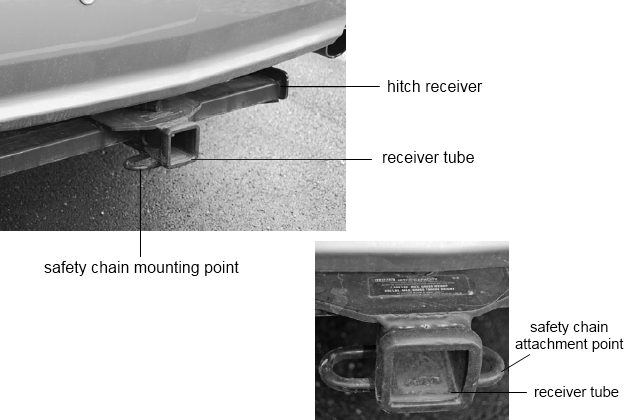
It’s also crucial that your safety chains be in good condition. They should never drag on the ground, which will quickly grind the links away, nor should they be so tight that they bind when turning. They should be securely attached to the frame of the car, and they should cross under the tongue in order to catch it if it should separate from the tow vehicle. This is required by law in some states. Safety chains commonly come with specialized S-hooks to attach the chains to the vehicle frame, but I prefer to use quick links, which are threaded to close. Quick links are weaker than S-hooks, so you should use a larger size. The big advantage to quick links is that the safety chain length can be more easily adjusted than with S-hooks. If you have S-hooks on your trailer, know that there is a correct way to connect the safety chains to your car frame – the opening of the S-hook should face forward. A quick wrap with duct tape or wire can secure S-hooks so they can’t bounce off the car frame.
There are other types of specialized hitch systems for high loads, like load-equalizer hitches, which use spring bars to distribute the weight of the trailer tongue over all of the tow vehicle’s wheels. This sort of system can increase the load capacity of the tow vehicle and offers improved braking and sway control, though it’s more complex and expensive than a regular receiver. Note that some of these systems are incompatible with each other – a loadequalizer hitch can interfere with surge brake operation, for example. Check with your equipment manufacturer before towing.
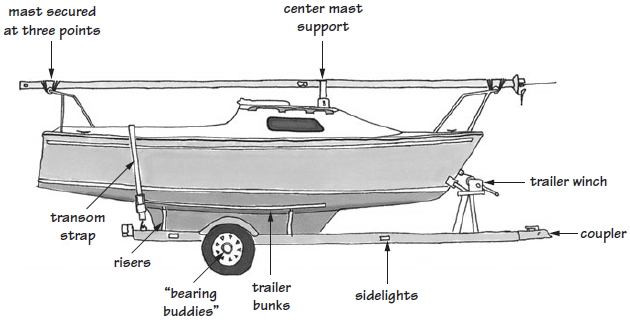
I’m a firm believer in redundant safety systems for trailers. (See section «Making Your Trailer Safer» below.) Take transom straps, for example. These are wide straps that go across the back of the boat near the transom and keep the back end of the boat from shifting as she bounces down the highway. Transom straps are especially important if your trailer is equipped with roller bunks; with no transom strap, if the tiny trailer winch pawl fails, you may launch your boat right in the middle of the interstate. Neither of my Buying Trailerable Sailboats: Condition Assessment and Riskstrailerable sailboats had transom straps when I bought them, and it appears that the trailers never had them from day one – I’ve had to add the straps and weld on the attachment points to both of my trailers. Now, it may be argued that you don’t really need transom straps, as both boats went for nearly thirty years without them. But why take the chance? They’re cheap and take but a moment to set up. Accidents do happen, but I like to think I’ve done everything possible to prevent them.
Making Your Trailer Safer. There are several simple things you can do to make your trailer safer. First, if you don’t have a transom strap, add one. These can be bought at most hardware stores as «ratcheting tie-down straps» for about twelve bucks. They are prone to rusting, so give them a squirt of WD-40 every now and again. The tie-down points need to be strongly welded to the frame, but this is a quick job for a welding shop. (Welding eyes to the trailer frame is far better than drilling a hole and bolting something in, which can weaken the frame.) If you do all the preparation, such as sanding away the paint in the area of the weld and bending a 3/8-inch piece of round stock into a U-shape, the cost for the welding should be minimal.
These small U-shaped bits of steel can be useful in other areas as well. Welded to the upright, near the winch, they make the perfect anchor for a safety cable for the bow eye. Should the pawl in the trailer winch fail, the safety cable keeps the boat and the trailer together.
Second, upgrade your safety chains; it’s easy. You’ll often see trailers with safety chains that are either undersized or so long they drag on the pavement. If a safety chain is too long and a loop is allowed to drag, is will quickly get ground away. The strength of a dragged chain will be a fraction of what it should be – the safety chains on my MacGregor were little more than wire slivers in some places.
You’ll need a bolt cutter to cut off the old chain. New chains can be installed using threaded links. I like to use threaded links at both ends of the chain rather than the standard S-hooks, which can theoretically be rattled off. These are weaker than S-hooks, so you should use the largest size that will fit your chain. The threads should be lubricated with grease or they’ll quickly seize up tight from corrosion.
Read also: How to Load Boat on Trailer and How to Unload It?
Third, always carry a spare tire for your trailer. Even a used tire, if it holds air, is better than nothing and might get you to a service station. Most trailer suppliers sell large U-bolts that you can use to mount a spare to your trailer.
Finally, it isn’t a bad idea to put together a dedicated tool kit for your trailer. Things to include might be a properly sized lug wrench, a can of spray lubricant, a pair of spare bearing sets, extra chain and links, extra bulbs, and maybe a can of touch-up paint. I once thought it would be clever to mount a tool box to the trailer, but then remembered my trailer would be mostly underwater during launching and haulout, so I decided it’s better to keep these tools in the trunk of my car.
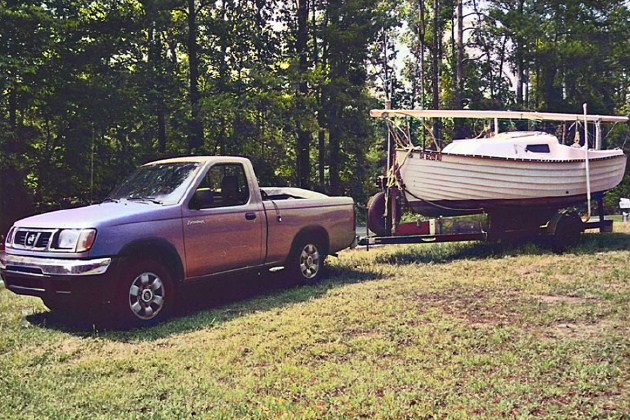
My Montgomery 17 on the day I purchased it. This trailer is a small float-on type, with PVC guide poles along the sides to help position the boat correctly when retrieving. Note that there’s no transom strap in place, so I tied on a length of stout line for the trip and added attachment points later.
Trailer Winches. Trailer winches come in two basic types – manual and electric. Unless your trailer has rollers, the winch won’t be used to drag the boat up onto the trailer; rather, it will guide the boat into the proper position. Most trailerable sailboats are too big and bulky to respond to brute force, so electric winches aren’t often seen on sailboat trailers. Trailer winches are simple affairs, consisting of a gear-operated drum with a pawl to prevent the drum from unwinding. Two-speed trailer winches are available, and these can be handy. The winch should be solidly mounted on a strong pillar, and should use either a heavy belt or galvanized steel cable. An extra safety chain for the bow eye is a good idea, since winch pawls aren’t tremendously strong – even tying the bow eye off with a short length of stout line would help.
Maintaining the trailer winch is a simple matter of keeping it clean and lubricated. If it looks suspect, don’t trust it; replace it with a new one.
Trailer Lights and Wiring. Federal regulations require that all trailers be equipped with:
- tail lights;
- brake lights;
- side marker lights;
- turn signals;
- and side and rear reflectors.
Since your trailer is regularly dunked in water, its wiring is particularly vulnerable, and failures are common. One recent development is LED lights for trailers, which, since they are sealed systems, are less susceptible to water-induced failures. You can extend the reliability of more common incandescent systems by giving all electrical contacts a:
- dab of dielectric grease;
- a squirt of silicone lubricant;
- WD-40;
- or wire dryer,
available at most auto parts stores.
Mounting trailer lights on a removable board that can be securely mounted to the boat’s transom is a good idea for two reasons – it elevates the lights to other drivers’ eye level, and it keeps the lights out of the water when launching. Even trailer lights that are supposedly waterproof will fail if repeatedly dunked in water.
A frequent point of failure with trailer systems is the ground wire. It’s common practice to ground the trailer wiring to the frame, and trailer electrical problems can often be traced to bad grounds. When you rewire a trailer – a pretty easy job, and new trailer tail lights usually include new wiring as well – consider taking the extra step of adding a dedicated ground wire for each of the lights. I use a green THWN stranded wire (not solid), available at hardware stores. Then solder all electrical connections, dab them with a little polyurethane caulk, and cover them with heat-shrink tubing. Secure all of the wiring to the frame every 18 inches, just as you should with the wiring on the boat. Never use wire nuts on trailer wires, even if they are supplied with new lights – save them for your house. I don’t like using electrical tape, either.
Although it can be unwrapped for inspection, the glue gets all over the wires in short order, leaving a sticky mess. Heat-shrink tubing is cleaner, stronger, and more permanent.
The trailer wiring connector takes a lot of abuse because it’s usually located under the car, where it’s commonly splashed with dirt, rocks, and road mud. Don’t let it drag along the road, as I did once, or the road will grind most of it away after a few miles. This is a good place for some dielectric grease – keeping both connectors lubricated will protect them from corrosion and extend the life of the sometimes-submerged connector.
What’s Dielectric Grease? Dielectric grease is useful in a lot of applications, but just what is the stuff, anyway? It turns out there’s nothing special about dielectric grease. It isn’t conductive, as you might assume – in fact, «dielectric» means a nonconductor of electricity. Its job is mainly to seal electrical contacts from oxygen, which prevents corrosion. It lubricates as well. Commercial dielectric grease compounds are usually silicone based. Just about any grease can work in a pinch, like wheel bearing grease or petroleum jelly, but petroleum jelly doesn’t hold up when it gets hot, and wheel bearing grease is a little messier.
Now, in my area of the country at least, dielectric grease isn’t that easy to find, and it seems that word dielectric on the packaging is worth several dollars. A cheaper alternative is faucet and valve grease, available in the plumbing department. This often silicone-based grease is waterproof, withstands higher temperatures, and is a whole lot cheaper. I paid $1,29 for a 1-ounce tube, whereas dielectric grease was $8 at an auto parts store.
Whichever you use, this type of grease is good to have in your toolbox, and regular use on electrical contacts can prevent all sorts of problems.
Trailer Tires and Bearings. Take a close look at your trailer’s tires. If they look old or cracked or are bulging in strange places, you may want to replace them before you go flying down the highway. It would be a good thing to have a spare already mounted on a rim, but this isn’t always possible. You should be aware that trailer tires are different from regular automobile tires. Car tires are designed for maximum traction, and they accomplish this with flexible sidewalls. On a trailer, however, flexible sidewall tires tend to sway, which is just what we don’t want. Instead, trailer tires are made with thicker, stiffer sidewalls to resist sway. They are also designed for higher pressure to increase the load-carrying capacity.
Trailer tires aren’t available at every smalltown service station, and it seems that tire dealers are always out of the one size or type of tire you need when you have a blowout. «Oh, we can order a tire for you, we’ll have it in next week» might mean the end of your cruise that could be salvaged if you bring a spare. Your trailer may have an unusual rim size or smaller lug nuts. Check these details before you tow Technical Recommendations for Inspecting Your Boatyour boat anywhere, especially if you have a long road trip to your sailing destination.
You’ll have to rely on the seller to tell you when the bearings were last serviced. A new bearing set isn’t too expensive, usually $12 to $25 per hub. If you want a trailer shop to do the work, however, plan on spending a good bit more. It’s worth learning how to replace trailer bearings. Your first bearing job might take an hour or two, but you’ll learn how to shave that time down with a little practice. Bearing failures caused by neglect are far too common, and the effects resulting from a failed bearing can include a tire parting company with the axle at interstate speeds, which is not something you want to see in your rearview mirror.
So, check your bearings carefully. In fact, you should double- and triple-check them, because you don’t want them to fail. Each time you set out with your trailer, drive a half mile or so and then pull over, get out of the car, and feel the bearings with your hand. Warm is Ok, but hot is not good. If they are hot, you need to either do a roadside bearing replacement or call for help. This repair is doable if you have the tools and parts with you, but first move your boat – very slowly – to someplace safe (not the side of the highway unless your bearings have already burned out and your wheel is falling off).
There are different kinds of bearing caps. First is a plain steel bearing cap, indicating a standard bearing set that needs to be disassembled for lubrication. Second is a diaphragm cap. This cap is a little larger and has a grease fitting in the middle. The idea is to fill the spring-loaded cap with grease, which keeps the grease in the bearing under a little bit of pressure. This pressure prevents water from entering the bearing when the trailer is immersed. A common brand is Bearing Buddy, but generic brands are also available. These work fairly well and do a good job of keeping the bearings lubricated, but reliance on them usually means bearings get less attention. Wheel bearings with either system should be taken apart, cleaned, and visually inspected at least once a year.
A third type of bearing cap – a bearing system, actually – looks like an ordinary cap, but when it’s removed, you’ll find a grease fitting under the cap, in the center of the axle. This is a spindle-lube system, and it’s far superior to the first two. The axle has been drilled with small holes down the center and out to the back side of the inner bearing. When you pump grease into the grease fitting (you’ll need a grease gun, of course), old grease gets forced out under pressure and new grease gets forced in, starting with the back bearing and working its way to the front. This kind of axle is available as a retrofit upgrade for many sailboat trailers, and will cost you around $150.
Yet another type of bearing system has become available for recreational trailers – the oil bath bearing. These use a liquid oil rather than grease for lubrication. The advantage is that the oil flows through and around the bearing surfaces, increasing lubrication and dissipating heat. The disadvantage is that they need careful installation and regular care to maintain the seals. If the seals fail and the oil flows out – well, imagine smoke, flames, and/or wheels flying off at highway speeds.
Brakes. Many states require a separate braking system for trailers with a loaded weight over 1 500 pounds. These are either electrically controlled brakes, which can be automatically or manually activated, or surge brakes, which are activated by a master cylinder at the coupler.
Electrical systems are vulnerable to water intrusion, so hydraulic surge brakes are more popular. The hydraulic system of the tow vehicle should never be directly connected to the hydraulic system on the trailer – they should always be independent. Trailer brakes often suffer from corrosion, since they get hot in use and are then dipped in water when the boat is launched. Trailer brakes are usually best installed and maintained with the help of a professional mechanic, though he or she can certainly give you advice about maintaining them.
It will be interesting: Popular Types of Yacht
One thing your mechanic will tell you is to wait a few minutes at the ramp before you launch your boat so the brakes can cool off. Some trailers include flush kits that allow you to rinse the brake assemblies with fresh water. If your trailer has one, use it regularly. Otherwise, rinse the wheels and brakes with fresh water using a garden hose, especially after every launching in salt water. But be advised – wet brakes don’t stop very well and should be allowed to dry out before you hit the highway.
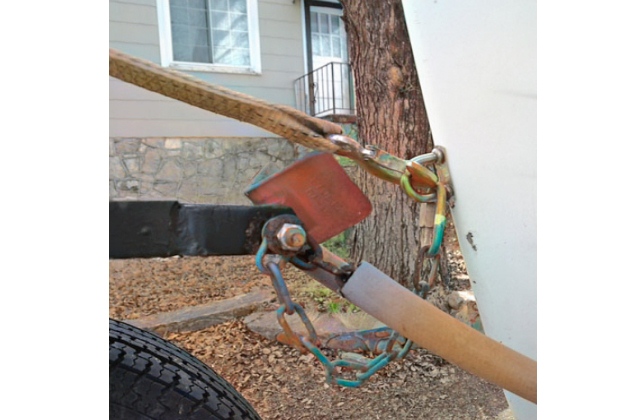
Optional Equipment. Some optional equipment for sailboat trailers is extremely useful. One item is a coupling extension. This can be built into the trailer, using a sliding tube, or may be a separate assembly that connects to the trailer’s coupling. There’s also a bolt-on hitch extension that will fit a standard trailer. Either way, the result is the same – the trailer will be farther away from the launch vehicle. With some deep-draft boats and shallow ramps, it’s the only way to get a boat off the trailer.
Another handy add-on is a keel guide. These are often nothing more than extra carpetcovered boards that channel the keel into position on the center of the trailer. Some owners say that keel guides are essential features and they wouldn’t have a trailer without them.
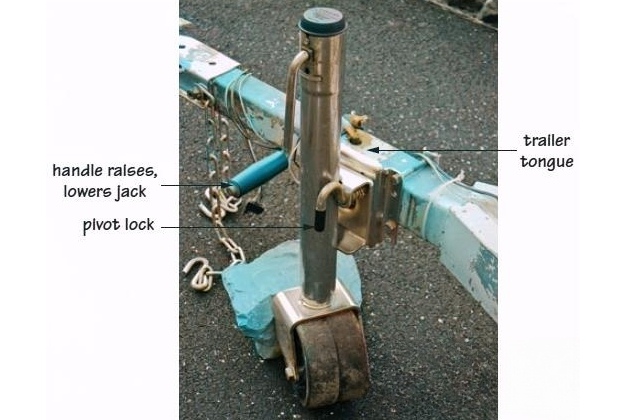
A good trailer will come with a trailer tongue jack. This can be used to raise or lower the trailer tongue, and is essential for hitching or unhitching the trailer by yourself. If the boat is loaded with the proper tongue weight, it’s the only way to safely raise the tongue. Some jacks have wheels, and they may be fixed or pivoting. The pivoting types are handy, as they won’t decouple the trailer if they hit a rise in the ramp, but the fixed types are generally stronger.
Side-view mirrors are a handy safety feature that is often overlooked. A sailboat on a trailer is so wide and high that it’s pretty much impossible to see what’s behind you using the factory mirrors on your car. Some side-view types clip onto your existing side-view mirrors and cost less than $20. You can see a great deal better with extended-view mirrors, and they may be required by some states.
Trailer Tongue Weight and Controlling Sway
One of the most basic trailering problems is insufficient trailer tongue weight. Measured at the coupler, the trailer tongue should weigh about 10 percent of the total trailer weight. When I bought my MacGregor, the seller proudly told me how the boat and trailer were balanced so that you could easily lift the tongue with one hand. I didn’t realize then that this was an extremely dangerous, underloaded condition. I’m sure glad he was the one doing the towing! Lack of tongue weight causes a significant increase in sway, which is a rhythmic side-to-side motion of the trailer behind the tow vehicle. It also increases the chance that the trailer will bounce off the hitch ball. One easy way to increase tongue weight is to remove the motor from the stern bracket and stow it inside the boat, as far forward as possible. (Warning: Drain all gas from the motor’s fuel lines and carburetor first.)
The Boat Outboard Motorsmotor mount and transom aren’t designed for trailering with the motor attached, and you can easily damage both. You’ll also make your expensive motor less accessible to rest-stop thieves, but be sure to wedge the motor in securely. You don’t want the heavy motor to shift while driving. A better solution is to build a simple motor mount on the trailer’s winch post, and to secure it with a lock.
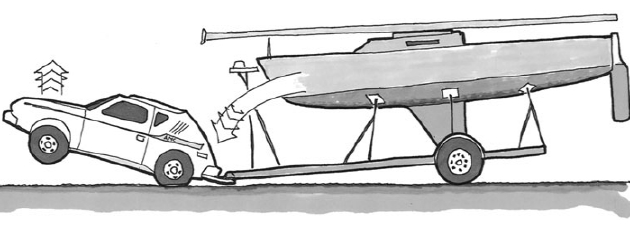
Having said this, it’s important to note that increasing tongue weight isn’t a cure-all. Too much tongue weight can lead to a dangerous condition called trailer dive. During a panic stop, inertia causes the trailer to press down heavily on the hitch. Heavy downward pressure at the rear of the vehicle causes the towing vehicle’s front wheels to lift, and if the weight is sufficient, you lose much of your braking power as well as your steering – hardly what you want in a panic stop. Heavy loads that are carried high – for instance, a fixed-keel sailboat – increase trailer dive. The only remedy is a lighter load or a weightdistributing hitch.
Controlling trailer sway is extremely important. A trailer that sways back and forth is very dangerous, the third most common cause of trailering accidents. If your trailer sways, reduce the speed gradually. Don’t slam on the brakes. Avoid sudden steering changes – you can’t steer out of a sway situation. Incorrect weight distribution is a primary cause of sway, though there are other causes, like incorrect tires or tire pressures. Your tongue weight should be 10 to 15 percent of the total gross trailer weight; with nearly all trailerable sailboats, that means it’s too heavy to pick up the tongue and move the boat around by hand. If this is the way you normally move your boat around the driveway, then either you’re an incredibly strong person with back problems in your future, or your trailer is incorrectly loaded. Seek advice from a trailer repair shop.
They should have scales to determine the exact weight of your trailer and what your tongue weight should be, and they can be an invaluable source of advice. Some axles can be adjusted slightly, and the shop folks will know the correct procedure. They’ll also tell you if critical parts look weak and need to be replaced. Even brandnew trailers need adjusting sometimes, and you can benefit by having a shop look over your rig.
A Simple Forward Motor Mount. An easy trailer modification is to add a forward motor mount.
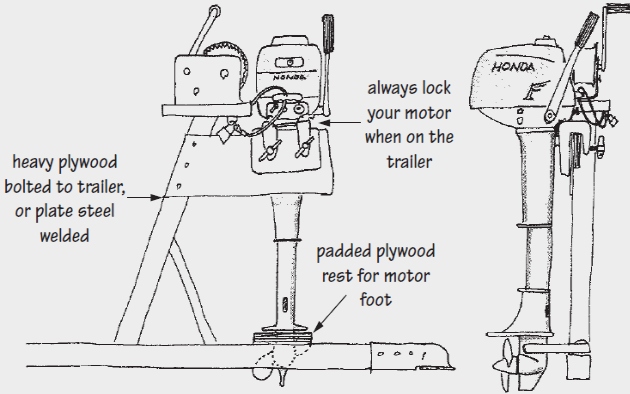
This is nothing more than a sizable piece of angle steel (an L-shaped steel commonly sold by steel suppliers; it comes in 20-foot lengths but can be cut by the supplier for a small fee) bolted or welded to the trailer’s winch post with some plywood clamping pads. You might want to include a chain or cable to lock your motor while trailering.
I wouldn’t store the motor here permanently, however. Move it to the garage or basement once you get home from your cruise.

- Everett Collier, The Boatowner’s Guide to Corrosion. International Marine, 2001, hardcover, 314 pages.
- Fernec Mate, Shipshape: The Art of Sailboat Maintenance. Albatross Publishing, 1986, hardcover, 416 pages.
- John Payne, Understanding Boat Corrosion, Lightning Protection, and Interference. Sheridan House, 2005, 90 pages.
- Edwin Sherman, The 12-Volt Bible for Boats. International Marine, 2002, paperback, 208 pages.
- Nigel Warren, Metal Corrosion in Boats. Sheridan House, Inc., 2006, 229 pages.
- Charlie Wing, Boatowner’s Illustrated Electrical Handbook, Second Edition. International Marine, 2006, paperback, 280 pages.
- Don Casey, Canvaswork and Sail Repair. International Marine, 1996, hardcover, 140 pages.
- Jim Grant, The Complete Canvasworker’s Guide, Second Edition. International Marine, 1992, paperback, 186 pages.
- Karen Lipe, The Big Book of Boat Canvas. International Marine, 1988, paperback, 242 pages.
- Emiliano Marino, The Sailmaker’s Apprentice, International Marine, 1994, paperback.
- Philip W. Conkling, Green Islands, Green Sea: A Guide to Foraging on the Islands of Maine. Down East Books, 1980.
- Euell Gibbons, The Beachcombers Handbook. David McKay, 1967, 230 pages.
- Janet Groene, Cooking on the Go. Sail Books, 1980, 234 pages.
- Peter Howorth, Foraging Along the California Coast. Consortium, 1977.
- Ken Neumeyer, Sailing the Farm. Ten Speed Press, 1981, paperback, 256 pages.
- Lin Pardey, The Care and Feeding of the Offshore Crew. Paradise Cay Publications, 1999, 414 pages.
- Linda Frederick Yaffe, Backpack Gourmet. Stackpole Books, 147 pages.
- Peter Hunn, The Old Outboard. International Marine, 2002, paperback, 320 pages.
- Jean-Luc Pallas, Outboard Motors Maintenance and Repair Manual. Sheridan House, 2006, 125 pages.
- Edwin Sherman, Outboard Engines. International Marine, 2008, hardcover, 176 pages.
- W. D. Booth, Upgrading and Refurbishing the Older Fiberglass Sailboat. Cornell Maritime Press, 1988, 287 pages.
- Paul and Myra Butler, Fine Boat Finishes. International Marine, 1987, paperback, 160 pages.
- Paul and Myra Butler, Upgrading the Small Sailboat for Cruising. International Marine, 1988, paperback, 224 pages.
- Nigel Calder, Boatowner’s Mechanical and Electrical Manual. International Marine, 2005, hardcover, 818 pages.
- Don Casey, Sailboat Hull and Deck Repair. International Marine, 1996, hardcover, 128 pages.
- Don Casey, Sailboat Refinishing. International Marine, 1996, paperback, 144 pages.
- Don Casey, This Old Boat, Second Edition. International Marine, 2009, hardcover, 576 pages.
- Fernec Mate, The Finely Fitted Yacht. W. W. Norton & Company Limited, 2005, 606 pages.
- Dan Spurr, Spurr’s Guide to Upgrading Your Cruising Sailboat, Third Edition. International Marine, 2006, hardcover, 400 pages.
- Fred Bingham, Boat Joinery and Cabinetmaking Simplified. International Marine, 1993, paperback, 265 pages.
- Michael Naujok, Boat Interior Construction. Sheridan House, 2002, paperback, 176 pages.
- Larry Brown, Sailing America: A Trailer Sailor’s Guide to North America. Seven Seas Press, 1990, paperback.
- Larry Brown, Sailing on a Micro-Budget. Seven Seas Press, 1985, 163 pages, paperback.
- Robert Burgess, The Handbook of Trailer Sailing. International Marine, 1992, paperback, 227 pages.
- Don Casey and Lew Hackler, Sensible Cruising: The Thoreau Approach. International Marine, 1986, paperback, 364 pages.
- Ronald Florence, The Optimum Sailboat: Racing the Cruiser and Cruising the Racer. Harper and Row, 1986, hardcover, 374 pages.
- Annie Hill, Voyaging on a Small Income. Tiller Publishing, 1993, paperback, 208 pages.
- J. C. Jenkins, The Humanure Handbook: A Guide to Composting Human Manure. Chelsea Green Publishing Co., 2006, 302 pages.
- Elbert Maloney (editor), Chapman’s Piloting, Seamanship, and Small-Boat Handling, (65th edition). Sterling Publishing Company, Inc., 2007, hardcover, 928 pages.
- Tom Neale, All in the Same Boat. International Marine, 1997, hardcover, 376 pages.
- Lin and Larry Pardey, The Capable Cruiser. Pardey Books, 1995, hardcover, 400 pages.
- Lin and Larry Pardey, The Cost-Conscious Cruiser. Pardey Books, 1999, hardcover, 352 pages.
- John Rousmaniere, The Annapolis Book of Seamanship (revised edition). Simon and Schuster, 1989, hardcover, 402 pages.
- Daniel Spurr, Your First Sailboat: How to Find and Sail the Right Boat for You. International Marine, 2004, paperback, 288 pages.
- Donald M. Street, The Ocean Sailing Yacht. W. W. Norton, 1973, hardcover, 703 pages.
- USCG Auxiliary, Boating Skills and Seamanship. International Marine, 2007, paperback, 404 pages.
- Thomas Ask, Handbook of Marine Surveying. Sheridan House, Inc., 2007, 246 pages.
- Don Casey, Inspecting the Aging Sailboat. International Marine, 1996, paperback, 144 pages.
- Andrew Douglas, Practical Sailor’s Practical Boat Buying, 2 volumes. Belvoir Books, 1998, paperback.