Buying trailerable sailboats can be an excellent choice for those who want to enjoy sailing without committing to a permanent mooring or marina slip. These boats offer flexibility, ease of transport, and often lower costs.
When selecting a trailerable sailboat, it’s essential to consider the size and weight of the boat to ensure your vehicle can tow it safely. You’ll also want to think about the type of sailing you plan to do, as different boats are suited to various conditions and purposes.
Additionally, examine the boat’s condition if you’re buying used. Check for any signs of wear and tear, and ensure all critical components, such as the mast, sails, and hull, are in good shape. It’s also helpful to get a survey from a professional to ensure the boat is seaworthy.
Ease of setup and breakdown is another critical factor, as some boats can be more complicated and time-consuming to prepare for sailing than others. Finally, consider storage options when the boat is not in use, as you’ll need a safe place to keep it when it’s on its trailer.
Overall, a trailerable sailboat offers the joy of sailing with the convenience of mobility, making it a popular choice for many sailing enthusiasts.
Evaluating Trailerable Sailboats
Let’s say I’ve convinced you, and you’ve decided to 10 Steps Guide – How To Buy A Sailboatbuy a sailboat. What are your options? You can:
- Buy a new sailboat.
- Buy a used boat in good, ready-to-sail condition.
- Buy a neglected boat in poor condition and fix her up.
You may have other options as well, like partnership or multiple-owner situations, sailing clubs where the members own the boats, charter lease-to-own arrangements, and so on. However, these creative options are most often employed with larger boats, and I have no direct experience with them. One boat, one owner is the most common situation.
Where to Look
There are plenty of places to look for a boat. If you’re interested in a new boat, a boat show can be a great place to start – as long as it includes sailboats, of course. Check the show’s website; most have a published list of exhibitors. If you’ve got your heart set on a particular design, though, you may have to travel to the factory to see a new one. Fortunately, trailerable sailboats lend themselves to dealer distribution, and many manufacturers have dealer arrangements where you can see and even sail a new boat.
Used boats may be easier to find or harder, depending on where you live. Newspaper classified ads can be a good source, and it’s possible to browse major newspapers for coastal cities at larger libraries. I found my boat by subscribing to an e-mail list for Montgomery sailboats and asking around.
Some of the very best deals are still found the old-fashioned way – simple footwork. Poke around in the back lots of marinas or storage yards for a «for sale» sign on the bow. Making a few phone calls ahead of time can put you on the trail of the perfect used boat.
Traditionally, if you were buying a larger sailboat with the help of a broker, you would first look over a few boats in your size/price range, and then perhaps make an offer on one. (Your options may be different for a small, trailerable boat, but it helps to understand the typical boat-buying process.) The first offer is usually lower than the asking price. Your offer is accompanied by some cash, which is held in an escrow account, until the sale is finalized and your offer accepted. Your offer is usually contingent on three important things:
- Suitable financing.
- Acceptable survey.
- Acceptable sea trial.
If any one of these conditions is not satisfied, the deal can be called off and your deposit returned. At least, that was the case with my broker. Check the paperwork carefully to make sure of the terms. It might be reasonable for the broker to keep a percentage of your deposit to discourage tire-kickers, who will drag a broker to a dozen different marinas looking at boats when they have no intention of actually buying one. But remember that the broker’s commission comes out of the amount you give to the seller; you don’t pay the broker yourself. (In other words, the final accepted offer is the price you pay. You don’t settle on a price, and then add a broker’s commission on top of that.)
As with houses, the broker is working for the seller, not the buyer, although it is obviously in a broker’s best interest to sell boats. Brokers work best when they keep both sides happy. My point is, don’t expect a broker to pull you aside and say:
«Look, pal, don’t buy this boat – the exhaust system is all below the waterline and hasn’t been maintained in years. She could sink any minute».
It’s up to you and your surveyor to find the boat’s faults and use them to lower the price. Hopefully you’ll catch that corroded exhaust before you finalize the deal.
When you buy a smaller, trailerable sailboat, you may not go through all these steps. If you’re paying cash, you don’t need a financing contingency. You may or may not want to hire a surveyor, and the boat may or may not be available for sea trials. But this traditional boat-buying model can still be very useful. If you are buying your boat from an individual rather than a broker, then it might help you to structure the deal following the traditional model – make a small deposit, agree on a price, then arrange financing, survey, and sea trial. If any of those steps turns up major shortcomings, you either renegotiate the price or cancel the deal.
New Boats
Buying a new boat is the easiest way to get on the water in a nice sailboat. It’s also the most expensive.
Buying the boat is only part of the story – you’ve still got to equip it for sailing. How to Buy a New Boat: Tips for Buyers New boats are usually pretty bare sailing platforms, and the price doesn’t include much of the necessary equipment:
- anchors;
- life jackets;
- fire extinguishers;
- a VHF radio;
- a depth sounder;
- and other basic safety equipment.
See article «Equipment of a Sailboat: What You Need to Have on Board While SailingSail Boat Equipment: What You Need to Have on Board While Sailing» for lists of required and optional safety equipment.
Plus there’s loads of gear that doesn’t count as safety equipment but is nice to have – a stove for the galley, eating utensils, a cooler. The list of things that can be handy to have aboard is almost endless. And don’t forget that a trailer and motor are usually options – that is, they’re priced separately – though these can usually be financed as part of the purchase price. Taxes will be higher on a new boat, and you’ll lose more to depreciation. The plus side? Your maintenance costs will be fairly low for the first few years. And, of course, a brand-new boat can be a joy to own. Just make sure you can handle those monthly payments.
Used Boats
Another option is to find a used, late-model boat that has been well maintained and is ready to sail. At first glance, this can seem like an expensive way to buy a sailboat. After all, it’s not impossible to find two identical boats – one in great shape, the other a fixer-upper – where the well-maintained sailboat is selling at double the price. Many times (but not always) the more expensive boat is the better buy. Here’s why.
Let’s suppose the better boat has a fairly new motor in good running condition, a few extra headsails, a working VHF and depth sounder, all the required safety gear, and a couple of anchors. Everything works on this boat; nothing is broken or worn out to the point of needing immediate replacement. Not only can you immediately start enjoying your sailboat, you’ll find you have to spend much less on equipment at the outset. What you do buy will be more personal in nature, like foulweather gear rather than equipment for the boat, like a fire extinguisher.
A boat that is better maintained costs less to own in other areas as well. The simple act of keeping the hull and topsides waxed (and covered in the off-season) will keep the fiberglass looking new, and a conscientious owner is much more likely to take this step. This will save you the labor and expense of a paint job in later years.
The downside of this approach is economic, as you’ll need more bucks to take this path. Financing is sometimes difficult, as it can be hard to convince a bank that this boat is worth more. You may need to come up with the difference between asking price and the book value in cash. And if you’re talking about an older boat in great shape, the bank may refuse the loan on the basis of the boat’s age.
Fixer-Uppers
Your third option is to buy cheap and fix it up. I’ve done it, and it can be done, but it’s not my preferred way to buy a boat. There are advantages – you need only a small amount of cash at the start, a fraction of what’s required for a new boat – but the work and ongoing expenses can seem endless. You need skills, time, and a willingness to enjoy boatwork should you take this route. With some folks, because of money, this is the only option available. That was certainly the case with my first trailer sailer, a 1972 MacGregor Venture 222. If this describes your situation, then go for it, but arm yourself with knowledge before making your purchase. Read as many books as you can on the subject of sailboat restoration. (My mother says the best book to get is Fix It and Sail, written by Brian Gilbert and published by International Marine, but there are a number of other helpful books.) Read all you can, and talk with other boat restorers out there.
It’s smart to fix up a boat that has a higher resale value or a proven track record of sailing ability over an older, relatively unknown design. For example, a Catalina 22 is a very common boat with an active owners’ association. This would be a better restoration choice than, say, a Luger, which was sold as a kit to be completed by the owner. My own Montgomery 17 would be a better choice than my previous MacGregor 22, even though my Monty cost almost seven times what I paid for the MacGregor. (It was in much better shape, though.)
Read also: Recommendations for Choosing the Type of Boat
It can be more economical to restore a smaller boat rather than a larger one. A Seaward 17 can be brought back in less time and at lower cost than a Buccaneer 25, if both are in relatively the same starting condition. You may discover a hidden talent for boatwork and find that you can’t wait to start on a larger boat. Or you may discover that it’s much harder than it looks, and swear that your next boat will be in better shape to start with.
There is one undeniable advantage to restoring a trailerable sailboat, and that’s the education it provides. Sure, it’s a school of hard knocks, and the tuition can be pretty steep. But once you’ve completed a restoration and brought a junker back to grade-A seaworthy standard, you’ll know your boat inside and out. If you’re out sailing and something goes wrong, you’ll be much more able to assess the situation quickly and implement repairs, often without calling for help – which may or may not be available. This ability is a safety issue and is thus an important part of your responsibility as captain and owner of your vessel.
Surveying a Used Boat
My three sailboat buying choices – new, goodcondition used, and fixer-upper – are arbitrary conditions. There are a million shades of gray when it comes to boat condition, and it’s up to you as the buyer to determine the seaworthiness of the used craft you’re thinking of purchasing.
Depending on the boat and the price, it might be wise to hire a professional surveyor.
Why do you need a surveyor?
A surveyor is needed to inspect a boat and provide a professional written report, much like inspecting a house. Some banks require a professional survey before issuing a used-boat loan. Surveys are not cheap – they often start at $300 and can go much higher. Some surveyors require a haulout and unstepping the mast, but this isn’t nearly so difficult with trailerable sailboats unless the boat is being sold without a trailer.
For older boats with a lower book value and selling price, though, the cost of a surveyor becomes harder to justify. With a fixerupper, a surveyor is likely to take one look and say:
«She’s shot, Captain. Find yourself another».
You might be able to find a surveyor who is sympathetic to your needs and will help you find a restorable fixer-upper versus a boat that, for all practical purposes, cannot be fixed. It doesn’t hurt to make a few phone calls. But remember, the surveyor is supposed to work for you.
I wouldn’t rely on a survey provided by a seller, especially if the survey is a few years old. There have been cases where an unscrupulous broker kicks back part of the commission to a «surveyor» who issues a favorable report. This is rare (it’s also illegal), but it has happened. So find your own surveyor; don’t rely on a recommendation from a broker or a seller. Also, remember that a surveyor’s word is not gospel.
A recent letter in Practical Sailor tells of two surveyors hired by an owner who was selling his boat. The first surveyor gave the boat a fair market value of $33 000, saying the boat was «a moderately built production model using poor-quality marine materials». The second surveyor valued the same boat at $45 000 to $50 000, and called it «an excellent coastal or inland water cruiser/racer». Surveyors are people, too, and not without their biases. It’s a good idea to ask any surveyor whom you are considering hiring to provide a sample report or two for you to look over.
It is possible for you to do your own survey on a low-priced sailboat. It’s very hard to be objective, and a pro will probably do a better job, but it can be done. First, do your homework. Read at least one of the books on surveying. If you’re new to sailing, bone up on basic boat terminology. (See section «Parts of a Trailer Sailer» below.) While I was writing about boat surveying in Fix It and Sail, I came up with a list of deal killers that can make restoring a boat unfeasible at any price. Here’s my list:
- Structural cracks or holes in the hull.
- Missing major equipment, like a mast, boom, standing rigging, or sails.
- Extensive wood rot.
- A «partially restored» boat.
A boat with these problems earns an automatic «no, thanks», even if the boat is nearly free. It often costs more than the boat is worth to put these problems right. In addition, any of the following items should rate big discounts:
- Any trailerable sailboat without some kind of motor or trailer.
- Any sailboat without a fiberglass interior liner.
- A heavily modified sailboat.
- Any sailboat with a spongy deck.
- A filthy boat, especially one with standing water in the interior.
- A boat with missing or hopelessly rotten cushions.
A boat with any of these problems, while not automatically rejected, must be heavily discounted by the seller in order to be considered. Correcting these problems can require a serious commitment, and sometimes they can’t be fixed at all. Do not be fooled by the seller’s claims that «all she needs is a good cleaning» or «needs a little TLC». Such phrases should be illegal when describing boats for sale. These terms are sellerspeak for «needs more dollars in repairs than I could ever hope to get for her if she were fixed». Think about it – if all she really needed was a good cleaning, then the seller would give her one and ask more for the boat.
Never look at a boat without knowing the book value first! (See section «Operation and Maintenance of the Your Own SailboatCan You Afford it?») If the seller wants a great deal more than the book value, you should mention that fact to him or her. They’ll feign ignorance, but it’s a fairly safe bet that the seller has looked up the book value, too. And remember, the bank won’t loan any more than the book value. This works to the buyer’s advantage with boats in good condition, and to the seller’s advantage with boats in poor condition. Well-maintained boats generally sell quickly, while boats that are dirty or unmaintained can take forever to sell.
So let’s take an imaginary look at a hypothetical trailer sailer. Say you’ve got your eye on a 1978 O’Day 22 that’s down at the local marina. The asking price is $2 250, not too bad. She comes with an old Evinrude outboard and a trailer. The BUC value for this boat is $2 500 to $2 900, so the asking price is pretty good. And we’re lucky – a profile of this particular boat appears in Practical Sailor’s Practical Boat Buying, where we learn that this boat has a shallow fixed keel and a fairly basic interior. As an option, some boats were built with centerboards, and some with deep-draft fin keels, each giving better sailing performance and pointing ability than the standard shoaldraft fixed-keel model. If this boat has one of those two options, that’s a plus, as she’ll sail better than the standard model.
Armed with this knowledge beforehand, you’re ready to take a look. Bring along a few tools when you look at a boat – a clipboard and a pen to take notes, a pocketknife or fine ice pick to check for rot, and a small digital camera. From the outside, she doesn’t look too bad – she’s reasonably clean. The portlights show a number of weblike cracks, indicating the plastic has weakened somewhat with age. They’ll need replacing, but not immediately. There’s a little wood on deck that definitely needs varnishing, but it’s teak, so you don’t see any rot. The gelcoat looks chalky, and there are some dings and a little crazing, but this has to be expected in a boat of this age. Some rubbing compound and wax can do wonders on hulls like this.
Parts of a Trailer Sailer. If you’re new to sailing, it will seem like every little bit of your boat has an arcane and obscure name. Don’t panic. You’ll find most of these terms will come naturally with use.
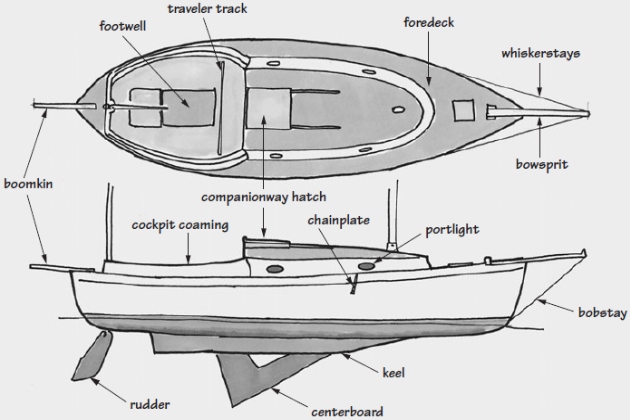
This is one of those situations where pictures truly are worth a thousand words, so study the drawings labeled here. The parts of your boat may not look exactly the same as what you see here, but they will be similar. Many trailerable sailboat manufacturers use the same handful of hardware suppliers, so you might see the exact same mast step used on a 1976 O’Day 22 and a 2004 Precision 18.
As your nautical vocabulary expands, don’t get too hung up on terms, insisting that your crew always use the correct nautical terms. Or worse, don’t start slinging marine jargon all over the office, either. You’re talking about a trailerable sailboat, for heaven’s sake, not the Dorade (Olin Stephen’s winner of the 1931 Transatlantic and Fastnet races). It’s more important to be understood than correct – it’s better to stop the boat with a rope than to confuse your crew with commands about breast lines, spring lines, and after cleats.
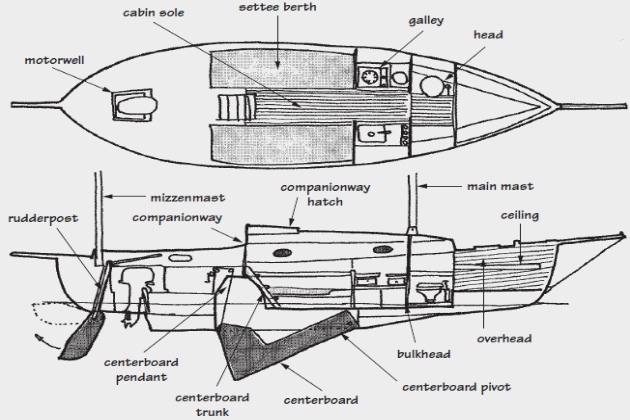
Interior. While it may seem logical to start on the outside when examining a boat, one of the first things I do is take a quick look inside. This is because it’s common to find a Buying a Used Boat: What to Look for, Tips for the Buyerused boat that looks pretty good from the outside but whose interior is a nightmare. It takes but a quick glance (and a sniff) to know whether any big discounter problems lurk belowdeck. If the seller expects to sell a boat for a hundred bucks off the book value when the boat is a shreddedcotton mildew farm on the inside, then I know that to go much further is a waste of time.
If you don’t see the cushions, ask about them. Some conscientious owners take them off the boat and store them at home during the off-season, which helps to significantly extend their life. But if the seller says, «They kept getting wet so we threw them away», alarms should go off in your head. One, there’s an uncorrected leak somewhere in the deck that has probably rotted the deck core as well as ruined the cushions. Two, here’s an owner who doesn’t care about problems on his boat. Three, replacing a full set of boat cushions will cost at least $400 if you do all the work yourself, and $1 500 or more to have it done by a pro. Hopefully the cushions will be there.
A disgustingly filthy, mildewed interior usually earns at least a 50 percent reduction in boat value, possibly more. All that muck usually hides a multitude of problems that you won’t discover until after two weeks of cleaning and repair work. Think like a drop of water – it’ll usually, but not always, find the lowest point in the boat. Start low and work your way up, looking for any standing water or evidence of standing water.
Bilge. All boats of course get a little water in them now and again – after all, they live in a pretty wet environment. Some trailerable sailboats, especially older, deep-draft boats such as the Cape Dory Typhoon or Halman 20, have a bilge, which is a space underneath the floorboards that collects water.
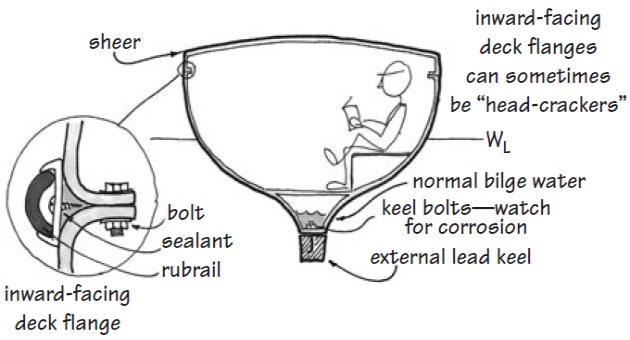
A small amount of water in the bilge is no cause for alarm. Water that has leaked down the hull – either from deck hardware leaks (for instance, around the base of stanchions or cleats) or from the hull-to-deck joint – can collect there.
This bilgewater gets pretty nasty, with drippings from the engine, dust, and so on. It’s best to keep the bilge pumped dry, but usually it doesn’t hurt much to have a little water in the bilge. (It is now illegal to put anything in the water that causes an oily sheen to appear, and this includes oily bilgewater. Most inboards now have a separate engine pan underneath them to catch oily drips.)
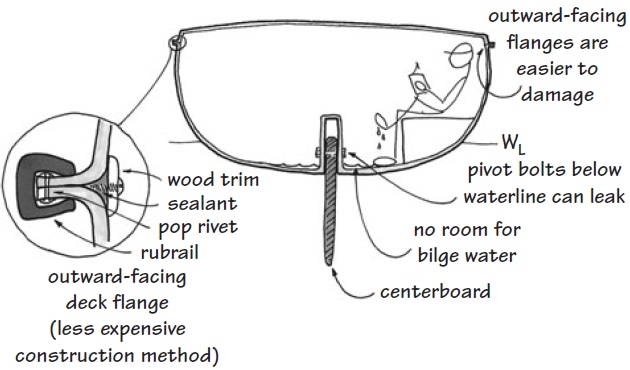
If there are leaks from the deck hardware or the hull-to-deck joint, water will accumulate on the cabin floor.
A little water in the boat for a short period of time usually doesn’t hurt anything, but large amounts of water left for any length of time can lead to problems. How much water is too much? Well, if you step below and hear a splash, that’s too much. Water shouldn’t be allowed to come above the floorboards or saturate any of the interior woodwork. It’s the cycling of wet and dry that really accelerates rot in wood.
If the boat has a hatch in the center of the floor, lift it up to look in the bilge. Clean and dry is best, but a small puddle shouldn’t hurt. Look for evidence of flooding and rot in any of the low wood on the boat by poking your ice pick or pocketknife into inconspicuous areas. You’ll quickly learn what rotten wood feels like – the ice pick will penetrate the wood with little resistance.
Some boats, on the other hand, don’t have a bilge. Instead, the cabin floor is the lowest part of the boat. Underneath the fiberglass is nothing but the deep briny blue. The centerboard trunk protrudes into the cabin space. My MacGregor was designed this way.
Boats without a traditional bilge space are more sensitive to standing water and will be much less tolerant of neglect. If there is a wood bulkhead that runs all the way to the floor, then examine the bottom of the bulkhead carefully for rot. A little water can do a lot of damage here, and replacing a bulkhead is a big repair job. Ideally the fiberglass liner will extend up from the floor about a foot or so, and the bulkhead will be attached to that, but this isn’t always the case. (See the section «Fiberglass Boatbuilding for the Sealorn» below, for a crash course in boat construction.) If you don’t see any standing water in the boat, that’s good, but now you should look for a mud line. This is a discolored area where standing water has been – like a ring around the bathtub. You’ll often see mud lines in concealed areas rather than obvious places.
When I look at the interior of a boat, I open up all the lockers and hatches. Sometimes you’ll find a pocket of standing water that can’t drain to the bilge. Clean and dry is best, dirty is normal, but puddles you can step in are a problem.
If you do find standing water, that means there’s a leak somewhere. You’ve got to track it down and look for damage. Most of the time, puddles come from rainwater, so look up. Any screw or bolt on the deck – used to hold various deck hardware, including stanchions and cleats – is a potential leak, so look carefully for water tracks or dampness. If you find any, then there’s a good chance that the deck core is wet, too, and possibly rotten. Depending on the extent of the damage, repairs can be relatively simple or involve major work, so look carefully.
Sometimes a leak can result from a problem below the waterline. Any hole in the hull is a potential leak, and bedding compounds (the stuff used to further seal deck hardware and various other parts to the boat) do fail over time. One place particularly prone to leaks is the centerboard pivot bolt, and if the centerboard case is inside the boat rather than under it, a leak here becomes a particular nuisance. My MacGregor had this problem. Despite extensive reinforcement and upgrades, the heavy centerboard bent the pivot bolt a little and resulted in a slow, weeping leak after three seasons in the water. The only fix was to continue increasing the bolt size, which is a big job – I had already increased the pivot bolt from 1/2 inch to a 5/8-inch grade 8 bolt. So if you can see the centerboard pivot bolt from the cabin, examine it carefully.
If, during your search for rot, you find any rusty fittings, note them, because they’ll have to be replaced. All fittings on the boat should ideally be stainless steel or bronze, and sometimes you’ll see some mild steel fittings that have been added by the current owner. Occasionally these can work well – I had a hardware-store-variety spring bracket on my Catalina 27 that saw five years of constant liveaboard use, and it worked fine – but if a fitting looks rusty, you should probably plan on replacing it with something more durable, like bronze or stainless. You should also be aware that certain grades of inexpensive stainless steel will rust if conditions are right. Be warned that rusty stainless can fail very suddenly, without further warning, so be especially concerned if you see rusty stainless bolts or chainplates.
Fiberglass Boatbuilding for the Sealorn. Naturally, building a sailboat is a complex process, but most boats have three major parts:
- the hull,
- the deck,
- and the liner.
The hull is usually created first. Most are solid fiberglass, though some have a core material of balsa or dense foam between two thinner layers of fiberglass. Cored hulls are lighter and stiffer but can delaminate as the hull ages.
Next comes the interior, often called a liner or hull sock. A complex molding containing most of the cabinets, bunk surfaces, and countertops is glassed inside the hull. Such a boat can be much cheaper to build, since it cuts the amount of time and skilled labor necessary to complete the boat. Better boats have liners glassed to the hull in many places, not just a tab or two here and there. Everything attached to the inside of the hull makes it stiffer and stronger. Wiring and plumbing are often run before the liner is bonded to the hull – easier to construct initially, but harder to repair later. Wooden trim and accent pieces are fitted after the liner is in place, which can greatly enhance the interior appearance.
The advantages of using a liner are obvious for the builder, but for the owner there are pluses and minuses. On the plus side, the boat costs less, and routine maintenance is much easier. The fiberglass liner doesn’t rot, and since it’s protected from the sun, the gelcoat lasts practically forever. One disadvantage is reduced hull strength, because every piece of furniture bonded to the hull can act as a stiffening member, and these stiffeners are greatly reduced with a liner. The other big drawback is lack of access to all parts of the hull. If you get a leak in Technical Recommendations for Inspecting Your Boatyour boat in an area that’s hidden behind an inaccessible area of the liner, your boat can sink and you’ll never know where the water is coming from. On most boats, access and storage can be improved at the same time by adding hatches, drawers, and doors to the liner.
The deck is attached to the boat only after the interior is complete. Decks are usually cored with plywood, balsa, or foam, since uncored fiberglass decks flex and bounce underfoot. But if water is allowed to leak into the deck core, it rots and begins to flex. Repairs are difficult and expensive, so it pays to keep deck hardware well sealed wherever it attaches to the deck. Really thoughtful designers and builders design deck moldings so that fittings pass through solid fiberglass wherever possible.
Mildew. Mildew is a problem common to most boats. (See section «Maintaining and Modifying Your SailboatMaintaining Your Sailboat».) In the boats I’ve owned, mildew takes the form of small black spots on fiberglass or cloth, or a grayish powder that forms on wood surfaces. On hard surfaces, it’s pretty easy to wipe off using a damp rag with a little Pine-Sol. However, once mildew gets into fabric, like sails or light-colored cushions, it’s really difficult, sometimes impossible, to remove. This brings out my pet peeve with many manufacturers of trailerable sailboats, and that’s fabric that is permanently bonded to the hull.
A popular interior finishing method with many manufacturers is to glue something resembling indoor-outdoor carpet to the hull sides and overhead (the overhead is the interior surface of the boat), which looks great for four years or so. It insulates the hull and topsides (topsides is another term for on deck, meaning outside the boat), preventing condensation and reducing noise belowdeck. But after the warranty expires and a good healthy crop of mold sets in, it’s nearly impossible to clean. Some builders provide a method for removing and cleaning these covers, but this is seldom the case with less expensive boats. A boat like this has to be kept dry. A week in the summer with a foot of water on the floorboards would be disastrous, so if the boat you’re looking at has an interior that resembles a sheik’s tent, understand that it’ll require diligence to keep the insides nice.
Electrical System. Chances are your prospective boat has some kind of electrical system. In its simplest form, an electrical system means a battery, a few switches, and some lights, but things are rarely this simple in the real world. Multiple batteries, distribution panels, chargers, radios, and other electronic navigation equipment are commonplace on trailerable sailboats these days. But is all this stuff necessary?
In a word, no. You aren’t required to have any electrical equipment on board whatsoever, and a few souls still safely sail without it. Kerosene can be used for lighting, even for navigation lights, and battery-operated equipment is getting more efficient every day. But most of us want some kind of electrical capability on board.
Most people don’t think much about their electrical system until something goes wrong. When it does, even the simplest system can seem maddeningly complicated as you try to trace the source of a problem. When surveying a used boat, try to ascertain whether all the electrical components are functioning properly. The worst kind of electrical problem to correct is one that works only part of the time. The question then becomes whether to fix just that single problem or replace the entire system. There are often sound reasons for replacing rather than repairing electrical systems, especially on older boats. Electrical systems were often optional, and many boats were sold without electrical systems to lower the purchase price.
The electrical system may have been added later by a less-thanknowledgeable owner. Some factory-installed systems were very marginal indeed – the wiring on my old MacGregor was just plain terrible.
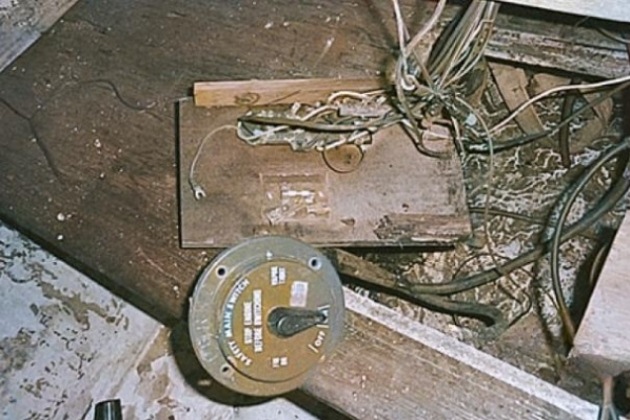
I don’t know if the lamp cord was installed by the factory or a previous owner, but it was a tangled mess of bad splices and substandard practice.
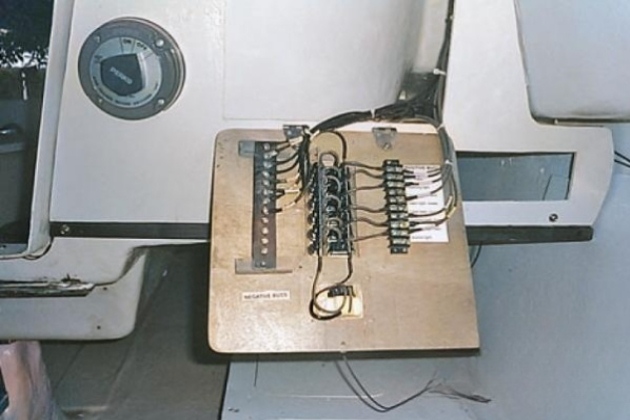
Lamp cord is cheap wire that you can get at a hardware store, and it should never be used aboard a boat. In fact, all components of the electrical system should be rated for marine use or they will corrode in the damp environment. Corroded electrical components can easily overheat and cause a fire. Marine-rated components aren’t cheap, and the differences aren’t readily apparent at a glance, but you should never skimp in this area – you’ll likely regret it later.
No battery should ever be installed aboard a boat without a good, sealed, marine-grade battery switch.
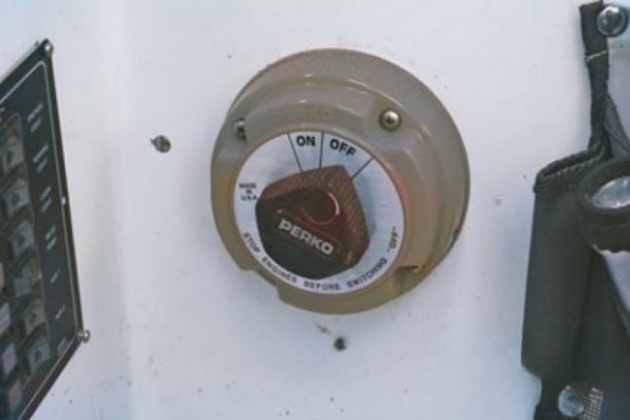
If you ever do have an electrical problem, it’s imperative that you be able to disconnect the power source or your day will only get worse. Good switches are sealed and spark-proof, and they’re rated for continuous high-amperage operation without overheating.
If the boat doesn’t have a battery switch or needs a new one, consider getting a two-battery switch rather than a simple one-battery, on-off switch. A two-battery switch costs only a little more, and allows you to easily increase your total battery power later by adding a second battery. You don’t have to connect battery №2 for the switch to work. Be careful of less expensive battery switches, because some – like the one on my old Catalina – don’t have an alternator field disconnect. When you change the position of the switch from battery №1 to battery №2, there is a split second when the switch is open, with no load on it at all. If your engine has a charging alternator connected to the switch, and it goes into a no-load condition, the diodes in the alternator will blow. An alternator field disconnect has a line that effectively turns off the alternator when you switch batteries, saving your diodes from damage. If it sounds like I learned this the hard way, you’re right – I had to replace my alternator after I switched batteries while charging.
Plumbing/Seacocks. How many holes does a sailboat have through its hull? Most reasonable people would say none, cause if it had a hole, it wouldn’t float. While this is technically true, nearly all sailboats come with several holes already drilled through the hull, and any one of them has the potential to sink the boat if these holes are located below the waterline. That’s how I like to think about the boat’s plumbing.
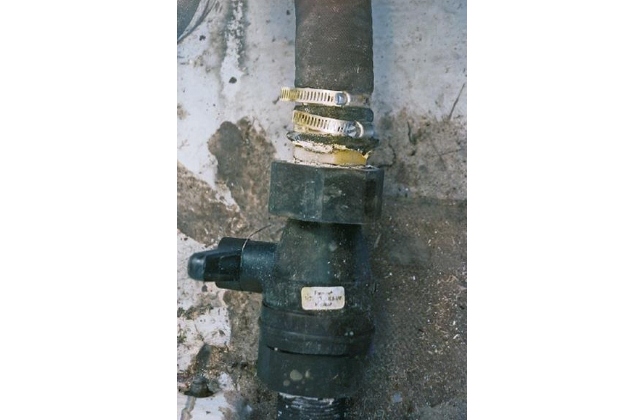
All the holes in your potential purchase, if located near or below the waterline, should have proper seacocks attached. Some builders save money by connecting hoses directly to through-hulls, which are bronze or plastic flanges that screw tightly against the hull. No shutoff valves of any kind. These installations should be upgraded immediately to include seacocks, and while you’re at it, you might as well replace the plastic through-hulls with bronze. Even worse are hardware-store gate valves, with wheels that you turn to screw the valve closed. These are especially dangerous and should be replaced. Bronze and stainless ball valves on a bronze through-hull, with a proper plywood backing pad against the inside surface of the hull, aren’t as good as seacocks, but they are far better than gate valves.
All hoses should be thick, very strong, fiber reinforced, and resistant to chemicals and heat. Clear hose should never be used below the waterline, and garden hose should be used only for washing down the boat. If you see any bulges or cracking in the hose, it should be replaced.
Also take a close look at the hose clamps, because the best hose in the world is useless if it slips off the seacock. All hoses should be double clamped, and any rusting means replacement. Some hose clamps are made with cheaper grades of stainless and are more likely to rust, especially the screws. Check with a magnet if you have any doubts: in general, as the grade of stainless gets higher, the magnetic attraction gets lower.
So, we’ve pretty much gone over the entire inside. Note any leaks, rot, water damage, and broken equipment in your notebook. If you’re not scared off at this point, turn your attention to the deck and the rig.
Exterior. Deck. The first thing I do is use my not-unsubstantial weight to check the deck core. I take off my shoes and walk carefully around all the surfaces of the deck, taking small, closely spaced steps, making a note of anyplace the deck feels spongy. If the boat is an older, less-expensive model, then more likely than not you’ll find at least some deck rot. Pay particular attention to areas around the mast, stanchions, fittings, and deck blocks – anywhere hardware is bolted through the deck is a potential source for leaks and core rot. Small areas can often be fixed fairly easily, but large areas – let’s say larger than about a square foot – can mean a big repair job. How big? If deck rot is the only problem on an otherwise great boat, then I might be inclined to buy it with a significant discount, but this is rarely the case. This problem is easily prevented by proper sealing and bedding of fittings on the deck, but it’s unfortunately far too common a problem on older sailboats.
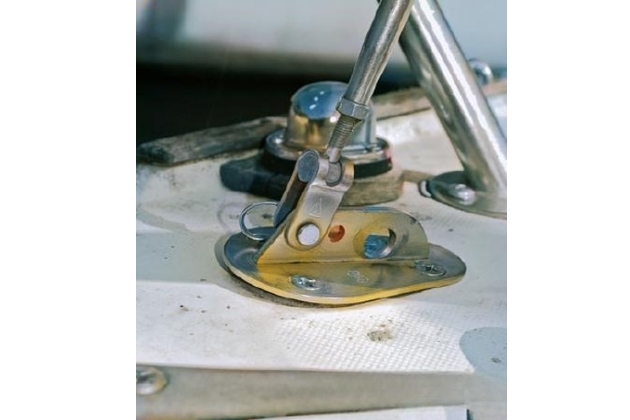
Look carefully at this stemhead fitting (the fitting on the bow where the headstay attaches to the deck). The hardware is lifting off the deck, no doubt causing a leak down into the interior. If the deck is cored in this area, then the core is rotting. (All boats have some sort of core in the deck area, either of plywood, balsa, or foam. The best boats have solid fiberglass where fittings are mounted, but that level of quality is pretty rare in the trailer-sailer market.)
Straight Threads or Tapered? One of the problems with using gate valves or ball valves on your boat is the threads. The plumbing in your house uses a special thread called NPT (National Pipe Tapered). Tapered threads are designed to screw together for a few turns and jam tightly, making a watertight seal. But the through-hull fittings you buy at the chandlery use NPS (National Pipe Straight) thread. These threads will screw their entire length without jamming.
If you mix threads, the result is a joint that screws in only partially, engaging just a few threads and making a weak connection that’s more likely to leak.
You want to have all the threads match on any belowthe-waterline fittings. Look for the letters NPS or NPT stamped somewhere on any fittings you plan to use. Using all NPS threads is preferable, but if you must, a tapered thread can be used as long as both male and female surfaces use the same type of thread. Special seacock bases are available with straight threads on the outboard end and tapered threads on the inboard, making a pseudo-seacock using a standard ball valve.
Note any water stains or puddles on the deck. A properly designed boat won’t have any areas that can trap water, but it can and does happen. These can be corrected by installing drains, but hopefully you won’t see any water stains or puddles.
Hull. Next, turn your attention to the hull itself. Look for bad repairs, big cracks, or dings.

Since gelcoat is harder than the fiberglass underneath, small accidents and places where the hull flexes under stress show up as gelcoat cracks.

Some small cracks are inevitable, but extensive large cracking could indicate underlying laminate that needs to be strengthened. This can be done by reinforcing the boat using epoxy and glass – if you can get to the part of the hull that needs attention.
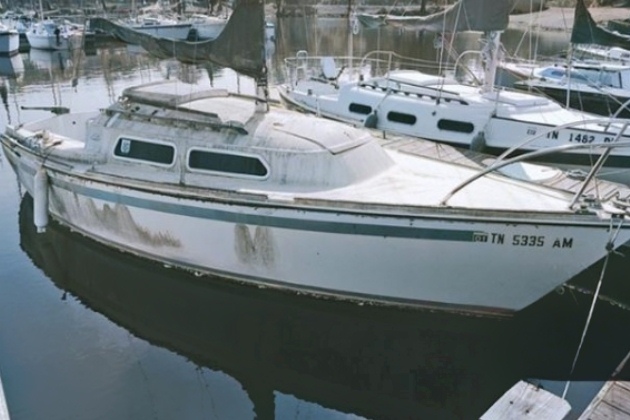
But getting the gelcoat cracks filled, with a perfect color match, is a bit more problematic. Gelcoat repair kits are probably the best bet for colored hulls, but if your hull is white like mine is, you might try Marine Tex. That’s what I’ve used for a few small spots, and so far it seems to be working fine. But then again, the gelcoat on my hull is 26 years old, and a perfect glossy color match isn’t the same priority as it would be on a newer boat. Epoxy compounds often yellow (or even fail to bond completely in the case of clear epoxies) in the sunlight, since epoxy is sensitive to both heat and UV rays.
Blisters. An older boat that has been sitting in the water for a long time could be blistered on the bottom. Blisters were a mystery when they began appearing on fiberglass boats because everyone thought fiberglass was completely waterproof. It isn’t. Explaining blisters is complex, but here’s a simplified version of why they occur.
When a hull sits in the water for years, tiny amounts of water seep into the fiberglass itself where it finds chemicals to bond with. Once the water has bonded with these chemicals, the molecules become larger, the resulting fluid (acetic acid) is trapped, and blisters form. Certain Use of Fiberglass in Boat Constructiontypes of fiberglass – specifically, vinylester resin – are more blister-resistant than others, such as polyester resin. Boats with an outer layer of vinylester resin are significantly less likely to form blisters than boats using plain polyester resin.
Most, but not all, blisters form at the junction between the gelcoat and the hull laminate. Thicker gelcoat slows blister formation but doesn’t stop it entirely.
A blister or two isn’t much cause for concern, but a maze of blisters covering the entire bottom – called boat pox – is more serious. Repair involves peeling off the outer layer and relaminating the hull, usually with epoxy. It requires a big commitment of time and money, even if you plan to do the work yourself, and deserves a hefty discount.
Keel and Keel Bolts. If the boat you’re looking at has a fixed keel, you’ll need to check the ballast attachment. Some keels have internal ballast, where the keel cavity is filled with something heavy. Lead is best, but you’re more likely to find cast-iron weights, concrete, or steel scrap (such as boiler punchings). As long as the ballast stays dry, it’s fine, but if water gets in and the steel starts to rust, it swells up and you’ve got big problems. Some owners have gone so far as to cut the keel sides, chip out the rusting mess, and replace it with lead shot. A job like this isn’t for the faint of heart. Look for rust stains weeping from cracks in the keel exterior as a sign of possible problems.
The other major way to install ballast is with an external keel. Here, a carefully shaped and smoothed keel casting is bolted to the hull. This system works well, but the keel bolts live in a tough environment – the bilge. The keel bolts need to stay well-sealed. Again, look for rust stains weeping from cracks or persistent leaks. If neglected long enough, the keel bolts can corrode completely away. Repairing or replacing keel bolts usually requires help from the pros.
Rigging (Standing and Running). Next, look over the standing rigging and the mast. The rigging should be all stainless steel, with no rust stains or darkening of the metal. Also, run a rag over all of the shrouds and stays. You are looking for fishhooks, which are single strands of broken wire. They’ll catch on a rag, immediately notifying you of a problem. Really tough wharf-rat sailors use their bare hands, in which case broken strands are called «meathooks».
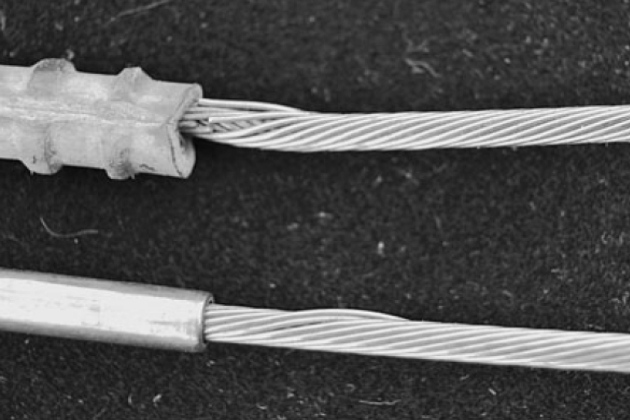
No matter what you call them, they’re a particular problem with 1×19 stainless steel rigging wire. (It’s called 1×19 because it’s made of nineteen strands, one wire each.) If one breaks, it’s most likely because the whole bundle is fatigued, and now the other eighteen strands are under a higher load. You’ll get no further warning that a shroud is about to break. Rust-stained shrouds or shrouds with fishhooks require immediate replacement, or you risk losing your rig overboard.
The mast should be fairly straight, with no pronounced kinks or bends. Some racing boats are set up to bend the mast aft to flatten the sail, and a gentle curve dead aft is Ok, but the mast shouldn’t bend to either side at rest, and certainly not forward. Hopefully the mast or boom isn’t perforated with holes from old fittings. A kinked or dented mast is especially bad – I wouldn’t buy a boat with this problem without consulting a professional rigger for a repair estimate.
Now check out the running rigging. Problems here usually take the form of wornout blocks, dirty lines, or ineffective or cheap sail controls. These kinds of problems are usually fun to fix. New blocks and lines are expensive, but they are usually pretty easy to install. New boats rarely come with a traveler, but it’s a common upgrade, and you’ll often see them on boats that have been around awhile. Replacing a complete traveler is expensive, but it can be rebuilt. Winches are expensive, and a boat with high-quality, well-functioning winches is a plus. If the winches are in poor shape, plan on replacement costs of around $100 to $200 each for single-speed standard winches, $400 to $500 for single-speed self-tailing winches, and $700 to $1 300 each for two-speed self-tailers.
Corrosion. I touched on the subject of corrosion with regard to the mast and rig, but this subject deserves more attention because all sailboats have some metal aboard, and all metals corrode in certain conditions. Several types of metal are commonly used on sailboats. Some, like stainless steel, are used because they resist corrosion well. Some are used because they are strong and light, like aluminum for masts and spars. Some metals for small fittings are used because they are cheap. (You’ll see the term Zamak in marine catalogs – it’s mostly zinc, and only slightly better than pot metal.) All of the metal fittings on your boat should be either stainless steel, aluminum, or bronze.
The types of corrosion you’re most apt to see are rust, crevice corrosion (both of which affect steel), and aluminum corrosion. Some corrosion is inevitable; see section «Maintaining and Modifying Your SailboatDealing with Corrosion» for tips on treatment and prevention. But when is corrosion a significant problem? Here’s what to look for.
Stainless steel comes in myriad varieties, but in boats you’ll most likely find:
- 304,
- 308,
- 316,
- 408,
- or 416.
The numbers refer to the amounts of different metals (chromium, molybdenum, and nickel) in each alloy, but, in general, higher numbers indicate more expensive steels with greater corrosion resistance. You can check stainless with a magnet – lower grades are magnetic and more likely to rust.
Stainless needs good air circulation to prevent rusting. You will often see a rust streak coming from the drain hole of a stanchion. That’s because air doesn’t circulate inside the tube. Usually this is just a cosmetic problem, but some owners are tempted to «fix» it by plugging the drain hole, which is the worst thing to do. The stanchion should be replaced with a higher grade of tubing.
Any deep crack in stainless steel can trap moisture and prevent air circulation, causing crevice corrosion. This is a serious problem when it occurs in rigging parts. Any rust stains there call for immediate replacement.
When aluminum corrodes, it often takes the form of pitting over the surface with a white deposit of aluminum oxide. Treatment involves removing the oxide and sealing with a polish or wax. Painted aluminum will sometimes corrode underneath the paint; it then needs to be sanded clean, primed with a special aluminum primer, and repainted.
Plain steel on boats is usually found in only a few places – the trailer, which I discuss in a moment – and, in some older boats, in the swing keel or centerboard, where its weight forms part of the ballast. As long as it’s kept perfectly sealed from water and air, plain steel is Ok, but lead is a better choice. It’s heavier and more expensive, but it doesn’t rust. Some swing centerboards are made from cast iron. These need to be repainted and faired every five to ten years or so, depending on the quality of the previous job.
Bent Turnbuckles. A very common problem among trailerable sailboats is bent turnbuckles. The shrouds foul something while the mast is going up, and the turnbuckles are easily damaged. While this doesn’t seem like a big deal, very close inspection reveals a problem.
Stainless steel is much stronger than plain steel but more likely to crack if bent. My Montgomery had a bent turnbuckle when I bought it, and I didn’t think too much about it at first. Then I looked at the threads under a microscope. I found cracks at the bottom of the threads. This turnbuckle was compromised, and if it had broken, the mast could have gone over the side. An event like that can ruin your whole day. I replaced all the turnbuckles with new ones, just to be safe.
This problem can be lessened somewhat by adding Comprehensive Collection of Common Sailboat Rig Types and Designs rigging toggles to the turnbuckles, but the main thing to remember is to raise the mast slowly, and have a crewmember on hand to free up fouled shrouds.
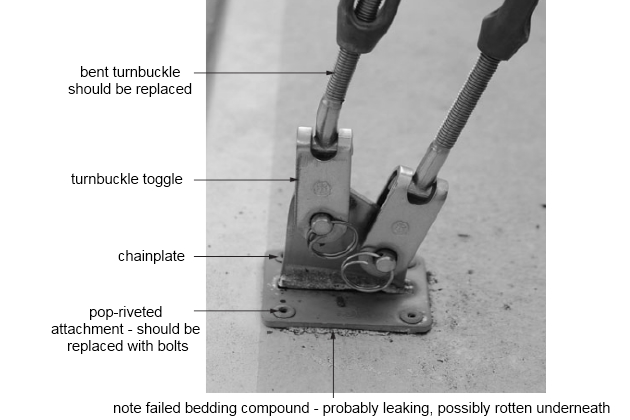
The bent T-bolt on the turnbuckle should be replaced, the cheap «pop rivets» drilled out and replaced with stainless machine screws, and the old, dried-out bedding compound cleaned off and renewed. Since this chainplate looks like it’s been neglected for some time, you can expect to find at least some rot underneath that should be addressed as well.
Trailer. If you’ve gotten this far, you’ve crossed over the line of casual looker to serious contender. The subject of motor and trailer and their effect on the final price of a used boat can be tricky, as these items are not usually included in the BUC value. But these are both big-ticket items to replace. And besides, what’s a trailer sailer with no trailer?
The most important feature of a boat trailer is that it exists. If the trailer is missing, it can be difficult to find a replacement with the right measurements. Often sellers of old boats will scrap an old, rusty trailer rather than try to preserve it, and the trailer will rust away to nothing if neglected – especially near salt water. This creates a problem for you, the buyer, because you’ll often need to transport the boat to a new location. Many boat transport companies will be happy to move the boat for you, but this is rather expensive, especially when you consider that boats with usable trailers are readily available. If you have to buy a brand-new trailer, plan on spending at least $1 500, which doesn’t make a lot of sense for a boat with a book value of $2 000.
Hopefully, though, the trailer will be there, and in reasonable condition. Don’t be bothered by some rust, but if parts of the trailer have rusted clear through, I strongly recommend pulling the trailer to a shop to have it looked over. (Camper and RV dealers often have trailer shops; check the Yellow Pages.) I’d even go so far as to make this a condition of the sale. You don’t want to be responsible for an accident caused by trailer failure, and since you don’t know much about this trailer’s history, you shouldn’t take chances.
Fortunately, most trailers can be repaired. New parts are readily available, and even a rusted frame can be rewelded. You can get a completely new axle assembly, with custom grease fittings that let you lube the bearings without disassembling the hubs, for about $175. If you have access to a welder, then you can make some pretty quick upgrades in the form of extra safety chains, lifting handles, and attachment points. (See section «Performance Characteristics of Boat TrailersMatching Vehicle to Trailer and Boat».)
Outboard. When buying a boat, a functioning outboard in good condition is a big plus. Replacing an old, poorly functioning outboard with a new motor is an expensive proposition – prices start at about $1 400 – so don’t turn up your nose if the power plant on your prospective purchase looks old. If it runs well, it’s worth keeping. Quiz the current owner in detail about his outboard – how does he like it, what kind of oil does he use, does he have the manual, has the motor ever fallen off the transom, has it ever left him stranded? Start it up and look at the exhaust – a little smoke is expected, but clouds from the muffler can indicate needed repairs.
If you’ve never touched a wrench in your life, don’t hesitate to get help from a good mechanic. That’s the beauty of outboards versus inboards – you can take just the motor to the mechanic rather than hauling the entire boat. Call a few shops, tell them that you’re thinking of buying a boat, and ask what they’d charge to look at a small outboard. Rates will vary but shouldn’t be too high. (Tips on maintaining outboards can be found in the article «Maintaining and Modifying Your SailboatSailboat Maintenance: Basic Tips for Caring for Components».)
Almost all new outboards these days use four-stroke powerheads, while most used motors for sale will be two-stroke models. The two-stroke models are being phased out because of pollution concerns. What’s the difference between the two? To find out, we have to talk about engine design on a basic level. It may be more than you want to know, but trust me, this info will come in handy when your motor conks out in the middle of the ocean, and all motors conk out eventually.
Four-Stroke Motors. The type of engine that you’re probably most familiar with is a four-stroke design. This is what you’ve got in your car. Speaking on a highly simplistic level, each cylinder has an intake valve, an exhaust valve, a piston, and a spark plug. Fuel – gasoline – is mixed with air by the carburetor and travels to the cylinder via the intake valve. This is stroke number one, the intake stroke. The piston travels downward during this stroke, creating the suction that pulls the fuel and air into the cylinder.
Next, the intake valve closes and the piston travels upward, squeezing the fuel/air mix. This is stroke number two, the compression stroke. Both valves are closed during this step.
Now, at just the right time, the spark plug fires. The resulting explosion drives the piston downward. This is the ignition stroke, sometimes called the power or drive stroke.
The last of the four strokes is the exhaust stroke. The piston travels upward while the exhaust valve opens, pushing the smoke out of the cylinder.
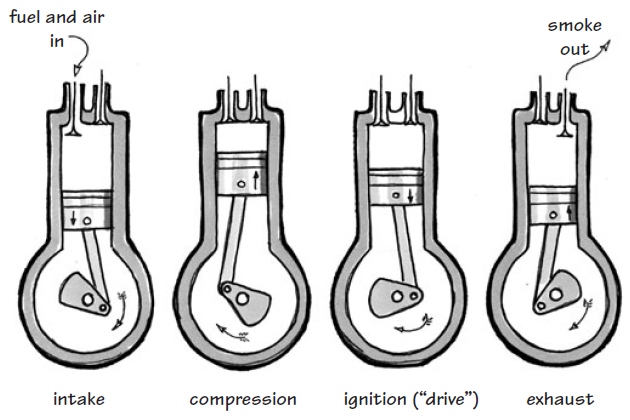
It’s important to note that the piston is producing power only during the ignition stroke. The rotational force for the other three strokes comes from a flywheel, or, more accurately, the mass of the driveshaft, which acts as a flywheel.
Two-Stroke Motors. For many years, most outboard motors were the two-stroke variety, mainly because of their lighter weight and greater power. Older twostroke outboards are fairly simple machines and will last a long time if properly cared for. However, two-strokes have several downsides. First, let’s learn how they operate.
The two-stroke design, along with the ported cylinder design, was invented by Joseph Day in 1889. The ports, which are simply holes in the cylinder wall, are covered and uncovered by the piston. The ports replace the valves that the four-stroke requires, greatly simplifying the engine. Although most modern two-strokes use a reed or rotary valve instead of piston ports, the design is equally simple. Reed valve engines deliver power over a greater range of rpm, making them more useful.
It will be interesting: Key Points for Buying and Selling a Boat
The thing to remember about two-strokes is that where a four-stroke needs four motions of the piston for each power cycle (up, down, up, down), a two-stroke does the same thing in two motions (up, down). Explaining this is a little tricky, but bear with me.
Let’s start as the cylinder is starting to travel upward. While fuel is being compressed at the top of the piston, a partial vacuum is created at the underside of the piston. The fuel and air mix is drawn in by the vacuum, filling the back side of the cylinder chamber.
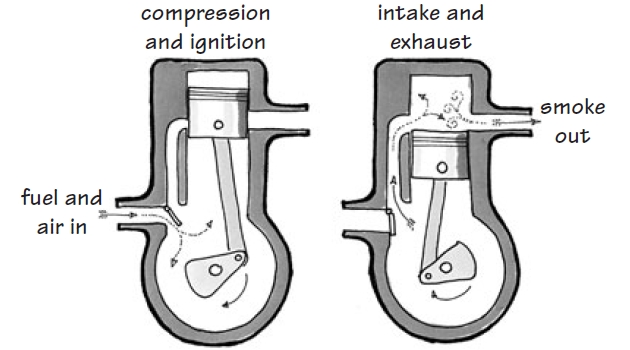
As the piston reaches the top of its stroke, the spark plug fires, driving the cylinder downward. At roughly the same time, the reed valve closes. Now, as the cylinder travels downward, compression is created at the underside of the cylinder, where the unburned fuel/air mix is. As the piston nears the bottom of its stroke, the exhaust port is first uncovered, allowing some of the smoke to escape. Then the intake port is uncovered. This allows the pressurized fuel/air mix into the upper part of the ylinder, forcing out the rest of the smoke, and the cylinder begins its upward journey again. So we’ve taken the processes of a four-stroke and accomplished them in two – pretty clever, eh?
Two-Stoke versus Four-Stroke Trade-offs. Now we can examine the specific trade-offs for each type of engine. Since fuel is swirling around both sides of the piston in the twostroke, lubrication will be a problem. In a fourstroke, the bottom side of the piston isn’t used, so we can give it a luxurious bath of nice, warm oil – just the sort of thing an engine likes. We can’t do this with a two-stroke, though, so we have to mix some lubricating oil into the fuel. Some of this oil lubricates the engine, but some is necessarily burned along with the gas. In general, this makes two-stroke enginess more polluting than their four-stroke cousins, and this is why they are being phased out. Many inland lakes have banned two-stroke outboards already, and eventually they will be a thing of the past.
As a rule, two-stroke motors are lighter, simpler, and more powerful, though four-strokes have more low-end torque. Twostrokes are very sensitive to fuel, and if you use this type of motor, the single most effective thing you can do to make sure that your engine runs well is to always, always mix your oil and fuel in exactly the correct ratio stated in your manual. Too much will foul your spark plugs, clog your engine with burned oil deposits, and smoke like a chimney. Too little oil will starve your engine of proper lubrication.
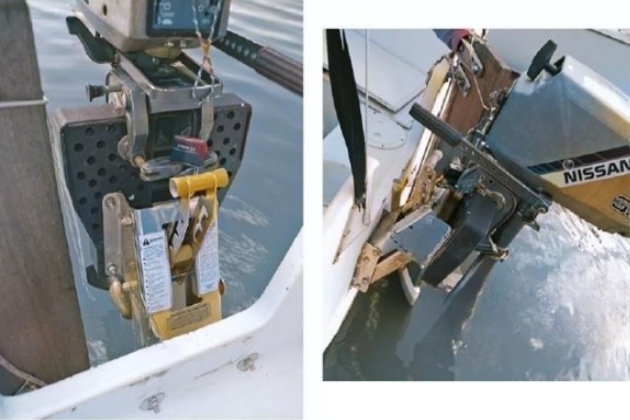
Motor Mounts. Most outboards these days are mounted on the transom rather than in a motorwell, a watertight case that was popular on early Manufacturing of Fiberglass Boats and Design Featuresfiberglass boats. Transom motor mounts can be fixed or adjustable. Adjustable mounts are preferred, as you can raise the motor farther out of the water, protecting the motor head from following seas. The advantages are not great enough to warrant removing a properly installed fixed mount, though. You’ve got a little more latitude when installing an adjustable motor mount.
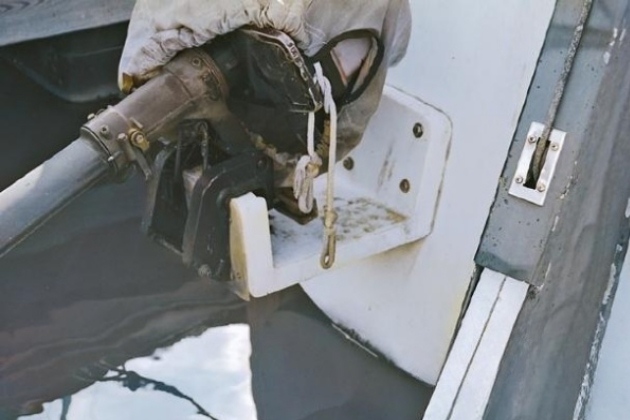
An important thing to check on any motor mount is the pad that the motor itself clamps to. These are commonly made of plywood, and they can rot. I know of one case where an outboard tore away from a rotten pad after it was shifted into reverse. The owner naturally grabbed his expensive motor to keep it from sinking to a watery grave, to the great mirth of everyone watching at the crowded launch dock. A running motor that is not attached to a boat might make a great Hollywood comic routine, but in real life it’s extremely dangerous. The laughing bystanders quickly changed their tune when the wildly spinning propeller cleared the water and started swinging their way. Fortunately, no one was hurt, the motor was subdued, and the experience damaged little more than pride – the owner managed to shut the motor off before water entered the air intake.
New motor mounts are built with rot-proof plastic pads, and an old one could easily be upgraded with StarBoard or a similar plastic building material. Knowledgeable owners check the motor mount screws before starting an outboard, and attach a safety leash to the motor and a strong eye somewhere on the transom.
Outboard motors come in short- and longshaft varieties. For a sailboat, you want the long shaft. Typical lengths are 15 and 20 inches. Short-shaft outboards are designed for dinghies and sportfishing boats, which have smaller transoms than sailboats. Even with a long shaft, it is sometimes a challenge to get the propeller deep enough. Occasionally you will see an extra-long-shaft outboard offered, and the venerable British Seagull outboards, which were designed for sailboats, came with 28-inch shafts.
Dinghy. Dinghies are less common among trailerable sailboats than larger boats – after all, some of the boats we’re cruising in aren’t a whole lot larger than many dinghies. Storage is a problem, and with rigid dinghies, towing is often the only option. Inflatable dinghies, even when rolled up, still take up a lot of space.
But dinghies can be a lot of fun, especially for the sailing family. Piloting a dinghy is a great way for a young sailor to develop skills and learn responsibility. Also, a dinghy may be the only way to get close to shore, and it’s great for exploring inshore areas, checking the depth of unknown channels, or hauling out a kedge anchor to pull yourself off a sandbar.
If your prospective purchase includes a dinghy, look it over for obvious damage. Inflatables can last a long time, though the sun eventually rots the fabric. Replacing an inflatable is expensive, starting at around $1 000, so I’d try several patches before giving up on the whole thing.
Any dinghy you buy should probably be the smallest one you can get your hands on. A Walker Bay 8 is a good commercially available model, and West Marine has a 7-foot 10-inch inflatable made by Zodiac. Both are good choices, though if your goal is serious longterm cruising, a larger model might be better.
Rigid dinghies can be rowed or sailed, whereas most inflatable dinghies can be rowed only for a short distance in calm conditions. All dinghies should include basic safety equipment, such as:
- oars,
- life jackets,
- daytime distress signals,
- flares,
- and an anchor.
More than one sailor has died when a dinghy motor malfunctioned late at night and he was swept out to sea. A nice safety improvement is a line of small fenders attached to the gunwale – this makes most dinghies unsinkable and more stable, and they won’t bump the boat in the middle of the night.
