Learn everything you need to know about conducting a yacht survey with our comprehensive guide. Discover key points and detailed checklists for inspecting the hull, deck, rig, engineering, interior, and overall condition of a yacht. Perfect for prospective yacht buyers and owners ensuring their vessel’s safety and reliability.
If the yacht of your choice is costing a substantial amount then, just like a house purchase, a professional should survey it. If you are buying her second-hand, and borrowing money to purchase her, then the lender may insist on it. The Insurance company may also want sight of the report before confirming the quotation.
TIP: ensure that the surveyor is qualified to survey the construction type of the vessel, and carries third party indemnity insurance.
Key points about a survey
The surveyor should be qualified to inspect the construction type of your yacht. Not all are. Check if they are members of the International Institute of Marine Surveying (IIMS). This is an independent, non-political organisation that lists specialist surveyors and marine consultants in every corner of the globe.
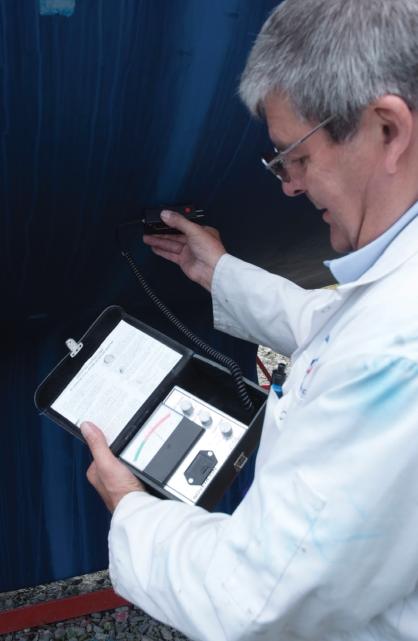
A condition survey provides a professional opinion on the structural condition of visible aspects of the yacht only, and the report should not be considered as a schedule of works, though it will certainly assist those preparing an estimate for repair or refurbishment. Hull condition is assessed using non-destructive methods of examination such as ultrasound and moisture meters, and the report is limited to the sample areas where the substrate paint is scraped away.
The surveyor will note whether the hull has undergone osmosis treatment, but not disturb the epoxy resin coating that has been applied. The readings from the ultrasound and damp meters, coupled with the practical test of tapping suspect areas of the hull, will give an indication to the surveyor whether further exploratory work is required to check for damp, delamination, and voids.
Likewise, the engine and machinery are given a visual inspection only, and the surveyor will limit his report to signs of corrosion, oil and water leaks. The content of tanks are not tested for contaminants unless you specifically ask for this to be done. Water and biological contamination in the fuel tank can be a particular problem.
Hull fastenings keel bolts and bolts securing thru-hull fittings etc – are not drawn out for inspection unless you ask for this to be done. The same applies to the testing of doors, hatches and windows for water tightness.

The report will reflect the experience of the surveyor at looking at similar craft and construction methods. He will know instinctively where damp is likely to lie, where rot or corrosion could be prevalent and where problems are likely to arise in the future. His report will be thorough, have an action plan, and a valuation based not on its replacement cost, but the retail values achieved by yachts of a similar type and condition.
A professional surveyor will not only highlight any structural concerns, and provide a list of items that need attention, but his report will give you peace of mind that problems will not appear later.
If you decide against having a professional survey, here is a checklist to work through.
Hull Checklist
1 Look at the transom and check the hull identification number.
Does it match the number on the registration document?
2 GRP boats:
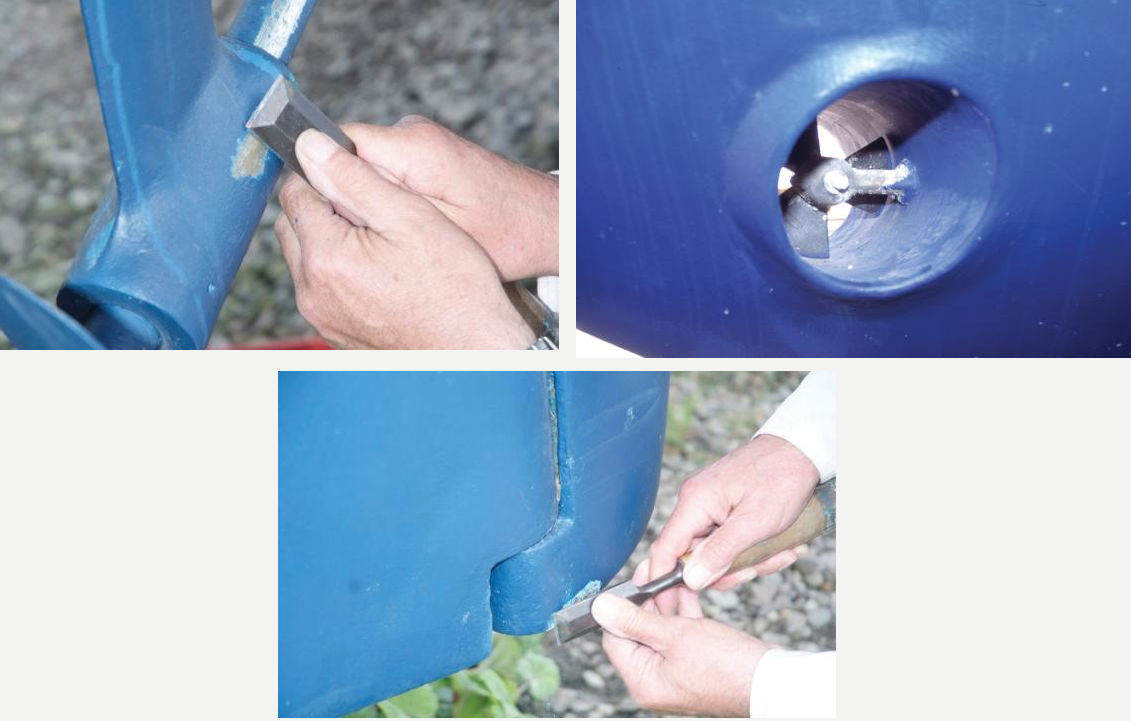
Take a small rubber hammer or the handle end of a screwdriver, and tap the hull lightly at short intervals across the whole area of the hull. If there is a sudden change of note, this can indicate osmosis, voids or delamination.
3 Wooden boats:
Check for black discolouration at joints and plank ends. This is a clear sign of the first stage of rot. Use a sharp bradawl to test suspect areas like the garboard strakes for softness – another sign of rot.
4 Does the keel run true to the centreline?
If not, then the yacht will perform better on one tack than the other.
5 Mismatched paint.
This could indicate that the yacht has been damaged in the past. If you were not informed of any repairs, what else have you not have been told about?
6 Does the propeller shaft turn true?
7 Take hold of the prop and check for shaft movement. If there is, this suggests a worn cutlass bearing.
8 Does the propeller have any nicks on the leading edges of the blades? These will lessen its performance.
9 Do any of the bronze fittings show signs of pinkness or pitting?
This is a sign that the boat has suffered from electrolytic action between dissimilar metals (bronze and stainless steel for instance).
10 Check the sacrificial anodes close to the prop shaft and rudder for signs of pitting. Do they need to be replaced?
Damp meter readings at regular points around the hull provide the best indication of the porosity of the gel coat or paint system. Non-invasive testing. The surveyor will scrape away small sections of paintwork at regular intervals around the hull to check for any breakdown in the gel coat. This yacht had already undergone extensive osmosis treatment, but pin holes through the epoxy coating were clearly visible.
Rudder bearings, especially those where bronze castings connect to a stainless steel rudder stock, can be badly affected by electrolysis. Often, the only way to check is to scrape away the paintwork.
The bow-thruster impeller can suffer wear, and if the gap between the blade tips and tunnel is large, then its performance will be considerably reduced. Check also that the bearings are not worn or loose.
Read also: Anatomy of a Boat Cost and Recommendations for a Profitable Sale
The same applies to the P-bracket and propeller. If there is any sign of “pinkness” within the bronze fittings – and this will be most prevalent on the tips of the Boat Propellers – Types and Technical Characteristicspropeller blades – then electrolytic action has occurred and the metal will be severely weakened.
The deck takes a good deal of wear and tear and provides a good indication of the yacht’s overall condition.
Deck Checklist
1 Walk around the decks checking for soft spots and investigate.
2 Check that the pushpit, pulpit, toe rail and deck fittings are secure and without the telltale signs of rust or rot around their base.
3 Check the stanchions for excessive movement. This could indicate a collision in the past.
4 Check the shroud plates are secure and not leaking. They may need to be re-bedded.
5 Check for telltale signs of cracking around chain plates and other highly stressed fittings.
6 Wooden boats: Check for rot wherever fresh water can lie – the cockpit corners, the hatch area, and scuppers etc.
7 Teak decking: Is the planking badly pitted around the grain. This indicates that it has been pressure washed.
8 Is the caulking sound or are there cracks along the edge of some planks that let in water?
9 Have dowel holes lost their cappings? Teak decks are very expensive to replace.
10 Check around hatches and windows. Are there water stains inside? If so, these will need to be re-bedded.
11 Winches: do they turn easily? Do the ratchet pawls stick? These may need to be serviced.
Gas installation. Check for perished tubing and leaky connections. EU regulations insist that gas lockers must drain outboard of the hull.
Teak decks look wonderful when new, but require considerable care and attention. Check that the caulking is sound and screw dowels are not starting to lift. A power washer does the greatest damage to the deck, and the tell-tale sign is bad pitting between lines of grain.
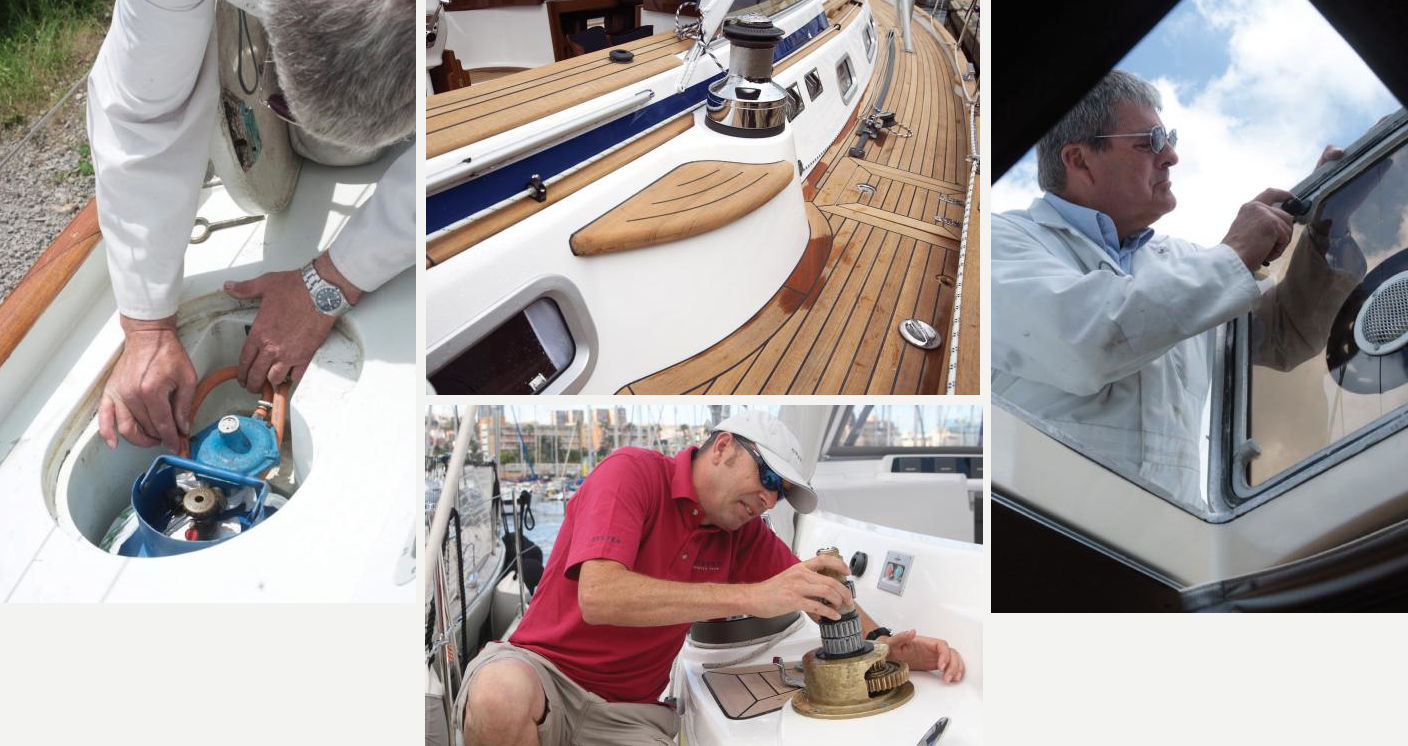
Winches should be checked for corrosion and wear. Are all the pawls in place and do they spring out satisfactorily?
Hatch rubbers perish after time and then let water in. A visual inspection will show up any problems, but it is good to aim a hose pipe over them and the cabin windows, and check for any water ingress.
The rig requires a thorough check because potential failings are not always easy to spot.
Rig Checklist
1 Check halyards and sheets for sign of chafe.
2 Check rigging and swages for signs of damage, bending and broken strands. If any of the 1/19 wire within the shrouds are broken, all standing rigging should be condemned unless there is recent proof of purchase of any replacements.
3 Check blocks for wear.
4 Are there any signs of corrosion on the alloy mast and booms?
5 Are the fittings secure?
6 Does the furling gear and reefing systems work easily?
7 Check the rubber collar waterproofing the joint between mast and deck. Is it waterproof?
8 Sails: Do they show signs of chafe? Check the spreader/corner patches as well as batten pockets for loose stitching. Plan to have them washed and serviced.
The rig must be checked thoroughly. Insurance companies will often insist that standing rigging more than 10 years old should be replaced as a matter of course.
All mast fittings must be checked for wear, especially highly stressed areas like the boom gooseneck and spinnaker pole connectors. Check also for any signs of corrosion on the spars which may be caused through electrolytic action between dissimilar metals.
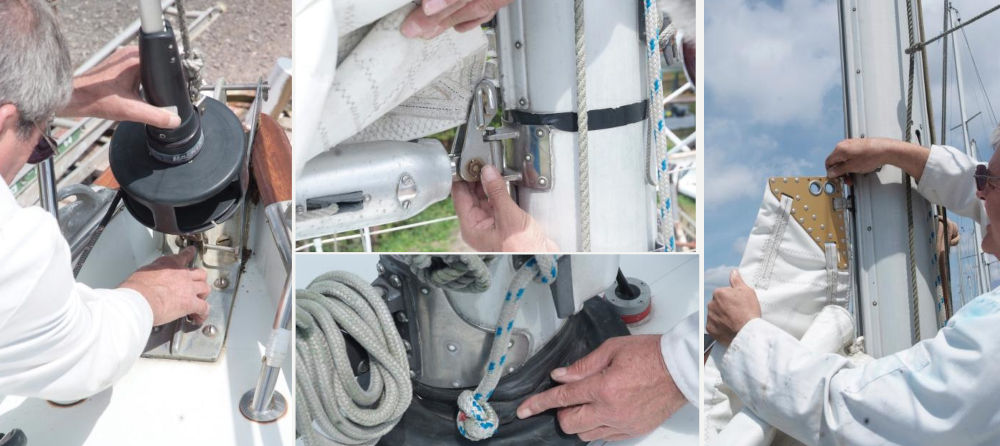
The rubber gaiter waterproofing where the mast goes through the deck can also perish over time. Check for tell-tale splits in the rubber.
Sails need to be checked for signs of wear and tear. The main headboard and sliders take a lot of punishment, but you should also check for signs of fraying around batten pockets and the corners of each sail.
Engines require regular maintenance to remain reliable. The state of the engine room and ancillary fittings provide a good indicator.
Engineering Checklist
1 Does the engine have good water flow through it?
2 Check belts and hoses for cracks or wear. Rubber deteriorates quite quickly in a salty environment.
3 Check the oil in engine and transmission and rub a drop between your fingers. Can you feel any grit?
4 What is the colour? If it is grey or cream a water leak could have emulsified the oil.
5 How does it smell: burned? That is a sign of overheating. If in doubt, send a sample to a laboratory for testing.
6 Does the transmission shift easily or does it clunk?
7 Check for debris in the water strainers and pumps.
8 Test the seacocks to make sure they open and close.
9 Is the steering free and easy?
10 Check the electronic instruments, batteries and electrics, testing lights and pumps in turn.
11 Boat Outboard MotorsOutboard motors:
- Does it start easily?
- Look for excessive corrosion under the cover and around the prop.
- Check that the tilt mechanism works properly.
Check all sink fittings in turn for tell-tale signs of weeping that they operate correctly.
Batteries are expensive to replace. All yachts should have two batteries – one for ship’s electrics, and one for Inboard and Outboard Enginesstarting the engine. Test the batteries for capacity and charge retention.
Check the oil in both the engine and gearbox. Any opaqueness or milkiness is a sure sign that there is a water leak somewhere. Does the oil smell ‘burnt’? Rub some between your finger tips to check if the oil is carrying any deposits.
Look for signs of rust and weeping water around the engine. If you can’t get a clear view, try to point a digital camera at the area and inspect the photographs for signs of corrosion and leaks.
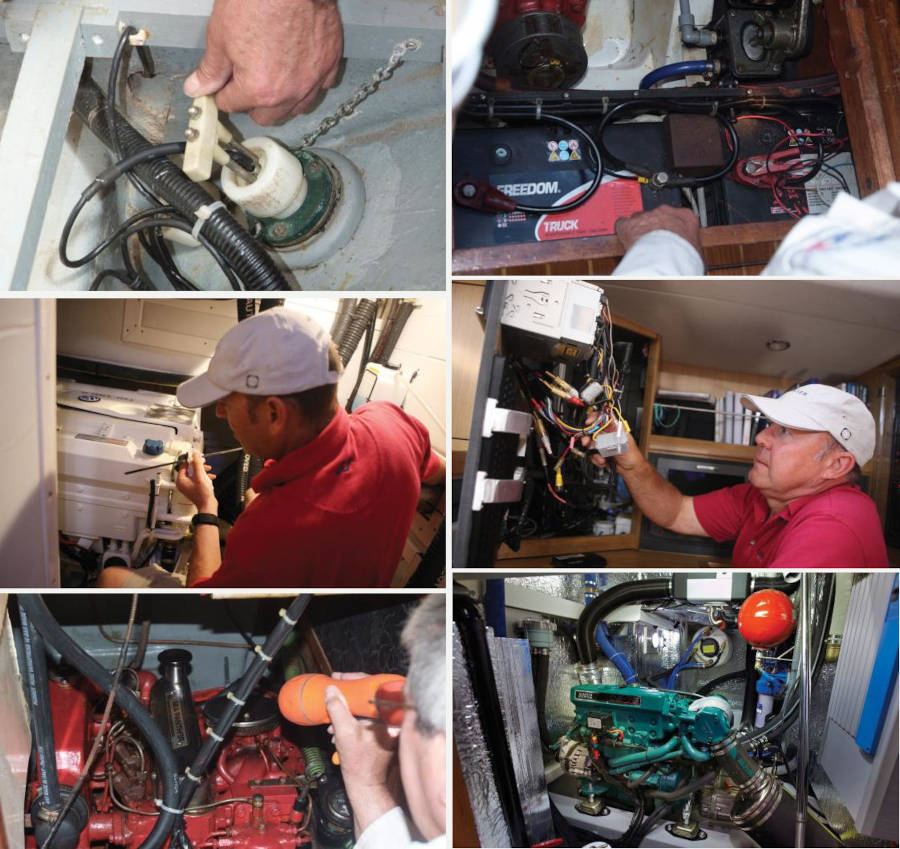
Pull out the electrics panel and look for signs of wiring repairs. Check wiring runs beneath the floor and look for corrosion and any sign of ‘blackness’ at wiring ends. This will suggest that the wiring has been immersed at some point in the past.
If only all engines had this much access around them. This installation aboard a Hallberg-Rassy yacht simplifies inspection and servicing considerably.
The insides of a yacht will provide clues to past history, repairs and potential problems.
Inside Checklist
1 Is there a musty smell? This could indicate a leakage, water damage or general neglect.
2 Check the bilges for signs of damage or repair.
3 Wood, Aluminum and John BoatsWooden boats: Check each frame for cracking. These will need doublers to strengthen them.
4 Are there any waterlines inside the boat? Look for rust lines around the hull sides and engine. These indicate that the boat took on water or has been flooded in the past. Another give-away will be any wiring run below these waterlines. Disconnect their connections and check to see if the copper wiring has gone black.
5 Floors and bearers: Any sign of rot?
6 Are the handrails secure?
7 Is the upholstery in good shape?
General Checklist
1 Check maintenance records for evidence of regular servicing. Look for recurring problems.
2 Contact previous owner(s) and ask about the boat.
3 Check the brokerage columns online and in magazines to determine value range for model and year.
What state are the cushions in? Is there a smell of mustiness below? What state is the finish on the floors, treads and furnishings? These checks will give a good indication on whether the yacht has been well looked after.
Pull the floorboards up and check for water in the bilge or waterlines that might suggest that the boat has been flooded in the past. Are the wooden bearers sound? Is anything loose in the bilge?
Hand rails take a severe amount of abuse in rough weather as the crew swing from one to another. Are they secure or is there movement when you try to waggle them? On older boats, these often need attention.
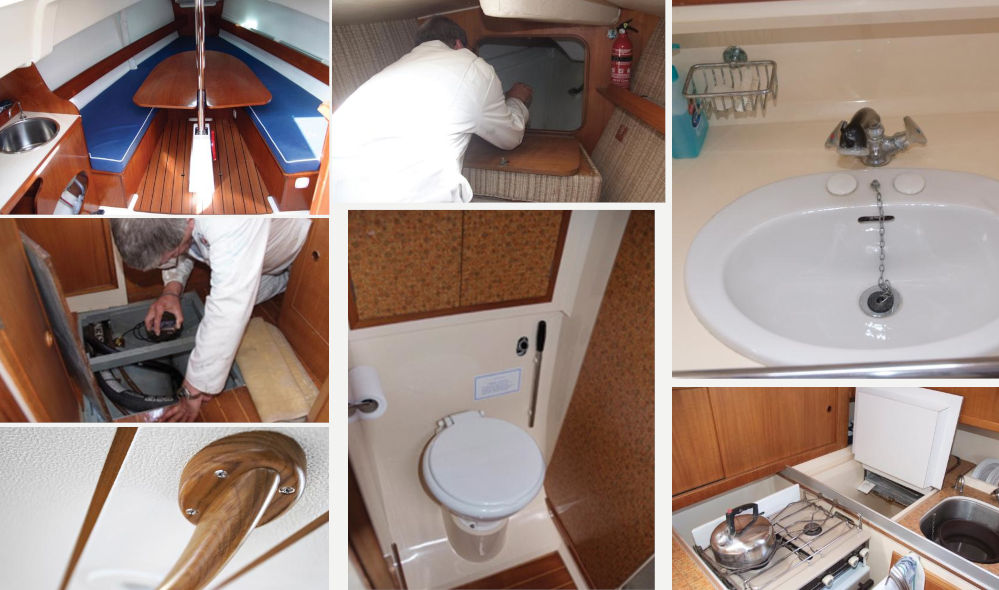
Look in all the nooks and crannies for signs of repair to the hull and water seepage. If you find an obvious repair and the owner has not mentioned it, what else may not have been disclosed?
However unsavoury, don rubber gloves and check out all the pipes, pumps and stopcocks connecting the toilet, sink and shower stall. If problems are hidden, this is where you are most likely to find them.
The galley invariably gets the most wear and tear. Check that the gas connections to the cooker and fridge are safe, the water pumps work satisfactorily and that water drains freely from the sink.

- Cruising World, Subscription Service Dept., P. O. Box 953, Farmingdale, NY 11737.
- Motor Boating & Sailing, P. O. Box 10075, Des Moines, IA 50350.
- Multi-hulls, 421 Hancock St., N. Quincy, MA 02171-9981.
- Nautical Quarterly, 373 Park Avenue South, New York, NY 10016.
- Sail Magazine, P. O. Box 10210, Des Moines, IA 50336.
- Sailing, P. O. Box 248, Port Washington, WI 53704.
- Small Boat Journal, P. O. Box 400, Bennington, VT 05201.
- Soundings, Soundings Publications, Inc., Pratt Street, Essex, CT 06426.
- The Practical Sailor, Subscription Dept., P. O. Box 971, Farmingdale, NY 11737.
- Wooden Boat, Subscription Dept., P. O. Box 956, Farming-dale, NY 11737.
- Yacht Racing/Cruising, North American Building, 401 North Broad Street, Philadelphia, PA 19108.
- Yachting, P. O. Box 2704, Boulder, CO 80321.
- Beiser, Arthur. The Proper Yacht, 2nd ed. Camden, Maine: International Publishing Co., 1978.
- Chapman, Charles F. Piloting, Seamanship and Small Boat Handling, 56th ed. New York: Hearst Marine Books, 1983.
- Coles, Adlard. Heavy Weather Sailing, 3rd rev. ed. Clinton Corners, N.Y.: John De Graff, Inc., 1981.
- Pardey, Lin and Larry. Cruising in Seraffyn and Seraffyn’s Mediterranean Adventure (W. W. Norton, 1981).
- Roth, Hal. After 50 000 Miles (W. W. Norton, 1977) and Two Against Cape Horn (W. W. Norton, 1968).
- Royce, Patrick M. Royce’s Sailing Illustrated, 8th ed. Ventura, Calif.: Western Marine Enterprises, Inc., 1979.
- Kinney, Francis S. Skene’s Elements of Yacht Design, 8th ed. New York: Dodd, Mead, 1981.
- Street, Donald M., Jr. The Ocean Sailing Yacht, Vols. I and II. New York: W. W. Norton, 1973, 1978.