Sailing is an exciting and multifaceted activity that blends practical skills with a deep understanding of marine conditions and navigation principles. At its core, sailing involves harnessing the power of the wind to propel a boat across the water. Different types of boats are used in sailing, each with its unique characteristics and components. This material provides you with basic sailing tips.
To sail effectively, one must be familiar with a wide range of sailing terminology. Knowing the difference between port and starboard, which refer to the left and right sides of the boat respectively, is crucial for communication and safety on the water. Understanding how to trim sails, tack, and jibe are fundamental maneuvers that allow sailors to navigate and control their boat in varying wind conditions.
- Rules of the Road
- Basic Rules
- Weather on the Water
- Altering Course
- Preparing Your Boat and Crew
- Shortening Sail (Reefing)
- Lightning
- Sailing Downwind in Strong Winds
- Navigation and Piloting
- Navigation Tools
- Measuring Time
- Plotting a Fix
- Danger Bearings
- Can We Turn on the GPS Now?
- Sailing at Night
- Emergencies
- Medical Emergencies
- Crew Overboard
- Risks to the Boat
Navigation skills are also vital in sailing. This includes reading nautical charts, using a compass, and understanding the principles of dead reckoning and coastal navigation. Modern sailors often rely on GPS technology, but traditional navigation skills remain essential for safety and effectiveness on the water.
Weather knowledge is another critical component of sailing. Being able to read weather patterns, understand wind behavior, and anticipate changes in the weather can make the difference between a smooth sailing experience and a challenging, potentially dangerous situation. Sailors must also be aware of tides and currents, which can significantly impact navigation and boat handling.
Safety is paramount in sailing. This includes wearing appropriate personal flotation devices, understanding the rules of the road at sea, and being prepared for emergencies with proper safety equipment and procedures.
Sailing is a rewarding activity that requires a blend of knowledge, skill, and intuition. Whether cruising leisurely or racing competitively, sailors must continually hone their abilities and stay informed about best practices to enjoy this timeless maritime pursuit fully.
Rules of the Road
The first few times out on your boat should be eventful experiences as you learn about Technical Recommendations for Inspecting Your Boatyour boat and how it behaves. Surely some unexpected things will happen, but hopefully you won’t need the Coast Guard.
After you’ve figured out the basics, you’ll want to bone up on the Coast Guard’s Navigation Rules (also called the Rules of the Road) that are essential for any captain to know. This section won’t make you a licensed captain, but hopefully it will help you handle some of the more common situations that you might encounter.
First, though, an important disclaimer: The rules contained here summarize only a small part of the basic Navigation Rules for which a boat operator is responsible. Think of this section as advice only; it is by no means everything you need to know!
Get a copy of the Coast Guard’s Navigation Rules and study it. The book is available through the US Government Printing Office. The legalese can be hard to interpret, but fortunately there are lots of resources to help you understand the meaning and intent of the rules, if not the actual rules themselves. The US Power Squadron, a nonprofit educational organization dedicated to boating safety, offers classes (both classroom and webbased), vessel safety checks, and other materials at reasonable prices – their computer-based America’s Boating Course is $35. There are other resources as well, including books, of course, such as Chapman’s Piloting and Seamanship. (It does help to get a current edition – my new copy of Chapman’s includes information on new restrictions involving the Department of Homeland Security, pollution regulations, and updated radio licensing requirements that won’t be found in an old copy.)
Basic Rules
A busy harbor on a nice, sunny Saturday can look a bit like a free-for-all. There are boats of all shapes and sizes going in all directions at once. There are no roads to stay on and no lanes to follow. How all these boats keep from running into one another is, at first glance, a mystery.
But the more you understand about the Coast Guard Navigation Rules, the more you begin to see that there is a defined system in place, and it does make sense – most of the time anyway. In some instances, there are «lanes» (called Traffic Separation Zones) and even something like «roads» (navigation channels defined by buoys).
Learning all of the rules is a tall order, especially when you consider that there are two different sets of rules, and they don’t always agree. The International Rules, sometimes called Colregs, are generally used in the open ocean. The Inland Rules apply to most areas where you’ll be taking a trailerable sailboat, so I’d concentrate on them, but check your chart. If you see a Colregs Demarcation Line, that’s where the rules change. These are the federal rules, and they don’t include state laws or local regulations. For example, a nowake zone or requirement to stay a hundred yards away from a swimming beach would be covered under state law.
You can take comfort in the fact that in many parts of the country, if you learn only a few of the rules, you’ll be ahead of the majority of the recreational boaters on the water. Unfortunately, far too many captains learn little more than where the throttle is. The Navigation Rules are federal law, and while you don’t have to memorize them unless you’re taking the captain’s test, a working knowledge is essential.
There are a few important overall rules – rules about the rules, if you will.
First, the Navigation Rules can be overlooked to avoid immediate danger. Do whatever it takes to avoid a collision. If you’re about to get run over, don’t worry about sounding three short blasts on you horn before you put her in reverse.
Everyone shares the responsibility for good seamanship. If there’s an accident, everyone is at fault. Never assume that the operator of the other boat has ever heard of the Navigation Rules. Some haven’t.
Another important principle: the closer you get to another vessel, the more important the rules become. If you can sail in an area where you can avoid other vessels, you won’t have to worry much about the various rights-of-way. Now, there are very few places in the world that meet this description, and you will be forced to sail close to other vessels at some point. But you can often make a simple course correction as soon as you see a boat approaching in the distance, and avoid a situation where you will need to know the rules. I always do this when a commercial vessel is in the area, especially ships or a fishing vessel with nets out. Both of these vessels have the right-of-way over a recreational sailboat.
The Navigation Rules establish a certain pecking order among vessels, giving some the right-of-way over others. Some people believe that sailboats have the right-of-way over powerboats, regardless of size. This is occasionally true, but not always. Here’s a list of the right-of-way for boats, starting with the most privileged (termed the stand-on vessel):
- A vessel not under command – for example, one with a broken engine or rudder.
- A vessel restricted in ability to maneuver.
- A vessel engaged in fishing.
- Sailing vessels.
- Power-driven vessels.
In many cases, a powerboat in a narrow channel is restricted in its ability to maneuver because it is constrained by draft. Likewise, a commercial vessel or vessel engaged in towing is restricted in its ability to maneuver. While the rules don’t say anything specifically about ferryboats, the courts have repeatedly ruled that ferries have the right-of-way. In general, give commercial vessels a wide berth whenever possible.
Additionally, the rules have provisions for the meeting of two sailboats:
- When both boats are on opposite tacks, the boat on a starboard tack (the wind coming from its starboard side) is the stand-on vessel. The vessel on a port tack is the give-way vessel.
- When both vessels have the wind on the same side, the vessel to windward (or upwind) is the give-way vessel; the vessel to leeward (or downwind) is the stand-on vessel.
- If a vessel on a port tack sees another to windward, and cannot tell what tack the other boat is on, then it must keep clear of that vessel.
Take a look at these three photos and try to imagine the correct course of action (the answers are on below).
Note that if your sailboat’s motor is running and in gear, you are considered a power-driven vessel even if your sails are up.
Keeping a Lookout, Maintaining Safe Speed, and Determining Risk of Collision. The rules require that you keep a lookout on your boat at all times. They define a lookout as a person with no other duties besides watching out for other boats. On a trailer sailer, this usually means the helmsman, but you can’t always see too well around a big deck-sweeping genoa. If you have extra people aboard, let them help you watch for other boats, or let them take a turn at the helm while you do the lookout duty. There’s nothing in the rules that prohibits singlehanded or short-handed sailing, but while you’re underway, you have to keep watch for other boats.

Let’s suppose you’re on lookout duty and you see another boat heading your way. How can you tell if you’re on a collision course? The most common method is to take a relative bearing on the vessel and watch for a change. If the angle of a boat in the distance seems to change as it gets closer, then you are most likely not on a collision course. You can use your own boat to help determine this – for example, you first notice the boat off your bow. From where you’re sitting, she appears right in line with, say, the leeward grabrail. You look two minutes later, and she appears larger but in line with the mast. The other vessel’s relative bearing has moved forward, and you probably aren’t on a collision course. If her bearing changes only slightly, then a potential for collision exists.
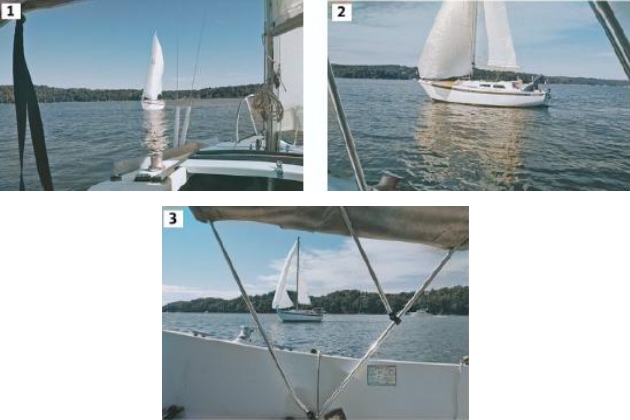
In fig. 1, both boats are on a similar point of sail but different tacks. Since I’m the boat on a port tack, the other boat has the right-of-way. I have to keep clear. In fig. 2, we’re both on the same tack, but I’m downwind of the other boat. The rules require that I maintain course and speed. In fig. 3, I’m sailing on a beam reach while the other boat (on a port tack) is approaching from upwind. I have the right-of-way, and I have to maintain course and speed.
Be especially watchful of large vessels and ships. While the Navigation Rules treat all vessels equally, it’s only common sense that a conflict between a fiberglass pleasurecraft and a large steel ship will leave the smaller boat with all the damage. Avoid getting close to any large ship that you see, and be wary of its speed. A tanker might be traveling four to six times as fast as the average Buying Trailerable Sailboats: Condition Assessment and Riskstrailerable sailboat, so the speck on the horizon can become very large in a surprisingly short time.
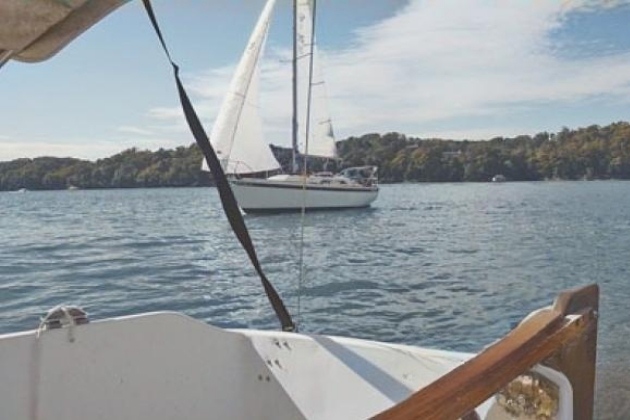
But here it looks like the captain doesn’t know the fine points of right-of-way and he’s getting too close without changing course. The rules say that I should do whatever it takes to avoid collision. In this case, tacking or luffing is the best course of action.
Usually, sailboats easily comply with rules for safe speed because they go pretty slowly – relatively speaking. The rules state specific factors that determine safe speed, including visibility, traffic density, sea state, and your draft and maneuverability. Usually a sailboat’s displacement hull is self-limiting, but there are times when even 5 knots is too fast. Beam-reaching through a crowded anchorage on a windy day could easily be considered operating a boat at an unsafe speed.
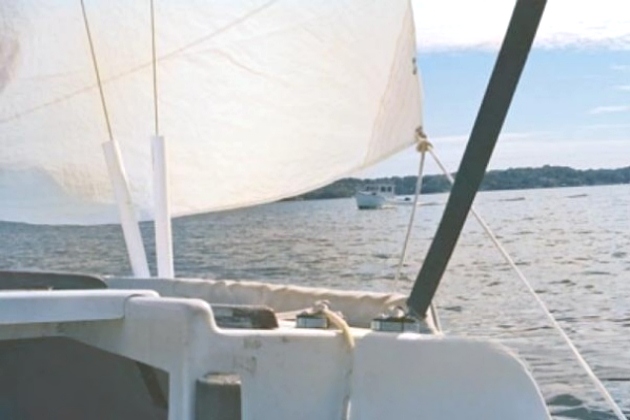
Keeping a close lookout is especially important aboard sailboats with headsails, as they can cause a blind spot forward. This sail has a high clew, which helps with visibility. Some sails have small plastic windows sewn into them, which also help. Shift your position frequently to be sure the way is clear, or assign a crewmember to be your forward lookout.
The Danger Zone for Powerboats. The Navigation Rules imply (although they don’t actually spell out) a concept for powering called the danger zone. It extends from dead ahead to 22,5 degrees aft of the starboard beam. A powerboat approaching from this side has the right-of-way. Coincidentally, this is the same area covered by your green sidelight. At night, the approaching boat sees a green light – and in this case, green means go. Usually, the preferred course of action is to alter your course to starboard, slow down, or stop. The give-way vessel should not turn to port for a vessel forward of the beam, but by turning to starboard you’ll «show him your red» or, in other words, alter course to starboard and pass port to port. You can’t always do this if you’re in a channel or near shoals or if the approaching vessel is far on your starboard side. But if you’re meeting nearly head-on and there’s still plenty of time, the preferred action is to alter course to starboard and pass port side to port side.
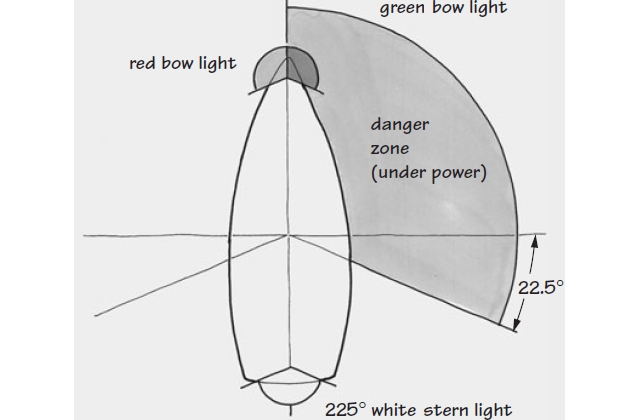
The danger zone principle doesn’t work in all cases, like in the Great Lakes or Western Rivers, and it wouldn’t work for boats under sail (such as a starboard-tack crossing versus a port-tack crossing, for example). But it’s a general rule that’s good to know.
Weather on the Water
Weather is important to all mariners, but especially for sailors. The comparatively slower speed of most sailboats means we are less able to run for cover when the water gets rough. Moreover, because the average trailer sailer is smaller and lighter than most other vessels, we feel the effects of stormy weather more acutely. But although we’re more uncomfortable in bad weather than our larger siblings, at least we have the advantage of smaller, easier-to-handle sails and gear.
Your exposure to heavy weather will depend on how far out you go. Generally speaking, you won’t have the same concerns as a vessel crossing the open ocean. But you could have to deal with some short-term rough weather if you sail more than an hour or so away from a safe anchorage, and a real duster on the water can be a scary – and even dangerous – experience.
The best way to deal with unpleasant weather is to avoid it if at all possible. An accurate, detailed weather forecast is essential before you head out for anything more ambitious than a quick day sail in the harbor. Weather reports from television news, while valuable, shouldn’t be your only source of information. Up-to-date weather summaries are available through the Internet, VHF weather channels, and dedicated weather radios. Most marine VHF radios include a number of channels that receive NOAA weather radio broadcasts. If not, you can buy a dedicated weather radio receiver. These broadcasts are automated brief summaries of local weather conditions, and they are useful to monitor before a day of sailing. Conditions can change fast, especially in the summertime, so check the weather channels frequently.
Read also: Tips on Rigging a Boat and Using Knots in Sailing
Of course, a weather forecast can be a far cry from what you actually experience on a given day, so you’ll need to develop your own meteorological sense. Local knowledge of summertime weather patterns is gained through experience, observation, and talking with other mariners. Commercial fishermen and professional mariners (tow vessel captains and pilots, for example) spend more time on local waters than anyone, and are vast sources of knowledge – if you can find them and get them to talk. Recreational fishermen and other sailors can also be helpful and are easier to find. (Books about weather written specifically for sailors can greatly increase your knowledge; it will help to read one or two of those as well.)
Some signs that the weather is about to change are obvious: heavier cloud cover on the horizon, a sudden shift in wind direction, or a drop in temperature. Other signs are more subtle: you hear a lot of static on an AM radio, or you suddenly notice you’re the only small vessel still out sailing while everyone else has headed for the dock. Sometimes these changes amount to nothing, but other times they warn of a heavy line squall coming your way.
If you notice signs that the weather is about to change, what should you do? Prepare your boat and crew, shorten sail, and consider altering course for home or sheltered waters if possible. What to do first will depend on your situation.
Altering Course
If you’re just out for a day sail and you notice a line of dark clouds on the horizon, consider turning for home, but only if you can make it. Try to imagine what you will do if a big wind hits you right in the middle of a tricky docking or mooring situation, and have plan B ready just in case. If your marina is tight or your mooring crowded, it may be better to stand off and wait the weather out, but make sure you have plenty of room in all directions. Many boats have come to grief when the wind suddenly shifted and the slackened anchor rode wrapped around the propeller. If you’re cruising far from home, check the chart for a safe spot, preferably with a good anchor-grabbing mud bottom and shelter from the wind and waves. It’s often difficult to predict which direction the wind will come from, so be ready if it changes.
Preparing Your Boat and Crew
If it looks like you won’t be able to outrun a storm, you need to make preparations. Talk things over with your crew, discussing your plan of action and your options. Calmly go over the procedures for «man overboard» and «abandon ship». Don’t overdo it – a panicked crew won’t be able to help you – but don’t be too casual about it either. Put on life jackets and harnesses, and go over the rules for use. For example, no one can be on the foredeck without a harness clipped to a jackline or a solid base. (Never clip a harness to the outer lifelines.) Pump the bilge dry, so you can see if you’re taking on water later. Secure all hatches and stow any loose items below. If you have any young children aboard, make sure someone is in firm charge of them. Allowing them to help with appropriate jobs can help ease fears, and allowing them on deck to watch – if things are under control – can be a great learning experience for them. Double-check your position, and give yourself plenty of sea room if you can.
Don’t Play Around with Summer Storms. Once I had a boatload of friends on my Catalina, and we were heading for the harbor for an afternoon of daysailing. Several had never been on a sailboat before and couldn’t wait to go sailing. The forecast was for a typical Charleston summer day – clear skies and an afternoon sea breeze. With so many friends aboard, finding room to stow everyone’s coolers and food got a little crazy, and I forgot to turn on the VHF to get a last-minute weather update. We’d just cleared the dock when I noticed the clouds building on the horizon. I wasn’t immediately concerned, but commented that «we needed to keep an eye on those clouds».
Within fifteen minutes, it was obvious that rough weather was heading our way, and fast. I broke the bad news that we’d better head back. Everyone was disappointed; a few even questioned whether it really looked all that bad. But no, I said, I’d rather not take the chance. We put the cover back on the main (which we never even raised) and wheeled around to head toward the marina. Just as a precaution, I casually passed out life jackets and said, «You probably won’t need these, but I would like anyone on deck or in the cockpit to wear one».
The return trip was faster thanks to a 3-knot tide, but we were clearly being chased. The clouds built with amazing speed, and I was presented with a dilemma – should I stand off and wait the storm out or try to get the boat back into the slip before the storm hit? I decided that since I had two experienced and trusted line handlers with me, we could try to get the boat into the slip. I talked over the docking plan with them. We would try it, but turn and run for open water if conditions deteriorated. Heavy, fat drops of rain were just starting to fall.
We managed to get the boat into the slip and tied up quickly without any mishaps. Everyone was gathering up their things in the cabin and getting ready for a dash to the parking lot when the real storm hit. The wind went instantly from 15 to perhaps 40 knots, and visibility dropped to about 50 yards. The boats in the marina were heeling 20 degrees. I remember feeling the mast shake and shudder from the wind. Everyone’s eyes got as big as pancakes. I smiled and said, «I told you so».
You really don’t want to play around with storms on the water. Be conservative and don’t take unnecessary risks.
Shortening Sail (Reefing)
Headsails are usually reduced by changing to a smaller one; you can also bring in the headsail altogether and sail under the mainsail alone if your boat will do that. Some boats reportedly refuse to sail to windward without some form of headsail. Some boats have a very heavily built jib called a storm jib, though it’s debatable whether a trailerable sailboat will see conditions that warrant its use. A storm jib was included when I bought my boat. It has never been used, as far as I can tell, and I honestly hope it stays that way!
On most boats, the mainsail can’t be changed to a storm sail. (On some boats, small sails called storm trysails can be hoisted in place of the main, but they are rare aboard trailer sailers.) Rather, the lower portion of the sail is gathered at the boom and secured there, leaving the upper part of the sail standing.
What is reefing?
Reefing is called process of reducing the exposed area of the main sails. Although there are other methods, the most common system you will find on trailerable sailboats is called slab or jiffy reefing. Lines led through reinforced eyes (called cringles) sewn into the leech and luff are tensioned, pulling the new tack and clew down to the boom (after you’ve eased the halyard, of course). The remainder of the sail is gathered using short lines through reef points sewn into the middle of the sail. A mainsail can have any number of reef points. Two or three are common, though it may have more or none at all. You can have a sailmaker add reef points or add them yourself. Sailrite sells a reef-point kit, but you’ll need a powerful sewing machine to install it.
When the wind picks up, reefing the mainsail can make a big difference in the way the boat handles, but the key is to reef before the wind gets too strong. If you wait until a storm hits, it’s much harder to reef the mainsail. If you’re heeling more than 25 degrees, it’s time to reef. The usual process goes something like this:
- Ease the main halyard but don’t lower it completely. Marking the halyards with a few turns of contrasting thread at the correct reefing position can help determine how much to lower it.
- Pull down the luff cringle (a metal ring sewn into the sail close to the mast) and secure it with either a line and cleat or a reefing hook – an upside down hook mounted near the gooseneck at the boom.
- Pull down the leech cringle and secure it. This is usually done with a line that’s secured to the boom at one end, passes up through the leech cringle, then back to a cheek block in the boom where the line is led forward and secured. The cheek block should be a little aft of the leech cringle so the foot of the sail will be properly tensioned.
- Gather the rest of the sail using short lines through the reef points and secure them along the boom. (Remember how to tie a reef knot?) There should be relatively little stress on the reef points; most of the load is carried by the leech and luff cringles.
There is no reason why a headsail can’t be reefed in a similar fashion, with reef points and extra cringles, but this is usually done by cruising sailors who don’t have room to carry dozens of bags of sails. It’s an option, though, and reef points are usually cheaper than a second headsail.
If you’ve waited too long to reef and the wind is blowing strong, reefing is more difficult, but it will be somewhat easier if you heave to before you reef. The mainsail will be somewhat blanketed by the jib, and the boat will be a little steadier than if she were underway.
Lightning
Being struck by lightning is rare, but it is a real risk to a sailboat. If you are caught in an electrical storm, avoid the shrouds and stays – lightning sometimes runs down them to get to the water.
There is no clear consensus about lightning protection. The American Boat and Yacht Council (ABYC) has updated its lightning protection standards. It’s been said that poorly done lightning protection systems can actually increase a boat’s chances of being hit. Providing a good, straight-line path from the mast to the water is the basis of most lightning protection systems. You need at least a square foot of metal below the water to ground lightning. If you have an external metal keel, a №4 cable wired to the nearest keel bolt provides a ground path, and extra protection can be provided by adding №6 cables from the chainplate to the metal keel. A pointed copper lightning rod at the masthead is recommended. More information on lightning protection can be found on the Internet and in the books listed in the Bibliography.
Sailing Downwind in Strong Winds
If you are heading downwind in a storm, be very careful of an accidental jibe. The wind can shift at any moment, and when it’s strong, it can bring the boom around in the blink of an eye and with great force. (See section «Getting Underway and Sailing on the SailboatPoints of Sail» for safety tips.) Running downwind before large waves can be dangerous because of broaching. In a broach, the stern is lifted by the following seas and the bow goes down. The boat’s balance shifts as more of the forward part of the hull is immersed in the water. The boat suddenly wants to turn upwind, and you’ll feel a large increase in weather helm. The boat will try to turn sideways, presenting the beam to the waves, which could knock down or even capsize the boat. Anticipate this tendency and head off slightly as the stern lifts; try to slow the boat down by reducing sail or dragging something off the stern. A broach, an accidental jibe, and a knockdown all at once could damage or sink a boat, so be careful.
Two old mariner’s sayings I found in John Rousmaniere’s Annapolis Book of Seamanship bear repeating:
- When the wind before the rain, let your topsails draw again (the blow may be fierce, but short-lived).
- When the rain before the wind, topsail sheets and halyards mind (the rain is the result of an approaching front, and the blow may last a few days).
And this one:
- The sharper the blast.
- The sooner it’s past.
Sailing with the Tides. If you live near the ocean, you’ll quickly become familiar with the tides and the tidal current. In most areas they have a big impact on sailing and how long it takes to get from point to point. In the areas around Charleston, South Carolina, where I used to live, the tidal range was around 6 feet – enough to cause a hefty current to run through the rivers and sounds twice a day. If I neglected to check the tides before planning a sailing trip, and the tidal current was against us (called a foul tide), the result was about an extra hour of motoring against the current to get to the harbor.
General tide predictions can be found in the newspaper, but tides vary locally. Detailed tide tables are available on the Internet, and NOAA printed tide tables are still available for around $14. Also, Nobeltec publishes tide-prediction software for US and worldwide regions.
The times of high and low tide are only part of the story. A tidal current chart can tell you the direction and speed of the tidal current. The speed of the current can typically run around 4 to 5 knots, and since the top speed of a trailerable sailboat might be around 6 knots, the importance is obvious. Ignore the tides and you might become the captain of the proverbial slow boat to China.
The tides also affect the charted depth of the water, of course, but most importantly, what happens afterward. Running aground on a rising tide is less dire a situation than doing so on a falling tide. Should you be so unfortunate as to run aground at the peak of the spring tide, when the moon and sun are aligned – both influencing the height of the tide – you might be stuck there for months. When I sail a fixed-keel boat during a falling tide, I’m very watchful of the depth sounder, and I check the chart frequently.
Tides can also have a big impact at the ramp. A strong crosscurrent can make launching and retrieving your boat difficult if not impossible at certain times of the day, though most ramps are located in areas with minimal tidal influence. Local knowledge helps; if possible, stop by the ramp without your boat to check the conditions. (You can sometimes find clues in the parking lot. If one ramp has an empty lot, another only a few powerboat trailers, and yet another is filled with trailers for sailboats and powerboats, that third ramp just might have better conditions. Or there might be a fishing tournament or race going on.)
Navigation and Piloting
People sailed for a very long time using more or less the same techniques to figure out where they were going. Then things went modern, first with the Chinese and their newfangled compass in 1117. When John Harrison developed the H4 chronometer in 1761, and sailors could finally determine their longitude aboard ships, we entered a veritable age of reason in the sailing world.
The idea that you can now switch on a GPS, push a button, and see your position plotted on a chart is almost unbelievable. Not too many years ago, this trick would have gotten you burned as a witch.
GPS is a wonderful tool, but you can still get burned if you rely on it too much. More on that in a moment. First, though, let’s consider some of the techniques that have been used for the two millennia or so before push-button fixes.
Navigation Tools
The fact is that the basic old techniques work. Navigating a boat with:
- a compass;
- chart;
- your eyes;
- a watch;
- the boat’s log;
- and a pencil isn’t that difficult or tricky.
The logbook is the official written record of the boat’s daily progress, which traditionally contains all the important happenings onboard:
- weather;
- navigation data;
- watch keepers’ names;
- sightings, and other information deemed important to the master.
You can get a pretty good idea of where you are on the water using just your eyes, though this takes practice. And as long as you have a chart (and can read it), you can get a good idea of where you don’t want to be. There’s a saying that goes something like this:
«A superior skipper is best defined as one who uses superior knowledge and judgment to keep out of situations requiring superior skills»
Nautical Charts. The first navigational tool that all sailors should buy is a chart of the area they’ll be sailing. A chart that’s printed on paper, that is. Electronic versions of charts are widely available now, but they aren’t the same. You can print out your own charts at home for some areas, but they’ll be very small, and, if printed on an inkjet printer, the ink will run if they get wet, so it’s best to use a laser printer for this job. Most NOAA-approved chart agencies print current charts using a special chart-on-demand service. Charts are printed as required by the customer on water-resistant paper. Plan on paying about $20 each. One big advantage of these new charts is that they can be printed without LORAN (long-range navigation) grids, which are rarely used anymore.
A good deal of the information on a chart is self-explanatory; for the rest, refer to NOAA’s Chart No. 1, which defines all the terms, colors, and symbols used. The bound version is about $10, and a CD version (together with all nine Coast Pilots) can be purchased for $5.
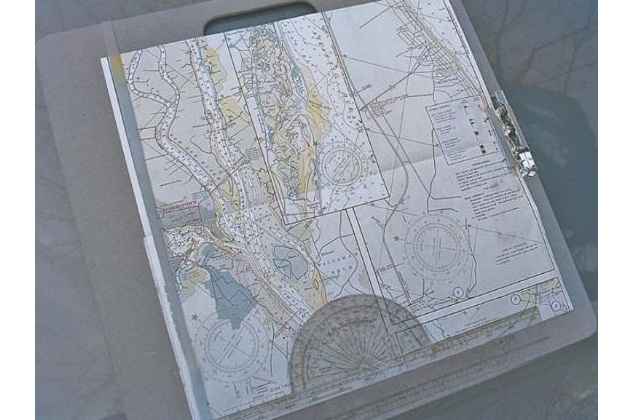
One of the problems with marine charts is their size. Storing them flat is best, of course, but that works only for something the size of a navy ship – no trailer sailer will have the space to store full-size printed charts flat. Probably the best solution is to fold the charts into quarters, and unfold them as needed. You can do your navigating at the dinette table, if you have one. My boat is too small even for this, so my solution is an inexpensive, oversized clipboard (available from art stores in several sizes).
Of particular interest on the chart is the compass rose, usually located in the corners of the chart. The outer ring shows true north, and the inner ring shows the variation calculated for magnetic north. The variation changes over the years, so if you’re using an old chart (not recommended, but better than nothing), you might check the inner ring of the compass rose to see how close it is. If the amount of variation calculated versus the amount shown on your chart is slight, you can probably use the printed magnetic compass rose.
It’s difficult to take a bearing from the deck of a moving, How to Choose the Perfect Sailboat: Tips on Selection, Ownership, and Alternativespitching sailboat without at least a degree or two of error. In fact, it’s a good habit to consider all your «fixes» as approximate. Look for danger spots near your fix, like rocks or shoals. There shouldn’t be any. Always leave plenty of room for mistakes and misjudgments when navigating and piloting your boat.
Print Resources. Besides charts, there are other resources published by the US Coast Guard that are essential for safe navigation of your boat. These include:
- the Coast Pilots;
- Local Notices to Mariners;
- Light Lists;
- and tide tables.
Government-printed versions were traditionally available for sale through NOAA chart agents like Bluewater Books and Charts and Landfall Navigation, but the US government has ceased printing most of these publications.

For the trailer sailor, it turns out that this is a good thing, as long as you have access to the Internet and a printer. Free versions of the Local Notice to Mariners, Light List, Coast Pilot, and other government publications are available for download to your PC. You can then print out only the sections that cover the areas that you sail, saving money, weight, and trees. But what are these publications, and why should you have them on board?
The Coast Pilot is a publication containing up-to-date details about navigating the waters in a given area. It contains details that aren’t easily gleaned from a chart, such as:
- sailing routes;
- tide ranges;
- areas of difficult navigation;
- harbor entrances (some with photographs);
- repair facilities;
- and marina locations.
Some of the information is geared toward commercial vessels, so you can skip those pages, but it’s all useful to the small-boat mariner.
The national Notice to Mariners and the regional Local Notice to Mariners contain important corrections and changes to the information found on the chart since it was published. This includes chart discrepancies like extinguished lights, missing buoys, and shifting sandbars. Issues of the Local Notice to Mariners were formerly available by subscription in the mail, but now they are published only in digital form and delivered via the Internet.
The Light List is a written description of all aids to navigation – not just lights but buoys, daymarks, radio beacons, and so forth. The list supplements the printed chart and gives remarks about an aid’s characteristics, such as visibility, height, and range.
Print resources such as these are useful to the trailer sailor because, when it comes to navigation, forewarned is forearmed. Print resources still work when the batteries go dead or a connection gets damp. And having these resources aboard and using them shows that you are taking your responsibility as captain seriously.
Binoculars. A compass is useful for determining your vessel’s heading, of course, and that’s about all you can expect of it if you’re out of sight of land or marks. A pair of binoculars can increase your range of vision dramatically, allowing you to identify marks that would otherwise be invisible. A good pair of binoculars is an important navigational tool.
But how good do the binoculars need to be? It depends on your sailing area and the type of sailing you do, as well as your own preference and finances. If you go onto eBay and type in «marine binoculars», you’ll find dozens. And marine catalogs show everything from basic compact binoculars to models with a built-in compass, digital image stabilizer, nightscope, and even a laser range finder/speed detector! Prices range from around $75 to $1 300.
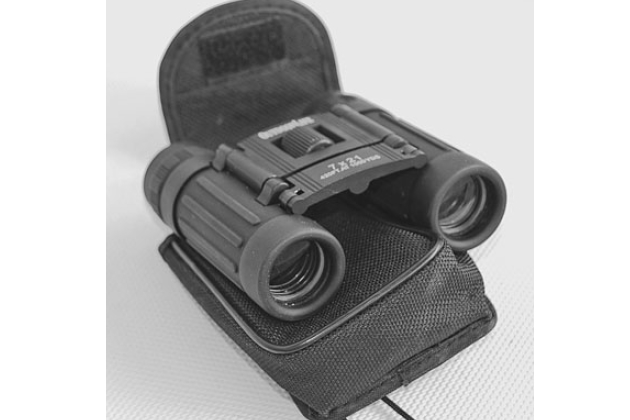
Any pair of binoculars is better than nothing. Usually, more expensive pairs work better than cheap ones. For boat use, waterproof, nitrogen-filled binoculars are nice because they won’t cloud up from humidity and condensation, though I’ve had a pair of inexpensive nonwaterproof binoculars on the boat for a while now and they haven’t clouded up. Beware of buying used binoculars, since you cannot know if they have been dropped – something binoculars do not like. If the prisms get knocked out of alignment, the binoculars must be sent back to the factory for repair. If you want to buy a used pair online, be sure to ask the seller if they’ve ever been dropped. The lens coating should look intact, the image should focus 100 percent sharp, and the binoculars should show no indication of rough treatment.
With binoculars, higher price doesn’t always equal higher performance. Binoculars are rated with two numbers – for example, 8×24. The first number means magnification; the second number means lens diameter. Often, the second number is most important when deciding between two similarly priced binoculars. A larger number means more lightgathering ability, which can equal a brighter image, but other factors such as the type of glass and the lens coatings play a big role as well. I recommend trying a cheap discount pair for your first few sails, and then upgrading to a better pair. Hopefully you can find a chandlery with several display models that you can look through before buying them. A pair of binoculars with a built-in compass is extremely handy for sighting bearings, and I’ve heard good things about West Marine’s compass models.
Chartplotting Tools. A few other low-tech devices are useful when navigating with a chart and compass. A pair of dividers with two points is handy for taking measurements and walking off distances. Dividers are easy to find at office supply stores. (These rarely wear out; I still use a fine pair that my father owned – patent date 1903.) With a set of parallel rules, you can walk a bearing line from the compass rose to your observed mark and draw a line of position (LOP) on your chart. (If the rules are at all wiggly, though, don’t use them, since the error can magnify itself with each step that it is walked across the chart.) A new type of parallel rule called a GPS plotter expands and contracts in a perpendicular line.
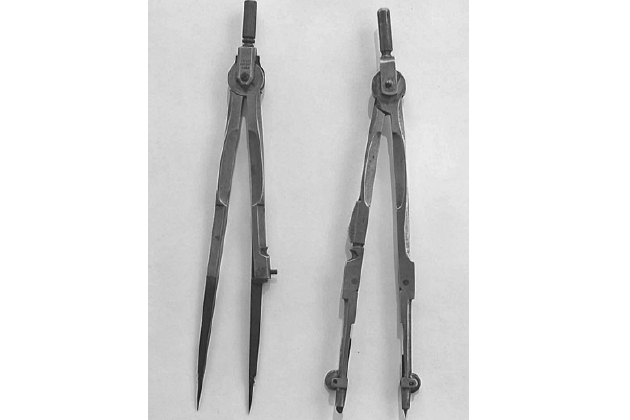
Many of the better drafting sets have interchangeable points, so a compass can be used as a divider. The compass in this figure is an inexpensive find that didn’t come with extra points. On a boat, you want a dedicated, full-time divider rather than having to switch out the points. A compass is handy, but, if forced to choose, I’d opt for the dividers.
It’s expensive, but some navigators swear by it. You can get other nifty devices, such as rolling plotters and protractors. Some sailors like them; others find them unnecessary. Generally, the farther you sail, the more you’ll find them useful. Consider the Getting Underway and Sailing on the Sailboattype of sailing you do before you buy a host of navigation tools.
Measuring Time
Some way of accurately measuring time is important for correct speed and distance calculations. For celestial navigation, accurate time is critical. Until recently, this required a chronometer that could compensate for errors such as drift, and a shortwave radio to get accurate time broadcasts from radio station WWV. But nowadays most digital watches are inexpensive and quite accurate. My Timex Chronograph is waterproof, includes a stopwatch, and cost $45 on sale. It’s fine for basic speed and distance work, though the tiny dials are sometimes hard to read. A digital chronograph would be a fine choice. A stopwatch is nice for measuring time from point to point.
Plotting a Fix
In a nutshell, navigating your boat is a simple process. You note your starting point on the chart, with a starting time, and lightly draw a line noting your compass direction and speed. Some sailors use tracing paper over their chart to avoid marking it. Then at regular intervals you update your position on the chart. If your speed is 2 knots and you’re sailing the same course (no tacking), after an hour you measure 2 nautical miles along your course line and note your estimated position along that line, along with the time. Then you correct that estimate using whatever data is available.
The best data will probably be fixed landmarks, if you can see any. A radio tower, an island in the distance, or a headland that you can identify are ideal. Take a bearing with your hand bearing compass and draw it on the chart. Two or three bearings are better than one.
When you draw these bearings, the usual result is a triangle. Your «fix» is somewhere within the triangle. If your angles are good and your observations accurate, the triangle will be small. One thing I can almost guarantee is that your course line will not go through the center of your triangle. All sailboats make leeway. Remember, leeway is a sideways motion as the sailboat is pushed by the wind. Current, sea state, and variations in speed will push your boat off your original course line. It is a good idea to take bearings often, especially if you are approaching any sort of shoal water or hazard.
Bearing lines shot from a buoy are always suspect. Buoys are often moved, renumbered, and subject to drift. Some can be pulled nearly under the surface by a strong current. Changes in buoy position are published in the Local Notice to Mariners, and you should update your chart when you read of a buoy change. (You can read the Local Notice to Mariners on the web.) Do use buoys, but don’t treat their position as gospel.
But what if you are out to sea with no fixed landmarks – nothing to take a compass bearing on? Nothing but lots and lots of water? Well, you do basically the same thing. Note your course, time, and speed. If you know the direction and speed of the current, you can increase your accuracy by correcting your estimated position for current. Current data is published in the Coast Pilot for nine different regions. Print versions are for sale at most chart agents; the downloads are free.
What you’re doing is making an educated guess about your position. Called dead reckoning, or DR, it’s your best guess about where you are on the water. You can never really know where you are until you can make a minimum of two observations of fixed landmarks. If you sail past a buoy, you can note that as a probable fix. Even a navigation mark that’s pounded into the bottom of the channel could be moved, though they’re moved less frequently than buoys. Oh, by the way, it isn’t called «dead» reckoning because most of the navigators who practice it meet a watery end. The dead or, more correctly, ded, stands for «deduced». It’s still a guess, though if you’re careful it can be a pretty good guess.
A Logarithmic Scale for Speed/Distance/Time. At the margin of most large-scale harbor charts, you’ll find a logarithmic scale that can be used to calculate speed, distance, and time relationships. The instructions on the chart are pretty simple – for example, to determine your speed, simply place one point of your dividers on the distance run, and the other point on the time it took to run it. Then move the divider point to 60, and the other point will line up with your speed in knots. For example, let’s say you’ve gone 2 nautical miles in 25 minutes. Moving the dividers (without changing the spread, of course) to 60 shows that you’re going pretty fast, about 4,8 knots.
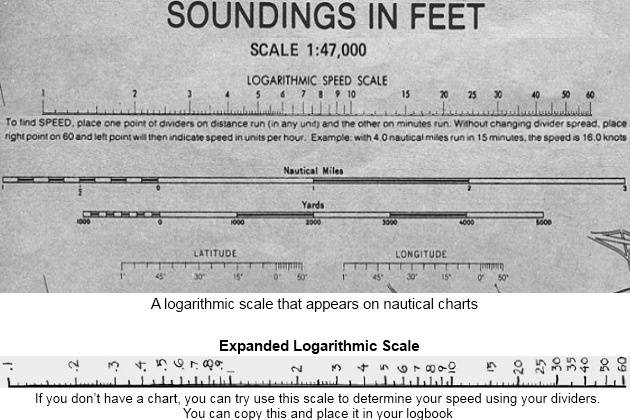
You can also work the other way to estimate your distance traveled if you know your speed. Here’s an example: suppose you’re traveling at a steady 4 knots. To set your divider, place one point on 60 and the other on 4. Now you can move the divider to the time, and the other point will show the distance you’ll go. Placing one point on 15, you’ll notice the other point lines up with 1. So in the next 15 minutes, you’ll cover 1 nautical mile.
Danger Bearings
Another useful idea for the navigator is the concept of danger bearings. Very often your sailing area will consist of a good-sized body of reasonably deep water, but there are always a few problem spots – a sandbar, for example, or a shoal bank that extends out in the water. Depending on where you sail, the worst offenders might be marked with a buoy or channel marker, but not all hazards can be marked. Naturally, these are spots you want to stay away from. You can use danger bearings to do just that.
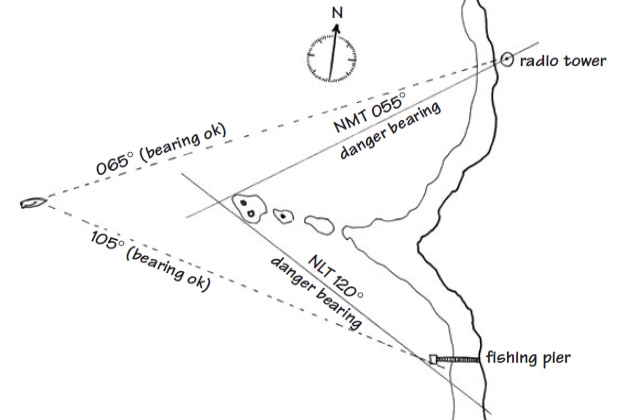
Rather than telling you where you are, danger bearings tell you where you don’t want to be. In this hypothetical example, we avoid submerged shoals if our bearing between the radio tower and the offshore rocks is no more than 055 degrees, and our bearing between the same rocks and the fishing pier is no less than 120 degrees.
First, identify the limit of safe water on the chart. Then find a prominent landmark nearby and draw a line. On one side of this line lies the danger – shoal, rocks, whatever – and on the other side lies safe water. This line is labeled danger bearing – in our example at left, NMT (no more than) 55 degrees M (magnetic) or NLT (no less than) 120 degrees M, depending, of course, on which side the danger lies.
Can We Turn on the GPS Now?
All this discussion about dead reckoning, bearings, and fixes begs the question, why not just turn on the GPS and know where you are. Yes, you should use a GPS, but only after you can navigate the hard way. As mentioned before, don’t rely on GPS as your only means of navigating your boat. This should be obvious – the story of the sailor who goes out with his push-button wonder, finds the battery has expired, gets hopelessly lost, and has to call the Coast Guard to rescue him is the stuff of urban legend.
There are many accounts of good, experienced sailors who damaged or lost their boats because of overreliance on GPS. Anything can happen. Batteries can die, and electronics don’t like water. A lightning strike can wipe out all of your electronics – remember that big metal mast sticking out of the middle of the boat? It happened to one boat, and they were carrying no paper backups for charts:
- many charts have not been verified or corrected with GPS coordinates;
- electronic charts can be incorrect;
- hazards can be out of position compared to GPS;
- some marine television antennas can screw up your reception – a whole host of problems can exist.
Because GPS units are so incredibly accurate most of the time, people have come to rely on them all of the time, and that’s a dangerous mistake. They are just another tool – a really good one, but not so good that you should toss all your other tools overboard. People have tried to enter unfamiliar ports at night (which should never be attempted in the first place) using only GPS coordinates and lost their boats. They ignored the cardinal rule – never enter an unfamiliar port at night. Another notable example occurred in the Bahamas, when a large powerboat had programmed a waypoint for the Northwest Channel into a GPS. The skipper turned the boat over to the mate and took a nap. The boat ran directly into the channel light, which crashed onto the deck along with some of the tower. They took the whole thing with them on to Nassau.
Cautionary tales aside, there is no doubt that, on the whole, GPS units have made boat navigation safer. In the 1970s Jimmy Cornell, author of several books for sailors, including World Cruising Routes, did a casual survey of cruising sailors about losses and came up with fifty lost boats, which were mostly attributable to errors in navigation. In 2004, he did the same survey and came up with less than a quarter of that number.
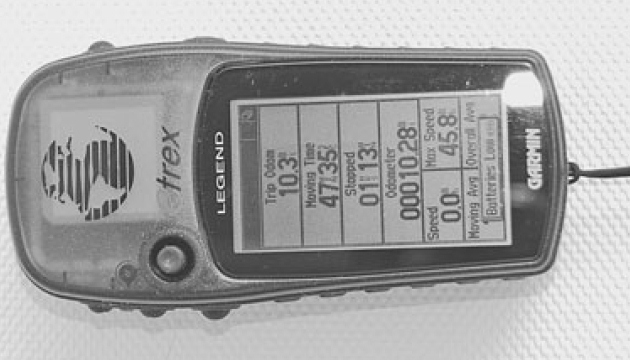
Although this older Garmin eTrex GPS has lots of functions and abilities, including basic maps, more expensive units can show your position on an electronic marine chart. GPS units seem to get more capable and a little less expensive every year.
What Is GPS? By now, most folks are familiar with GPS, which stands for Global Positioning System. The system consists of twenty-one satellites (with three spares) that transmit radio signals to dedicated receivers. GPS receivers are small handheld computers that calculate the distance to the satellites. By comparing the distances to three satellites, it can derive position information. Usually, five satellites are in range at any given time, so the system works with amazing accuracy. Differential GPS (DGPS) systems include additional radio information from fixed, landbased radio towers. By referencing this extra signal, the system can be even more accurate.
A basic handheld GPS like the Garmin eTrex can be found for as low as $100, and there are several models under $300. If you add fancy features like built-in digital charting, the price goes up quickly, and it’s easy to spend $1 000 or more. But while these more expensive systems are certainly powerful navigation tools, they aren’t any more accurate at finding a position than the basic units are.
A GPS that includes mapping features, on the other hand, is extremely useful. I purchased a Garmin eTrex for under $100, a black-and-white-display unit that was discontinued (all the new GPS units have color displays). The eTrex can give me a fix with the push of a button, as well as speed over the ground, actual distance traveled, and lots of other data. But the mapping feature is crude. If I were to do any serious cruising, a unit that includes charts would be worth having. Being able to see your location superimposed over an electronic chart would be a big advantage – especially on a trailer sailer, where the room to spread out a chart is hard to find.
It’s difficult to fight the allure of simple, push-button navigation, and a working GPS does make your ship safer. But don’t forget to use your eyes, ears, and all the information at your disposal. Use the GPS to confirm your position, but don’t let flipping a switch be your only navigational skill.
Sailing at Night
Nighttime sailing is an entirely different world. More risk is involved than in daytime sailing. Even the most familiar sailing grounds become disorienting at night. Distances are difficult to judge and lights become confusing. Nighttime sailing is best done in the open ocean, clear of hazards and shipping. Your DR plot becomes critical, as fixes are few and far between. Having others on board to relieve the on-deck watch after three to four hours is a great asset.
Nighttime is not the trailer sailer’s best element. These boats are generally small and don’t have room for a large crew. Most of these boats aren’t designed for open-ocean passagemaking, though in some situations they could manage. For example, a large, well-found trailerable might want to set out for the Bahamas Bank around midnight in settled weather, making landfall during daylight hours.
If you’re going to sail at night, you have to learn the various navigation light combinations and what they mean. There are free programs you can download to learn these, and other study aids like flash cards might help. Weems & Plath makes a nifty little slide rule type of device called a LIGHTrule, which shows light combinations from both sides along with their definitions. It would be really useful if it had built-in LED lighting so you could use it in a dark cockpit. If you can’t remember anything about the various light combinations, remember this: stay away from anything with a whole bunch of navigation lights. Bigger boats, boats with nets out, barges, and towboats will usually show more lights than a simple red or green at the bow, white at the stern, and a white steaming light. Stay clear of ferry channels and commercial shipping lanes at night.
A few tricks are helpful for night sailing in certain situations. If the night is clear and you’re sailing a parallel course along a reasonably straight beach, you can use basic observation to judge your distance offshore. From the deck of a Types of Sailboats and Their Management typical small sailboat, the beach will be under your horizon at a distance of about 4,5 miles. If you can just make out the beach, then you should be 3,5 to 4 miles out. If you can make out the light from individual windows in houses, then you’re about 2 miles out. Again, this is assuming good visibility, and you’ve kept your annual appointment with your optometrist.
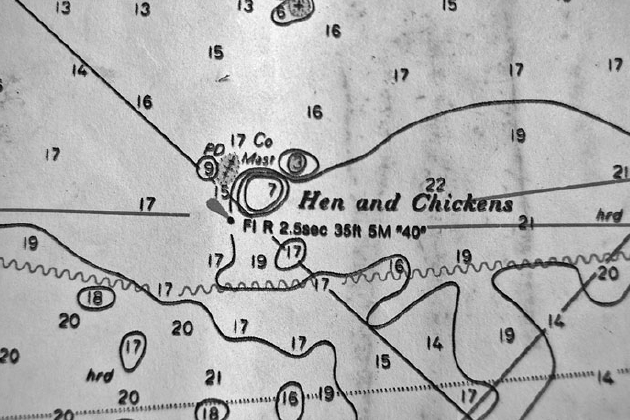
Navigation lights can sometimes be tough to pick out amid a confusion of rampant beachfront overdevelopment, but the distance from which you can see a navigation light usually depends on two factors: visibility and height off the water. (And whether or not the light is actually working – that makes three factors.) Lights in the United States are more reliable than in, say, the Bahamas, but they can go out anytime. Problem lights are listed in the Notice to Mariners. In good visibility, you can usually see a lighted buoy 1 to 2 miles out, though if you look on your chart, you’ll see a description like this: Hen and Chickens Fl R 2,5 sec 35 ft 5M 40. (See the accompanying chart.) Fl R means a flashing red light. «Flashing» means the light is on briefly, then goes dark – in this case for 2,5 seconds. The next number means the light’s height above the water in feet. If you want to use a range finder to determine how far off you are, don’t forget the tide – the light’s height is listed at mean high water, which means the average of all high tides. The 5M means the light’s nominal range is 5 miles in good visibility. The «40» is the number painted on the mark – often a dayglow orange triangle.
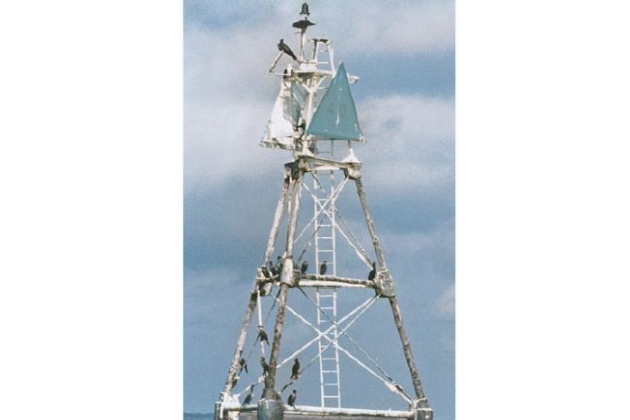
All these definitions can be found in NOAA Chart No. 1, Symbols, Abbreviations, and Terms. If you don’t already have a copy, you’ll certainly need one before making a nighttime passage.
When sailing at night, a masthead tricolor light will use less current than separate port, starboard, and stern lights, allowing you to go longer without running the engine. You’ll need plenty of battery power as well as alternative methods of charging the battery unless you’re sailing from marina to marina.
Use every navigational tool you can get your hands on when sailing at night. This includes the GPS, but I repeat – don’t treat its readings as gospel. (Don’t believe me? Turn it on at the dock. It isn’t unusual for a GPS to show your position as somewhere in the parking lot.) Borrow a second GPS if possible. Use depth-sounder data to check your position using bottom contours; if your estimated position lies in 30 feet of water and the depth sounder shows 60 feet, something’s wrong. If it shows 12 feet, something is really wrong, and it’s time to stop the boat and figure it out. Make sure you’re using an up-to-date, corrected chart and you’ve checked the Notice to Mariners, the Light List, and the Coast Pilot for your area. Everyone on deck should wear a life jacket and harness at all times and have a personal strobe light and a compressed-air horn. Going overboard is always serious, but going overboard at night can easily be deadly.
Naturally, nighttime sailing isn’t for beginners. It’s a much bigger deal than a casual afternoon ’round the buoys. Remember the cardinal rule of sailing after dark – never enter an unfamiliar port at night. I don’t care how tired you are. Heave to and wait until daylight.
Emergencies
Sailing is a safe activity compared to most other watersports. It’s quite possible that you’ll never have to deal with an emergency situation aboard. But anything can happen, and aboard a sailboat, help is not often minutes away. It’s more commonly hours away. You’ll have to either get yourself out of a jam or hold down the fort until help arrives.
An emergency can be anything that poses a risk to the vessel, its crew, and the people nearby, so the short version of this chapter could read, «Be ready for anything». And remember, the captain can be injured – or fall overboard – as easily as the crew. Can the remaining crew get the sails down, the motor cranked up, and then navigate to the nearest source of aid? Do they know the radio procedures to call for help? If anybody answers, can they tell them their position?
In most cases, adrenaline is great stuff. It gave us the quick burst of strength that enabled us to outrun saber-toothed tigers. But an emergency on a sailboat, while just as adrenaline producing, isn’t a fight-or-flight situation. Panic might help you outrun a tiger, but it almost never helps in an onboard emergency. Stay calm! Do not yell unless people can’t hear you or aren’t taking you seriously. A head wound produces lots of blood, and it’s important to protect the victim from shock. Screaming for the first-aid kit and yelling into the VHF that you’ve never seen so much blood won’t help your patient relax. You can throw up later – in this situation, you need to be the essence of calm. The captain should always be in control, and that starts with self-control. Some situations require fast action. It’s possible to be quick without panicking.
The key to staying calm is mental preparation. If you lack knowledge in a certain area, do some reading or Internet research. Continuing education programs often offer good first-aid classes, and sometimes these are specifically targeted to recreational boaters and sailors. Successful completion of one or more of these courses would be invaluable. If you wait for the emergency to come to you, it’ll be too late to learn what you should do. The most common emergencies aboard a sailboat include a medical emergency, a risk to the boat, or a person overboard.
Medical Emergencies
There are many potential medical emergencies that you should be prepared for, and proper preparation must include a good first-aid manual. Written by qualified doctors and experienced sailors, a first-aid manual is invaluable – both for study beforehand and for reference during a medical emergency. It should be an important part of your first-aid kit. Your level of preparedness can be adjusted to reflect the sailing you will do. Most manuals aren’t written strictly for daysailing and therefore assume that treatment may be days away, as some cruisers will venture long distances into countries with minimal medical treatment facilities. Since trailer sailers will rarely be so far from medical care, you shouldn’t need to stock heavy antibiotics.
So, what are the more common medical emergencies aboard sailboats? Dr. Andrew Nathanson, assistant professor of emergency medicine at Brown University, collects data on sailing injuries. Dr. Nathanson and Dr. Glenn Hebel say that some of the most serious accidents are being swept overboard and being hit by the boom. Head injuries caused by the boom are listed as the second leading cause of death aboard sailboats. Other common injuries result from falling down open hatches, tripping over lines and cleats, and catching fingers and hands in winches and cleats.
Warn your crew about these dangers and read the sections in your first-aid manual covering:
- head trauma;
- lacerations;
- broken bones;
- and hypothermia/drowning.
The law requires that an accident victim give consent before any first aid is applied. If there is an accident aboard your boat and the victim is conscious, ask if you can proceed. And administer first aid only if you know what you are doing. If not, your only recourse is to call 911 on your cell phone or call the Coast Guard on Channel 16 on your VHF.
Other medical emergencies that are less life threatening can sometimes be treated aboard. Jellyfish stings, for example, can be treated with a sprinkling of meat tenderizer, which neutralizes the neurotoxin. Seasickness is very common and often responds well to:
- Dramamine or Bonine tablets;
- scopolamine patches;
- or motionsickness wristbands.
Bonine or Dramamine can make you really sleepy, though. Heat exhaustion can happen while sailing, especially if accompanied by dehydration. Victims should not be given alcohol, but moved to the shade and cooled as rapidly as possible.
Carbon Monoxide Poisoning. Carbon monoxide (CO) poisoning is called the silent killer because it has no odor and no color. You can’t see, smell, or taste it. It makes you feel drowsy, and if you go to sleep, you don’t wake up. There’s even some evidence that CO exposure can lead to delayed heart problems because of muscle tissue damage.
CO poisoning on boats is rare, but it does happen. Early propane water heaters were found to be a culprit. Anytime you use an oven or a heater in the tight confines of a cabin, you are at risk. If you ever feel oddly dizzy or suddenly sleepy in the cabin, get fresh air immediately. Be sure you have plenty of cabin ventilation. If you sail in winter, a CO monitor for the cabin is a must. (See section «Equipment of a Sailboat: What You Need to Have on Board While SailingOptional Equiment» for suggestions regarding CO detectors and ventilation.)
Crew Overboard
Crew overboard is a serious situation, but it can largely be prevented by good sailing habits and a high level of preparation, including wearing a life jacket. Life jacket users are two to four times more likely to survive a fall overboard. Boats with lifelines and bow pulpits tend to keep their sailors on board, though there are many cases of sailors being swept under the lifelines and overboard. Wearing a harness on the foredeck and in rough weather also reduces crew-overboard cases.
Practicing crew-overboard drills in various conditions also helps. One of the best crew-overboard articles I’ve read is John Rousmaniere’s 2005 Crew Overboard Rescue Symposium Final Report, where four hundred tests were conducted over a four-day period using fifteen boats, forty different pieces of rescue gear, and numerous recovery techniques.
When a person falls overboard, there are four actions that are critical to his/her survival:
- Get flotation to the person in the water and maintain visual contact at all times.
- Change course quickly to get the boat back to the victim.
- Connect the victim to the boat by tossing a line.
- Get the victim back on board the boat.
Your crew-overboard plan has to allow for all of these things to happen quickly and with a minimum of confusion, even though the conditions may be chaotic. Let’s go through a recovery plan step-by-step.
Flotation and Visual Contact. You’ve got to see the person in the water, and a dark, wet head can disappear among the waves quickly, even during the daytime. A strobe light, personal Freon horn, whistle, and signal mirror can all help locate someone in the water if he or she is conscious and able to operate these devices and you’ve attached him or her to a PFD (see section «Equipment of a Sailboat: What You Need to Have on Board While SailingUSCG-Required Equipment»).
If others are aboard, assign one crewmember to keep the victim in sight. Get flotation to the person immediately, as well as any additional man-overboard gear you have ready, such as a man-overboard (MOB) pole or a Lifesling.
Altering Course to Return to the Victim. Several methods can be used to return to the location of a person who has fallen overboard. One is called a quickstop. As soon as a person goes over, head the boat straight into the wind and sheet everything in. Get the jib down and sail in a circle around the person in the water, coming to a stop just upwind of him or her. This is the maneuver used when recovering a crew overboard using the Lifesling.
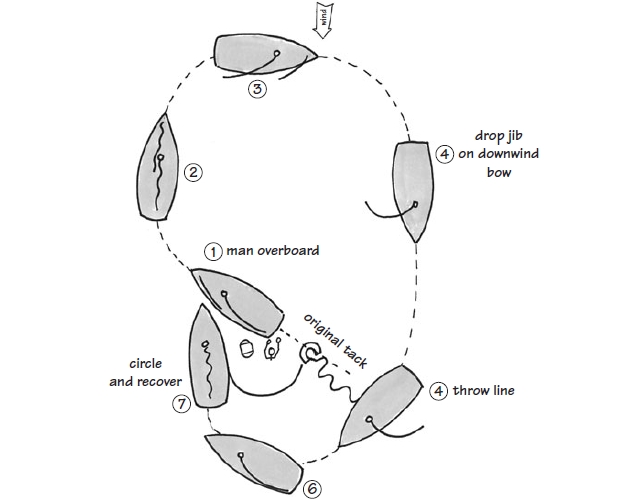
The quickstop recovery maneuver might be thought of as sailing a circle around the victim. Throw a float to the victim immediately, and then tack. Drop the jib on the downwind leg if you have the crew, then jibe and approach the victim, letting the sails luff as you throw a line. If the water is clear of lines, you can always start the engine and use it to aid your recovery, since stopping a sailboat in any sort of wind or tide is harder than it looks.
Another method of returning to the location of a person who has fallen overboard is called a fast return. If you’re sailing upwind, bear off the wind (see figure below).
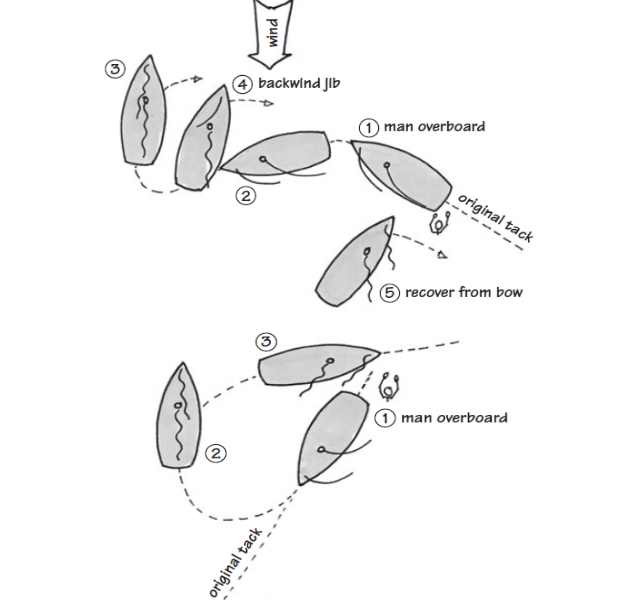
Depending on your point of sail, you head immediately into the wind, and then drift, sails luffing, back to the victim. Toss a line as the boat gets close. In both these maneuvers, try to position the boat upwind of the victim as it comes to a stop. The hull will shield the victim somewhat from the wind and sea swells. And since boats drift faster than people, you will more likely drift toward the person in the water rather than away.
After two and a half boat lengths, point the boat into the wind, letting the sails luff. Let the bow of the boat fall back toward the person in the water.
There are other crew-overboard recovery maneuvers, such as the figure eight or the deep beam reach, but the quickstop and fast return are probably more useful aboard smaller trailer sailers. Improvisation is certainly allowed, and different boats will have different success rates depending on the circumstances.
Of all the recovery maneuvers tried at the 2005 Crew Overboard Rescue Symposium, stopping the boat to windward at the end of the recovery maneuver was almost unanimously preferred. A boat will drift faster than a person in the water. In rough weather there is a risk that the boat could drift over the victim. The boat should be sailed as slowly as possible when approaching the victim, but not so slowly that the boat loses steerageway.
Connecting the Victim to the Boat. Never count on swimming ability during a crew-overboard emergency. When wearing clothes, even expert swimmers cannot swim very far without becoming dangerously tired. It’s better to bring the boat close to the victim and connect to the person with a line. When to deploy the line depends on the maneuver – a quickstop maneuver deploys the line right away, and then the circular path of the boat brings the line to the person in the water. In the fast return, the boat is brought back to the victim and a line is tossed. Naturally, a floating line such as polypropylene should be used, but these deteriorate in sunlight and should be renewed annually or stored in a bag.
Five different commercial throwing lines of various prices were tested during the Crew Overboard Rescue Symposium, and all worked well. (A popular example is the Lifesling.)
Getting the Victim Back On Board. Recovering a person who has fallen overboard can be especially difficult. There are several tragic stories about people who have fallen overboard and, unable to scale the smooth side of the hull, drowned while still connected to the boat. You have to have a plan for lifting the victim that final 5 feet or so up to the deck.
If the victim is conscious, the job is much easier. You can trail a loop of large line into the water, one end tied to a stanchion and the other led to a winch. The victim stands on the looped line and is lifted up to deck level by cranking on the winch. This method requires some upper body strength, though.
It will be interesting: Basic Hull, Keel, and Rudder Shapes
In terms of a commercial system, the Lifesling, which includes provisions for lifting the victim into the boat, has a long record of success. If the victim is unconscious, then a second crew, tethered to the boat, must jump into the water to place the Lifesling over the victim. In another method, called a parbuckle, a triangular-shaped piece of cloth is attached to the rail of the boat at two corners, and the third corner is lifted with a tackle. This system also has the potential to help with an unconscious victim.
Swim Platforms and Boarding Ladders. Most of the time a swim platform is a recreational accessory, but it becomes much more than that when someone has fallen overboard. Newer and often larger boats feature a reverse transom or a «sugar scoop» stern, where the transom itself is inset a little from the sides of the hull. This makes a convenient area, just above the water level, for entering and leaving the water for a swim or, more importantly in this case, recovering an overboard victim. Unfortunately, these hull configurations aren’t very common on smaller boats, where a sugar scoop can complicate a rudder installation and an outboard motor mount.
So, many owners install an aftermarket swim platform onto the stern. These are desirable upgrades, as long as the platform is well built and the installation is strong. Because transoms are often somewhat flexible due to their large, flat surface, you may need to reinforce the transom laminate from the inside. All attachment points for the swim platform should be through-bolted to the transom and have a large backing plate. This can sometimes be a problem because you may not be able to reach all the attachment points from the inside, so installations must be planned carefully. If there is room on your transom, the bigger swim platform you can have, the better. The platform on my boat is small, but very welcome when you are in the water.
Boarding ladders can range from a simple wood-and-rope affair that’s tossed over the side when needed to expensive telescoping or folding stainless assemblies that are permanently attached. If you have a swim platform, an attached boarding ladder goes hand in hand. But it’s essential to make sure that the ladder is long enough. My boat came with a swim platform and a single-rung ladder that swings over the side. It’s just barely possible for an adult to get back aboard. The single rung is too close to the surface to get your feet into, and the swim platform is too small to flop yourself onto like a seal. A new boarding ladder is currently on my upgrades list.

Could you haul yourself back aboard using this platform? Probably not – the ladder isn’t long enough, and the platform is too small. The transom size limits the use of a larger platform, but a telescoping stainless ladder would be a big improvement.
A boarding ladder isn’t a good place to save money. Cheap boarding ladders are really flimsy, and I wouldn’t want to count on one as being my sole means of getting back aboard. Permanently attached ladders are slightly better than the folding type, since the folders are usually stowed and out of reach when someone goes over the side. And since the ladders are fairly large items, stowage on a small boat is tricky. The ladder is likely to be deep within a quarter berth or locker, with lots of other stuff on top of it. But the folders do have one advantage – they can be deployed midships, where the motion of the boat will be more steady, rather than at the stern, where the motion is more pronounced.
Risks to the Boat
Taking on Water. All sorts of emergencies can pose a risk to the boat. Probably the most frightening is water getting into the boat, as in a serious leak. First, try to locate the source of the leak. Check all keel bolts and seacocks and any hose below the waterline. In one case, badly corroded keel bolts gave way on a large boat being delivered near Hawaii. When the keel fell off the boat, the captain felt the boat «jump up» in the water, and the next minute the interior was flooded. The boat sank in less than two minutes.
Sometimes, a sailboat on a given tack can siphon water into the hull through a sink drain or head intake, so make sure these are secure.
If no obvious collision has occurred to account for a leak, the problem could lie somewhere near a normal opening in the hull, such as a seacock. A burst hose or a frozen seacock has sunk more than one boat – keep softwood plugs taped to each seacock just in case.
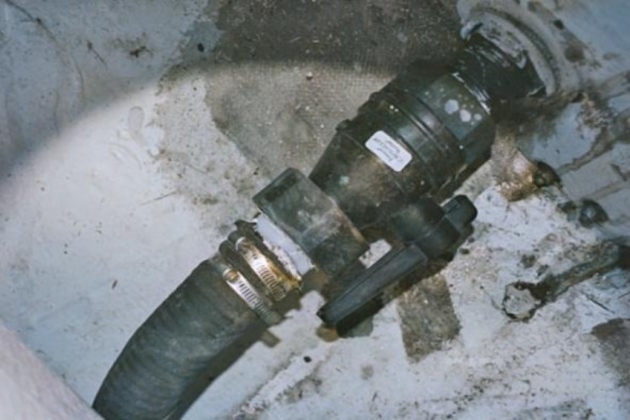
As you locate the leak, have your crew keep the water at bay using the bilge pumps or a bucket, if necessary. A bucket in the hands of a truly motivated sailor can remove impressive amounts of water. If the leak is really bad and getting worse, consider beaching the boat if you’re near relatively protected shoal water.
Collision. A collision on a sailboat can be anything from a hard bump to far worse. Collisions between sailing vessels are more frequent during races. The result is often a simple protest with the race judges, but it can be more serious. Collisions with powerboats operating at high speed can split the average trailer sailer in two. Of course, you’ve done everything possible to avoid a collision, but let’s assume it’s happened anyway.
First, make sure your crew is accounted for and there are no injuries. If there are, get on the radio and issue a Mayday or Pan-Pan as required by the situation (see section «Mayday and Pan-Pan Radio Procedures» below for specific tips).
Second, check for hull integrity. Even if everything looks dry, lift the floorboards and see if water is entering the bilge. You may have a hull crack that is allowing water into the boat, but the crack may be behind the interior liner. If the water is rising, slow the leak somehow – stuff anything into the leak that will slow the water – while your crew contacts the Coast Guard on the VHF.
If everything looks dry down below and there are no injuries, you still need to contact the Coast Guard. (Except for very minor scrapes, you are required to file an accident report with either a state agency or the Coast Guard. If colliding vessels are involved, both of them must file a report, regardless of who is at fault.) Establish contact with the other vessel, if possible, and check for injuries or flooding there. But by far the best way to deal with collisions at sea is to avoid them using any means necessary, as stated in the Navigation Rules. (See section «Rules of the Road» above.)
Fire. Fires on board can be very serious, especially fires involving fuel. A propane accident won’t be a fire; it will be an explosion. Concentrated gasoline vapors will cause an explosion followed by a fireball. There isn’t much you can do to «fight» either of these situations other than prevent them from happening in the first place. (Adequate ventilation is the key to prevention.)
More common are galley fires. Keep a lid handy for the frying pan, as you can quickly smother a grease fire that gets out of hand.
Your first line of defense in a fire is your fire extinguisher. Ideally, you’ll have more than one, kept within easy reach.
Mayday and Pan-Pan Radio Procedures. If your vessel is in immediate danger or there’s an immediate risk to life, it’s time to issue a Mayday. Here is the correct procedure (your emergency may vary from the one below, but this gives you the idea).
Set VHF to Channel 16, high power, and say:
Mayday, Mayday, Mayday – this is sailing vessel Tiny Dancer, Tiny Dancer, Tiny Dancer.
Mayday Position Is (give your latitude and longitude, or bearing and distance from the best landmark you can shoot from your position).
We are Taking on Water. We request Pumps and a vessel to stand by. On board are two adults, no injuries. We estimate we can stay afloat for one hour. Tiny Dancer is a 17-foot sloop with white hull, white decks. Monitoring Channel 16. Tiny Dancer. Over.
Wait a few moments, then repeat.
Please note that being becalmed and out of fuel is not a Mayday situation, and you should not issue a Mayday if there is no immediate danger. The Coast Guard used to respond to this type of call, but this is a convenience call that should be directed to a towing service such as TowBoat US If you’re on a large body of water, out of fuel, becalmed, and have lost all your anchors and are slowly drifting toward shoal waters, that’s the time for a Pan-Pan.
Set the VHF to Channel 16, high power, and say:
Pan-Pan, Pan-Pan, Pan-Pan, All Stations, this is Tiny Dancer, Tiny Dancer, Tiny Dancer.
We are out of fuel and drifting into shoal water. All anchors have been lost. Request a tow to safe water. On board are two adults, no injuries. We estimate we can stay afloat for two to three hours before grounding.
Position Is (give your latitude and longitude, or bearing and distance from the best landmark you can shoot from your position). Tiny Dancer is a 17-foot sloop with a white hull, white decks. Monitoring Channel 16. Tiny Dancer. Over.
If you’re in sheltered water and there’s no risk of damage to your boat, you shouldn’t issue a Pan-Pan. Contact a commercial towing company or ask another station to relay the information to someone who can help. Pan-Pan calls are for very urgent messages regarding the safety of a person on board or the vessel itself. Mayday calls are only when immediate danger threatens a life or the vessel. Rising water in the cabin or an out-of-control fire is a Mayday; a stabilized injury is a Pan-Pan.
Never issue a false Mayday – that can get you a $5 000 fine and possibly a hefty bill for gassing up a helicopter and a Coast Guard cutter.
If possible, use your cell phone to call for help. The Coast Guard sometimes prefers cell phones over VHF because cell phones are always a «clear channel», and personnel don’t have to worry about other transmissions interfering with a distress call.
Accepting Assistance from Other Vessels. If your boat is disabled to the point of needing help from another vessel, you need to be aware of salvage rights. Salvage rights are a very old part of the law that gives a vessel that aids another in distress the right to claim financial compensation. These laws originated long before the days of engines, a time when going to sea for pleasure was unheard of, and being on the water involved great risk and specialized knowledge.
Towing a vessel has a host of legal ramifications. If you become stranded and need a tow, you should never accept a towline without asking the other captain, «Is this tow or salvage?» Assumptions on your part can cost you dearly. A simple tow is a matter of convenience, as when you run out of fuel. But if you’re in real trouble – if your vessel is taking on water, or there’s a risk to life, to your boat, or to the environment – any assistance could be considered salvage.
Salvage doesn’t require a contract to file a claim; a salver has to prove only that salvage was voluntary and successful, and that the salvaged vessel, or the environment, was in danger. Do not sign a Lloyd’s Open Form Salvage contract, even if it’s «standard procedure for a tow», according to a commercial towing captain. If you do sign one, you can be sure that your vessel will get a salver’s lien as soon as she reaches port. Many captains have been shocked to find a bill presented to them for 20 percent of a vessel’s value for a few hours’ work, but salvage law allows this. (But without those few hours’ work, the boat could have been a total loss, and the owner could be presented with a bill for wreck removal and cleanup.)
Inexpensive towing insurance packages are available through organizations like Boat US, and buying insurance now might prevent a monumental payment later on.
The Coast Guard will not tow a vessel unless the situation involves a risk to life. While there’s nothing to prevent the Coast Guard from claiming salvage, it has a very long history of assisting distressed vessels at sea without claiming salvage rights.
