Rigging a boat and mastering knots are fundamental skills for any sailor. To begin with, it’s crucial to understand the various parts of the rigging. The standing rigging consists of all the fixed lines, wires, or rods that support the mast, such as shrouds and stays. In contrast, the running rigging includes the lines that you adjust while sailing, like halyards, sheets, and control lines.
Properly setting up the rigging involves ensuring that the mast is correctly aligned and tensioned. This setup is vital for optimal performance and safety. Regularly inspecting the rigging for wear and tear is essential, as even minor damage can lead to significant issues.
When it comes to using knots, a few basic ones are indispensable. The bowline is a reliable knot that creates a fixed loop at the end of a rope and is easy to untie even after bearing a load. The clove hitch is useful for temporarily securing a line to a post or a ring. The figure-eight knot prevents ropes from slipping through fittings. Additionally, the sheet bend is excellent for joining two ropes of different thicknesses.
Learning to tie these knots quickly and correctly can make a significant difference in your sailing experience. Practice tying them in various conditions, as you often need to tie knots quickly and securely in challenging situations. Understanding the appropriate applications for each knot and the principles of rigging will help you sail safely and efficiently.
Towing and Rigging Your Boat
Here’s the scenario – you’ve saved for months and, finally, she’s yours – your first sailboat. All those daydreams and fantasies are becoming a reality. This step is a major accomplishment, something that has taken vision, hard work, and even a little courage, so take a moment to appreciate what you’ve done. Close your eyes and take a nice, deep breath.
When you open your eyes, you may find yourself thinking, «Man, this thing sure looks big».
On a trailer, most sailboats look huge. Even my little Montgomery 17, by comparison a pretty small trailerable, seems to dwarf my pickup truck. How are you going to get this beast in the water?
Don’t panic. People tow sailboats safely all the time, and you can, too. Here are some tips.
Towing
Towing a sailboat safely does not have to be difficult or overly stressful. It should be a little stressful – that’s a sign that you’re taking things seriously. But if it feels overwhelming at first, don’t worry. You can reduce that feeling with the knowledge that you’ve taken every precaution to be safe. One way to help keep up with the details is to make a towing checklist for your particular boat and tow vehicle. (For example, if your tow vehicle has a manual transmission, you don’t need to check the automatic transmission fluid level.) See section «A Towing Checklist» below to give you a start. You might also review section «Performance Characteristics of Boat TrailersTrailers».
Ok, you’ve made a list and checked it twice. You’re ready to roll. Here are some tips to get you to the water safely. First, slow down! Don’t be in a hurry when towing a trailer. It’s a common sight to see people flying down the interstate, exceeding the speed limit while towing a huge boat behind them. At high speeds, a trailer is much more likely to sway, and air pressure currents from large trucks are more of a problem. If it’s raining, slow down a lot. You’ve already got limited maneuvering and stopping ability when towing a trailer. If it’s raining, you can add reduced visibility, a much longer stopping distance, and a tendency to slide to your list of worries. You can also double your expected travel time. It’s better to take forever to get there than not arrive at all.
Second, back off from the car in front of you, especially in wet weather. You will be amazed at how long it takes to come to a panic stop, especially with a trailer that doesn’t have brakes. I know – the minute you leave enough room to stop, some bonehead pulls in front of you with about 6 inches to spare. There isn’t much you can do in that event, other than tape a big sign on the back of your boat that reads, «This boat weighs over a ton and takes a hundred yards to come to a stop».
The third tip I can offer is for backing up. Backing up with a trailer for the first time is really tricky, but it becomes much easier with practice. Put your hand on the bottom of the steering wheel. To go left, move your hand to the left, and vice versa. You’ll want to use slight movements of the wheel – exaggerated movement will cause the trailer to go all over the place. It often helps to have another person out of the car directing you with hand signals. Don’t be in a hurry, take your time, and practice. A summer Saturday at a busy boat ramp is not a good time to back your boat for the first time.
You can find other towing tips from the government and in trailer-oriented magazines, like:
- Trailer Boats;
- Trailer Life magazine;
- and RVLiving.
If you type «towing a trailer» into a web search engine, you’ll get dozens of hits with good information and tips about towing your sailboat.
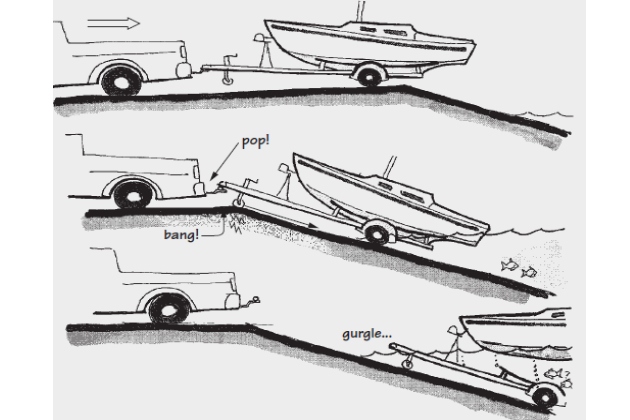
Safety Tip: Raise Your Tongue Jack All the Way! Here’s an important safety tip. Most boats, especially larger ones, have a crank-down tongue jack to raise the tongue for connecting and disconnecting the trailer. For a 2 000-pound boat, the proper tongue weight is at least 200 pounds – too heavy to lift by hand. Tongue jacks make it easy to lift the tongue. Some jacks pivot to swing out of the way, but some, like mine, are fixed in the vertical position. It’s very important, especially with fixed jacks, to raise them up as far as possible before towing a trailer. Otherwise, a sharp rise in the road – most commonly the top of a steep ramp – can hit the jack and force the coupling off the ball.
A Towing Checklist in the driveway, before towing.
Be certain the ball and coupler are the correct size.
Lubricate the coupler and the latch.
Be sure the coupler is locked and secured with a safety clip or padlock. Test to make sure the coupler is securely fastened to the hitch ball.
Check the safety chains. Make sure they’re solidly attached to the frame, facing forward if using open hooks, and crossed under the coupling. Don’t let the chains drag on the pavement.
If your trailer has brakes, inspect the trailer brake wiring and harness. Clean if necessary. Inspect and/or clean the lighting plug and receptacle. Test all exterior lighting, brake lights, and turn signals.
If a trailer license plate is required, make sure it’s current and hasn’t fallen off.
Inspect all hitch components:
- leaf springs;
- clamps;
- axle components, and so on,
for cracking or broken welds.
If your trailer is equipped with brakes, test the breakaway switch.
Check tire pressures and inspect each tire for rot, cracking, or wear.
Check the wheel nut torque.
Make sure the tongue jack is raised as far as possible.
Remove the dolly wheel (if appropriate).
Make sure the boat motor is off the transom and secured in the tow vehicle or on a mounting bar. If necessary, tighten and padlock the mounting screws.
Remove the rudder and store it in the cabin. Do not tow the boat with the boom or the rudder lying in the cockpit.
Make sure the transom strap and bow chain are secure and tight.
Store all loose items on the boat belowdeck. Hatches should have positive latches to prevent them from being blown open, and all should be secured. Items in the cabin, particularly breakables, should be stowed low and securely. Lock the companionway to prevent it from vibrating open.
Make sure the mast is well supported at a minimum of three points and securely tied to the hull.
Check that the hull is correctly positioned on the trailer and supported by the bunks and at the bottom of the keel. If the bunks are causing dents in the hull, reposition the boat until it is correctly supported – the trailer should never cause any deformation of the hull.
On the road, before driving at highway speeds. Test the bearings. After driving a few blocks, pull over and feel the bearings with the back of your hand. If they are hot, stop. The bearings must be replaced before you continue. Do nothing until they cool down, then very slowly find a place where you can safely work on the hubs, away from traffic. Don’t drive more than a few blocks, and don’t exceed 15 miles per hour, as your tire has a very real chance of coming off the axle. Call for roadside assistance, if available.
If your trailer sways, stop. Try to determine what is causing the trailer to sway, and correct it. Do not drive at highway speeds if Performance Characteristics of Boat Trailersyour trailer sways.
At the launch ramp, before raising the mast. Always look up! Make sure there are no power lines of any kind between you and the ramp. Your mast does not have to make contact with a high-power line to conduct a deadly electric surge – very high voltages can jump through the air if your mast gets close enough. Make sure no branches or trees obstruct your launch area.
If possible, point the boat downhill to make raising the mast a little easier.
If you have to disconnect the trailer from the car, be sure to block the aft corner of the trailer to prevent it from rolling before you step on the boat.
Make sure all your shrouds and halyards are connected and free of deck obstructions. Check the masthead to be sure the halyards are in their proper sleeves, and tighten the halyards on the mast so they don’t foul as you raise the mast.
If you have babystays to limit sideways movement, connect them.
Loosen the headstay turnbuckle. Be sure the correct size clevis pins are ready to secure the forestay.
If you can, get some help lifting the mast.
Rigging
Once you get to the ramp, you have to do a little magic. You’ve got to transform your boat from something that is more like an RV to a small, seaworthy vessel. And you have to do this in a parking lot. Then you have to launch the whole assembly. A fringe benefit to taking a little time for rigging is that it gives the trailer wheel bearings a chance to cool off. (Dipping hot bearings in cool water shocks the steel and pulls water into the bearings, increasing the possibility of failure.)
Some sailboat manufacturers like to tell you how simple rigging is. It’s simple only in theory.
Use Wheel Chocks at the Ramp. My good friend Mark Kennedy used to live in a house with a deck that overlooked a public boat ramp. He had great entertainment simply relaxing on the deck and watching people’s various hijinks as they attempted to launch and recover their boats. One afternoon we saw one hapless fellow launch his boat and his pickup truck. (This scenario is really funny – unless it happens to you. And it’s more common than you’d think.) If I remember it correctly, the water nearly made it past his windows as his truck slowly rolled backward while he putzed around on his boat. Just in the nick of time, he raced to the cab and got the truck out of the water before drowning the engine, but I’ll bet the saltwater-soaked interior had that special low-tide, dead-fish smell for a long time. I’ve seen, where car owners weren’t quite as speedy, and the tow vehicles were submerged completely.
The lesson: Your parking brakes are often less effective than they should be, and they’re quick to wear out. If you depend on your parking brakes at the ramp, you may launch your tow vehicle unintentionally. A simple solution is a pair of wheel chocks. You can buy these at an auto parts store; a short chunk of wood would also work. A small firewood-sized piece of log split in half and drilled with a hole would be ideal. Here’s a tip – tie the wheel chocks to your bumper (on a pickup) or the inside of your trunk (on a car) with a short piece of light line. When you are on the ramp, set your brakes, then put the chocks in place behind the rear wheels first thing. They are especially helpful when recovering your boat, because when you release the brakes, the car doesn’t roll backward. This was helpful when I pulled the boat with my standard-transmission Frontier – it gave me a second to let the clutch out a little and rev the engine. When you go up the ramp, the line drags the chocks along with you – no need to run back and pick them up before the next person uses the ramp.
In real life, rigging a boat at the ramp is a big job. But with practice, it gets much easier. I have seen some truly amazing, virtuoso performances by sailboat owners who have gotten the setup and rigging of their boat down to a fine science. One sailor I knew had a MacGregor 25 launched within twenty minutes of arrival at the ramp. His wife accompanied him, and it was obvious that these two had launched many times in order to reach such impressive rig times.
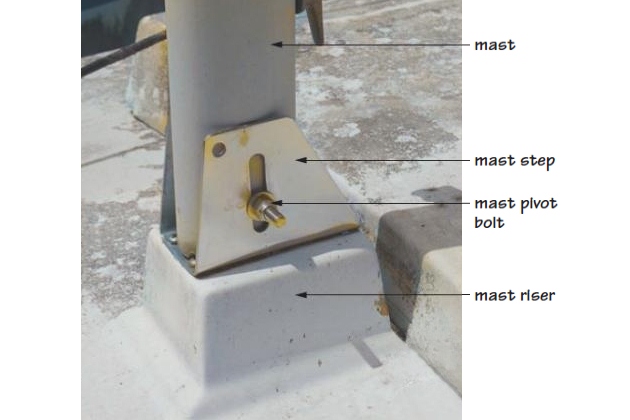
In general, larger boats with more complex rigs take longer to rig and launch, but this isn’t a universal truth. Each sailboat has its own quirks and characteristics – different hardware and different mast steps. The mast step is where the base of the mast connects with the boat.
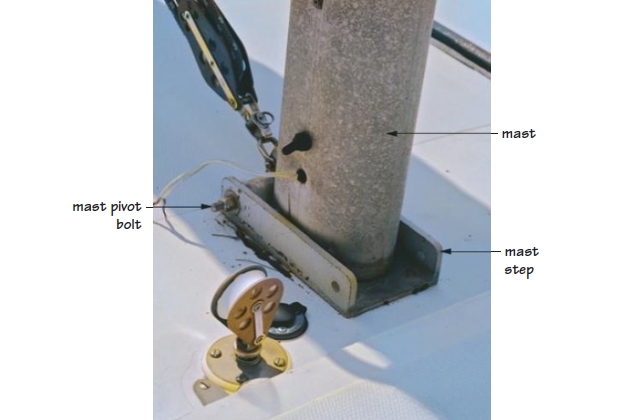
On trailerables, it’s often a stainless bracket with a bolt through it; other times it’s a hinged plate mounted firmly to the deck. Most trailerables have deck-stepped masts, though a few might have carbon masts that are keel stepped. The carbon mast passes through a hole on the deck and fits in a shallow socket in the keel. Some catboats with unstayed masts work this way.
Before you do any rigging, look up. Do this every time you approach a boat ramp, familiar or not. The most dangerous overhead problem is a power line. Some power lines carry so much current they don’t need direct contact to conduct electricity through your mast and boat. Your aluminum mast becomes a very effective lightning rod, and the results can be deadly. Not many launch ramps have these kinds of high-voltage lines strung about, but you can’t be too sure. Be careful – people have died because they raised a mast into an overhead power line, and this kind of tragedy is preventable if only you take a moment to look up!
Rigging your boat will be somewhat different than described here, as this is an overview of the process. The exact procedure is outlined in your owner’s manual. If you don’t have a manual, try to get one. Even if the builder of Technical Recommendations for Inspecting Your Boatyour boat has been out of business for thirty years, you still have a pretty good chance of finding a manual on the Internet. Most boats have a user’s group somewhere online, and those members can be invaluable resources for information about your boat – and not just for old manuals, either. Sources for obsolete parts, procedures, aftermarket suppliers, flotillas, group cruises, races, and crewing opportunities can all be found by being a part of a user’s group, so join the community!
Here’s how rigging a typical trailerable sailboat might go at a ramp. After checking for overhead power lines and branches, find a spot where you can park your car and boat. Hopefully you can rig the boat away from the ramp. Where I sail, sailboats are pretty rare, so I get some odd looks and questions. Usually these come at difficult moments – like when my mast is halfway up. I try to get as far away from spectators as I can. If you have a choice, park the boat heading downhill or on level ground. Don’t disconnect the boat from the car to rig it, as you’ll be walking around the deck and you could unbalance the trailer, sending the tongue skyward and possibly moving the trailer! Be careful as you get ready to raise the mast, since you’ll be a good distance from the pavement. Falling off the deck could easily ruin your next three months.
First, untie the mast and free the halyards and stays. Most folks use a few bungee cords to hold the halyards, stays, and spreaders securely around the mast for transport. Undo these and stow them where you can find them again when you next haul the boat. Tie the ends of the halyards tightly to the cleats at the base of the mast, but let the shrouds and stays hang loose for a moment. Check the masthead – make sure the forestay is facing up, the backstay is down, and all the halyards are clear, with no twists or kinks.
Next, bolt the mast to the mast step. The mast goes toward the stern, and when it’s bolted into the step, you can’t reach anything past the spreaders. Make sure the upper shrouds, halyards, forestay, and backstay are clear and don’t have any kinks in them. Most boats need something in the area of the cockpit to support the mast before it is raised. My boat has a teak mast crutch that fits into the rudder pintles – it supports the mast while on the highway. Your boat may have something similar. Make sure there’s some kind of support in place, ready to receive the mast as you shift it aft. If everything looks Ok, shift the mast to the rear and bolt it in the step. The mast is large and ungainly, but usually not too heavy. Sometimes it helps to pad the companionway with an old life jacket to prevent friction from the mast as you raise it, which can crack the gelcoat.
When the mast is bolted in place, attach the after shrouds and backstay. Some boats, like my old MacGregor, use vernier adjusters on the backstay and the shrouds, and a single turnbuckle at the headstay. Vernier adjusters are simple affairs commonly seen on Hobie Cats. They are simply two pieces of metal – one flat, the other U-shaped – with a series of holes drilled in them. The spacing of the holes is slightly different, so you can adjust shroud tension in small increments, depending on where you locate the clevis pin. (A clevis pin is a small stainless-steel pin with a head at one end and a hole in the other – see section «Clevis Pins» below for more detail.)
If your boat uses vernier adjusters, attach the shrouds to the verniers loosely, using the lower holes. This ensures you’ve got enough slack at the headstay to insert the clevis pin. As you gain some experience rigging your boat, you can mark the verniers where they normally go and save some adjustment time later. If you have turnbuckles, just pin them in – you’ll adjust them later. Always secure clevis pins with split rings.
On most boats, you’ll have five stays attached to the hull at this point: the starboard upper and lower shrouds, the port upper and lower shrouds, and the backstay. (These terms can get a little confusing. Generally, stays are anything that «stays» the mast, or keeps it in position. Shrouds are stays that go to the sides of the boat. So you usually have a headstay, a backstay, and a number of shrouds. But please don’t call them «sidestays», which is incorrect.) These all seem to have an unnatural ability to hook themselves under something as you raise the mast, and the problem is always worse if you’re launching alone. When this happens, there’s not much you can do besides lower the mast back down and free the snag. Be especially careful to watch for kinks in the stays and shrouds as you’re raising the mast.
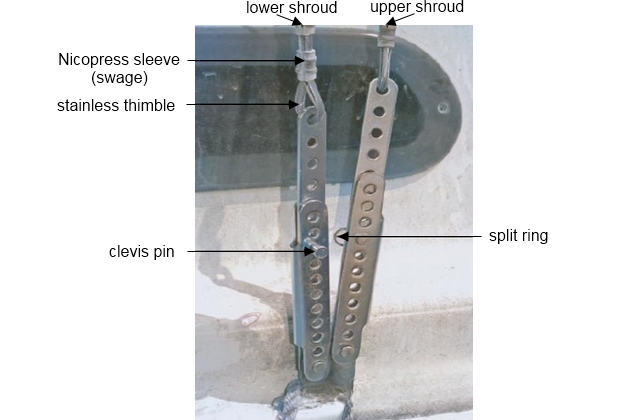
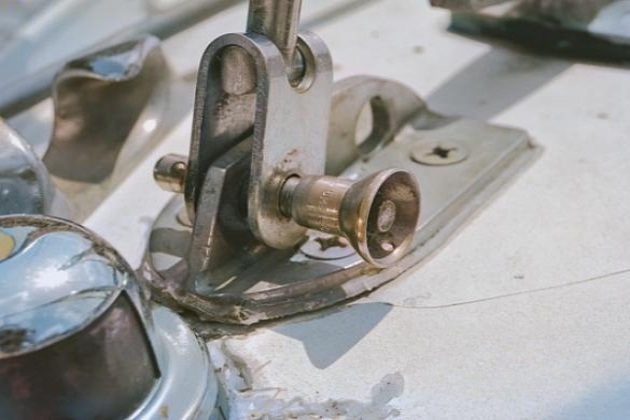
A vernier adjuster on a MacGregor 22. The adjusters are the two pieces of stainless steel with holes in them. The top half of the adjuster is permanently attached to the shroud with double Nicropress swages. At the bottom, the adjuster is fastened to the chainplate with a clevis pin.
If you have any kind of mast-raising system, now is the time to hook it up and use it. (More about mast-raising systems in a moment – see below.) Otherwise, you’ll just have to muscle the mast up. Having a second person around is a big help when launching in general, but especially when raising the mast. On my boat, I have to hoist the mast from the cabintop. I can’t start lifting in the cockpit and step onto the cabintop – the mast is too heavy and the cockpit too deep. I have to muscle it up while standing next to the mast step, and the leverage point is very short. When I raise the mast by myself, it’s very difficult to lift. A second person, standing in the cockpit and lifting as high as possible, is a big help.
Clevis Pins. Clevis pins are tiny, simple things, but they’re very important. If you don’t believe me, just ask someone who has experienced a clevis pin failure – the results are catastrophic.
Where used a clevis pins?
Clevis pins are used at various points all over your rigging, and they are a link in your rigging chain. Break a clevis, and you’ll likely lose the entire rig. This is why you should use only real stainless steel clevis pins. Never, ever use a bolt in place of a clevis pin. The threads on a bolt make them much weaker in shear strength – meaning forces perpendicular to the axis of the bolt – and that’s exactly how a fitting acts on a clevis.
For such little things, clevis pins are horribly expensive. You can sometimes find cheaper galvanized clevis pins at the hardware store. Never use these! They aren’t as strong as the stainless ones that you get from a boating chandlery.
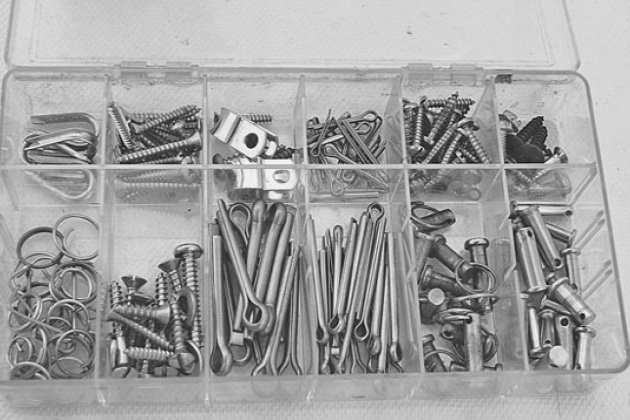
Clevis pins are so small and round that they seem to have suicidal tendencies aboard a sailboat. Thousands have leapt from the pitching deck of a sailboat to a watery death, never to be seen again. Whenever you buy clevis pins, buy more than you need in case you get a jumper, and always carry several spares.
Clevis pins can be secured with cotter pins or split rings. Cotter pins can be fine on larger boats with rarely removed standing rigging, but not usually for a trailerable. They can’t be reused, and their sharp little legs can cut fingers or sails, so they have to be taped over. A slightly better choice is the split ring, also known by various names such as:
- «ring-ding»;
- «Old Fingernail-Breaker»;
- and «You Little».
These tiny things also love to roll off the deck, hiding themselves in some inaccessible little crack or jumping into the water. I think the clevis pins talk them into it. Keep spares aboard.
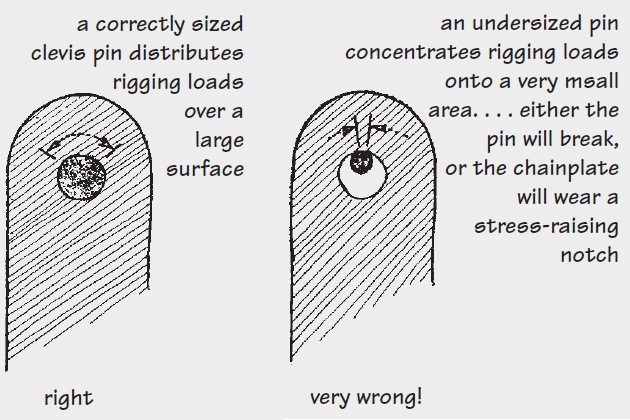
Clevis pins must be exactly matched to the hole in the fitting. A clevis that’s too big obviously can’t be used, but one that’s a size too small might be tempting. Don’t do it! What you get is point-loading of the pin and fitting, where all of the rig’s stress is concentrated at a small area. This can either break the clevis or crack the fitting. If the loads are small and nothing breaks, it can wear a little notch at the top of the fitting, which will weaken it greatly. Inspect all your fittings for these little notches and cracks at the top.
Trailer sailer owners are always on the lookout for ways to speed rigging. You may be tempted to use fastpins, which are pins with a split ring on one end and a tiny springloaded ball on the other. I wouldn’t use these for the rigging or anything critical. If they are solid (not tubular) and properly sized, they’d probably be strong enough. But there’s always a possibility that a loose line can snag the ring and jerk it out of the fitting, and the mast goes over the side.
There is one possible alternative to traditional clevis pins, and that’s a ball-lock quickrelease pin. These pins are expensive little buggers at about $20 each. They have a little ball on the end, just like fastpins, but the ball isn’t spring-loaded. You have to push a button on the end to get the pin out. Quick-release pins are quite secure, but they can come out accidentally.
A very experienced racer I know was racing a small boat rigged with quick-pins, and noticed the downwind shroud dangling – the quick-pin had fallen out of the chainplate! He recommends taping them if you use them. Several trailer sailers use them for their headstay fitting, where speed in securing that pin is an advantage. However, quick-release pins are tubular, not solid, though the tube does have a solid pin passing through the center. They aren’t as strong as plain clevis pins. Other sailors do use them and like them very much, but I don’t recommend them because of concerns regarding strength and the possibility of their working loose.
A better choice might be to lift the mast from the bow end and work toward the stern, but this technique is problematic on most boats. The port and starboard shrouds attach to the hull just slightly aft, so you can’t attach both to the hull if you raise the mast from the bow. You’ll be able to attach only one shroud, either the port or the starboard one. Once you get the mast up, you have to get the other shroud attached somehow. And until you do, the mast will be quite unstable – a moment’s loss of pressure on the mast could result in it crashing down, which we’d really like to avoid. Doing this by yourself is very risky, and it’s chancy even with help, so I can’t recommend this method for a typically rigged trailer sailer with single, aft-swept lowers. (A few boats have double lowers, and these can be raised from the bow in relative safety.)

For now, let’s say that you’ve got a second person to help, and you’re going to raise the mast from the stern. Before lifting, loosen the headstay turnbuckle by several turns. This gives you enough slack in the rig to position the headstay clevis pin. Find the clevis pin and split ring that goes in the stemhead fitting, and have them ready. If everything still looks Ok at the masthead and all the shrouds look fair, start lifting. Yes, it’s heavy. Be careful – don’t let the mast get sideways! The most risky part is when the mast is about 45 degrees from vertical. Once you get that far, keep going up – if you stop at 45 degrees, then the mast will probably start drifting around. If the mast starts to make a circular motion to the side, it’ll be hard to stop and you can lose control of it. Don’t hesitate; get it up quickly – the shrouds and backstay will hold it upright. Once it’s up, hold it there – do not take your hands off the mast for a second!
When you get the mast up, take another look aloft. Make sure none of the stays are twisted or kinked, and you didn’t hoist aloft a stray line. Bending turnbuckles is a common problem when raising a mast, so be careful – I had to replace my turnbuckles after I discovered microscopic cracking along the threads. As the shrouds tighten on the way up, the spreaders will go from their folded position to their Equipment of a Sailboat: What You Need to Have on Board While Sailingnormal sailing position. (The spreaders are the short tubes that hold the upper shrouds away from the mast. You’ll find them on all but the smallest boats.) Sometimes the spreader brackets jam and don’t unfold properly. When this happens, the mast usually stops short of vertical. There’s nothing much you can do except utter a few of those salty sailing expletives, bring the mast back down, get the spreaders in the proper position, and try again. Make sure you haven’t kinked or bent your shrouds when the spreaders jam. (When the mast is down, I usually put a shot of lubricant in the spreader brackets once per season to encourage them to operate properly.)
Now you have to install the headstay. Don’t relax until you get that stemhead clevis pin in. If the bow is pointing downhill, gravity will help hold the mast upright, but I certainly wouldn’t count on it – a good breeze could blow the mast down. Have a crewmate push the mast forward until you get a clevis pin in and secure it with a split ring. Only until you do that can you take a break and breathe freely.
Raising the mast is the biggest job when you launch. The rest is small potatoes, comparatively. Once the mast is up, tighten the standing rigging. Usually you start by getting the forestay and the backstay approximately tensioned, then work on the shrouds. (See section «Determining the Correct Shroud Tension» below.)
If your boat uses vernier adjusters, get them as tight as possible by hand, then complete the tightening while under way. If you have turnbuckles, screw them down by hand until the rig is evenly tensioned. To check if the rig is even, lay your head along the mast and look up. If there’s a curve to one side, tighten the shroud on the convex side to bring the mast straight. Check the mast for straightness again when launched, as some sailboats flex a little when they are in the water compared to on the trailer. Don’t use tools to get more leverage on your turnbuckles just yet, and never use Channellock pliers or Vise-Grips on turnbuckles – you’ll chew them to bits. You can do your final tuning once you’re under way.
If you want to do a quick, basic setup of your rig tension and you can’t find a manual, try this. Tighten everything evenly, make sure the mast is straight, and give each stay a pluck with your thumb, as if you were playing a giant guitar. If the stay can sound a note, then your tension should be Ok. Don’t overdo it, though – the note you want is just above a thud, not an F sharp. More rigs get damaged through overtightening than undertightening.
Once the turnbuckles are tensioned, make sure they’re seized with wire, a cotter pin, or small line so they can’t adjust themselves. If they’re seized with wire, be sure the ends are carefully trimmed and turned in so they cannot tear your sails.
The boom often attaches to the mast at the gooseneck fitting, usually with some kind of clevis pin. Some goosenecks are fixed, others are adjustable. Adjustable goosenecks are often better than fixed, since they make tensioning the mainsail easier. Attach the topping lift at the aft end of the boom. On most trailer sailers, the topping lift is a just a short piece of line tied to the backstay with a clip.
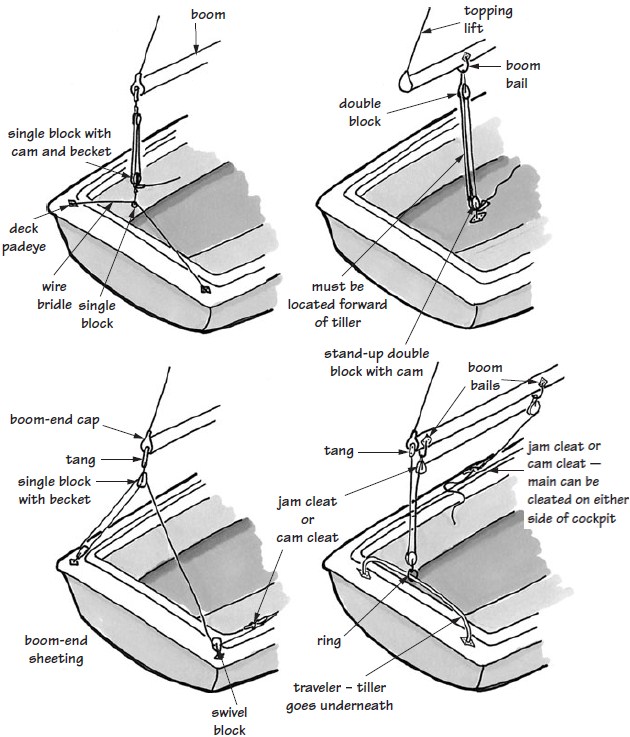
Rig the mainsheet according to your manual or the previous owner’s instructions. There are lots of different ways to rig a mainsheet on a sailboat. On most trailerable sailboats, the mainsheet is a compound system – meaning two or more blocks. The mainsheet on my boat has a block that attaches to a bail on the boom via a clip. The lower end of the mainsheet attaches to the traveler in the middle of the cockpit.
A traveler is a rail mounted across the cockpit from port to starboard that has a traveler car – a ball bearing slider that attaches to the mainsheet – that travels back and forth, controlled by – you guessed it – traveler control lines. Not all boats have travelers. Travelers allow fine adjustments to the mainsail shape by altering the position of the mainsheet. In light winds when a full sail with a good bit of curve is optimal, pull the traveler all the way to windward. This allows the boom to lift a little, adding curve to the sail. In heavy winds when a flatter mainsail is desirable, sheet the traveler all the way to leeward. This pulls the boom in a downward direction, flattening the sail. Travelers are usually more of interest to racers. They are fun to play with, but in all honesty, half the time I sheet mine in the cockpit and leave it there. You can easily spend $300 adding a traveler to your boat, and on most trailer sailers, it’s in the way.
A less fancy way to rig the mainsheet on a trailer sailer is to use boom-end sheeting. This method uses two swivel blocks at the aft corner of the cockpit and a block at the end of the boom. While this lacks the fine-tuning capability of a traveler, it’s much less expensive and simpler, and has the advantage of keeping the mainsheet above the tiller. The cockpit is much less crowded this way, and you can still get a lot of adjustment in the sail.
Read also: Types of Sailboats and Their Management
But rerigging the mainsheet is something you can do after you’ve had a few sails. For now, we’ve still got a hypothetical boat to launch, and we’re nearly ready.
Get the rudder and put it in place in the pintles. (The rudder pintles look like pins, and they fit in the gudgeons, which are usually strongly bolted to the transom. The gudgeons have the holes.) Make sure your rudder kickup mechanism (if your rudder is so equipped) is in good working order. Many kick-up rudders rely on a bungee cord to provide tension. This cord should be renewed at the beginning of every season. While you’re at the stern, put the motor onto its mount and clamp it down tightly. (You do have some kind of backup line for the outboard, just in case the motor mount fails, right? The easiest solution is a short length of line with a clip snapped onto the motor, attached to the boat at the other end at a ring bolt. Or just tie a short length of line from the motor to someplace strong on the transom, like the backstay chainplate.) Then connect the fuel line and tank, and make sure the kill switch is in the correct position. Open the tank vent and valve on the motor and prime the fuel line before you get it in the water, so you won’t have a fuel spill. If the system leaks, take corrective action – it’s much easier to fix now than when your boat is drifting out to sea with the tide.
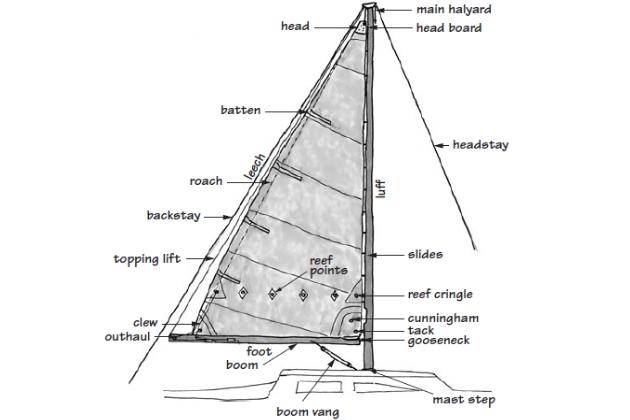
Bend on the sails. (For some reason, we «bend» the sails onto the mast and boom. It’s an archaic term meaning to fasten or attach, as in a sheet bend.) You’ll most often start at the mainsail’s tack, which is the lower forward corner of the sail. Feed the boom first, which means sliding the sail’s boltrope into the groove that runs along the top of the boom. (A boltrope is a length of rope that’s sewn into the edge of a sail. This is one of the few «ropes» found on board. Everything else is called a line.) Tie off the other end of the sail (called the clew) to the aft end of the boom with a short length of line, stretching the foot of the sail just enough to get the wrinkles out. Next, attach the forward edge of the sail (called the luff). Oftentimes the luff attaches by feeding sail slides into a track that runs up the mast. Feed in these slides, and tie the headsail to the main halyard. Don’t get the halyards mixed up. As soon as you hoist the main, it will be immediately obvious if you get it wrong.
Four common mainsheet rigging methods are shown here, but there are dozens of ways to rig a mainsheet, using:
- winches;
- traveler systems;
- double-ended or cabintop sheeting, and so on.
Look at racing boats for some clever (but often expensive) ideas. (Tillers and rudders not shown for clarity.)
If you have plain rope halyards, the best knot to use for attaching them is by far a bowline, because it’s easy to untie after being tensioned. Try to make this knot as short and compact as possible. For many years, larger boats used wire halyards with screw pin shackles or snap shackles, because these have lower stretch. The wire halyards had rope tails so they could be cleated off at the mast base. Newer high-tech fiber lines, such as Sta-Set X or Vectran V-12, have very low stretch, approaching that of wire. These must be carefully spliced or their strength suffers, so they’re normally fitted with shackles and eye splices made by a professional rigger.
Usually I wait to bend on the headsail until we’re under way rather than put it on at the ramp. This way the foredeck stays clear – often you need that space to maneuver the boat once you get it in the water. More than once, having the mainsail ready to hoist has allowed me to sail out of a tight spot when my engine sputtered and died. Engines seem to do that when you need them most.
Determining the Correct Shroud Tension. Correct shroud adjustment is something that perplexes many sailors, new and experienced alike. Some manuals seem vague about the subject, with ambiguous phrases like «moderate tension». Your moderate and my moderate might be very different! Other manuals have very specific instructions for setting the tension, which should be followed exactly. Too little or too much tension could potentially damage your rig.
Most nonracing sailboats require a straight mast. Racers often flatten the mainsail by bending the mast slightly while under way. This is done with an adjustable backstay. Tension can be increased or decreased with blocks or even hydraulics. Overuse can result in a mast with a permanent bend aft. (If you have to sail with a bent mast, a slight aft bend is what you want. Side-to-side bends are bad, but a mast that curves forward is worse.)
There is a wire tension gauge on the market called a Loos gauge. It is specifically designed for testing the tension on sailboat sides and stays by measuring the amount of deflection with a spring. It is quite accurate, and costs around $65. The old Model A Loos gauge had a leaf spring that can stretch out with age, so if you’re looking for a used Loos, get the more recent PT-1 model. Also note that once you’re under way, a Loos gauge doesn’t work – the stresses and strains of a boat in a seaway make the readings go all over the place.
Some racers use a «gaugeless» method to adjust their shroud tension. First, tighten Self-Survey Criteria for the Rigyour rig as tight as you can get it by hand at the dock, and make sure the mast is straight. Then, go out and sail upwind. The leeward upper shroud will probably have a lot of «slop» in it. If it does, tighten the shroud a half turn. Tack the boat and tighten the other shroud the exact same amount.
Now put the boat back on the original heading and check the shroud again. If it’s still flopping around (on its own; you don’t have to touch the shroud), repeat the process. Continue this routine until the shroud shows a slight movement on its own, perhaps a deflection of about 1/2 inch. A large deflection of, say, 4 inches is a «floppy» shroud and should be tightened. While Greg didn’t mention the subject of lower shroud tension, I believe that you can use similar parameters to adjust them as well. The lower shrouds are shorter and will stretch less in normal use, so if the leeward shrouds are flopping around, they need to be tightened as well. When checked with a gauge, it is common for lower shrouds to be adjusted with less tension than the upper shrouds.
An indicator of a rig that’s too loose is a «pumping» motion of the mast in waves or chop. You may need to increase the overall rig tension to dampen the effects of rough water.
Just as important, this can tell you if your shrouds are too tight. If the leeward upper shroud is rocksteady when sailing upwind, then it is too tight and should be loosened. When you complete the adjustment, sight up the mast and check for bends. A small amount of bend to leeward at the spreaders, say a 1/2 inch or so, is normal, but if you see any significant bending of the mast, then something is wrong and should be corrected. Of course, this procedure assumes your rig is undamaged and in good shape – no broken strands of wire on any of the shrouds or stays, no cracks anywhere, no bent turnbuckles, no loose chainplates, and so forth.
You’ll notice that, when using this method, your shrouds will be adjusted tighter when you have higher winds. This is just as it should be – higher winds call for a tighter overall rig tension.
Unfortunately, this doesn’t help you much when setting your forestay and backstay. Racers use their adjustable backstays to tighten the headstay as well, tweaking the sag in the jib luff for various conditions. If you’re just out for a pleasant afternoon sail, you can hand-tighten the headstay and backstay, then tighten the shrouds, and then give the mast a little bit of bend aft by tightening the backstay a little more.
Launching Your Boat
The remaining jobs are to put out fenders along the side of the boat and to tie docking lines onto their cleats. There’s often (though not always) some kind of dock at a launch ramp, so determine the side you’ll approach from and position your fenders accordingly. The same thing goes for the docking lines. Make sure they’re long enough to maneuver the boat on the trailer. When I launch the boat by myself, I use two long lines, one at the bow and one somewhere near the middle of the boat. If a line can be secured amidships, then the boat can be brought slowly to the dock using the line alone. I’ll try this only when the weather’s calm, though. Usually, I’ll have someone along to help, and I’ll use a single long bow line. Before you launch, take a moment to clear things up on the boat. Make sure all the docking lines are coiled neatly and ready to toss, and be certain that no stray lines are dangling over the side. Now is a good time to load those last few items onto the boat. Remove the transom strap, but keep the bow eye connected to the trailer winch.
Now you’ve got to back the boat down the ramp. (You have been practicing in an empty parking lot, right?) If this is your first launch, try to avoid Memorial Day weekend. In our area, any Saturday in the summer is like a bass boat mosh pit. Sometimes it calms down around lunchtime, but I avoid launching on a Saturday. If it is crowded, just wait your turn. When it comes, don’t let people pressure you into hurrying. The ski boat folks can get a boat on and off a trailer in a flash – those 110-horsepower engines can get a boat onto a trailer while it’s sitting in the parking lot, it seems. They hardly take their SUVs out of gear when they launch, so the ten minutes you’ll be taking on the ramp will seem like years to them. Don’t worry about it. Most people can see that a sailboat is a different animal altogether, and they understand that launching will take a little more time.
At the launch ramp, you won’t need to back the boat fast, but it’s helpful to make it go where you want without having to make too many corrections. Backing a trailer straight takes practice, so if you start to wander off to one side and you can’t correct, stop and pull forward a few feet to straighten things out, and try again. It’ll get easier each time you do it. You want the trailer straight when you enter the water. It’s tougher to make corrections when you can’t see the wheels in your mirrors, and you don’t want to roll off the side of the ramp.
You need to get your trailer to a certain depth before your boat will float off. The goal is to have it deep enough that you can push the boat off, but not so deep that the boat floats away on its own. Some ramps are very shallow, and you’ll have to practically launch your tow vehicle as well as the boat in order to get the boat to float off. It may be impossible to launch your boat from a shallow ramp, especially if there’s a drop-off at the end – you don’t want your tires to go over a drop-off, because then you’ll need a tow truck to get the trailer out. (This is more likely when trying to launch a deep fixed-keel boat that sits high on a trailer.) You can estimate how much water you’ll need at the ramp by measuring the height of the waterline near the wheels (while the boat is on the trailer, of course). Some trailers, especially those with fixed-keel sailboats, have an extension that allows you to get the trailer deeper, but watch out for that drop-off. It’s a good idea to ask for advice at a new ramp; if no one is around, put on a bathing suit and walk out to check the length, depth, and condition of the ramp. Wear something on your feet – most ramps are slippery.
If the stern starts to float, then you’re getting close to the correct depth. When the angle of the boat changes in your rearview mirror, stop the car. If you have an automatic transmission, put it in park; a manual transmission, leave it in reverse gear and turn it off. You don’t want to launch your car, just the boat. Your emergency brake will engage only the rear wheels on most cars, so you’ll want to chock the wheels with something. Real wheel chocks from the auto store are best, though I must admit I usually use a short chunk of wood. (See section «Use Wheel Chocks at the Ramp» above.) Unhook the bow eye and shove. Hopefully the boat will float off, though sometimes it needs a little more shoving and grunting. If you need to get the trailer deeper, don’t forget to pull the wheel chock. Once you figure out your boat and trailer’s perfect launching depth, notice how deep the trailer wheels are so that you can repeat this positioning next time you launch the boat.
Once the boat floats free, hand the bow line to your crewmate and park the car and trailer. Either walk the boat to the dock or have your crew toss the line to you, and tie up at the dock while you get the boat ready.
That’s How to Load Boat on Trailer and How to Unload It?sailboat launching in a nutshell. It’s obviously a fictional account, since nothing went wrong. It never seems to go that way when I launch – something always seems to goof up, and it’s usually my own fault. When it happens to you, don’t sweat it. Just take your time, be safe, and fix problems as they come up. Hopefully they’ll be minor irritations and nothing that’ll cancel your trip.
Mast-Raising Systems
There are some alternatives to muscling the mast up (or down) with brute force and swearing like a sailor. Mast-raising systems can range from very helpful back-savers to fiddly timewasters. It depends on the system, the boat, and the owner. I haven’t used mast-raising systems on my boats because the masts have been fairly manageable, the boats small, and my strength adequate to the task. Your situation may be different.
I know of three basic kinds of mast-raising systems that seem like they’d work. They all use angles to reduce the effort required to raise the mast. Like most everything sailboat related, they all have advantages and disadvantages.
Single Gin Pole and Babystays. The ideal mast-raising system would consist of parts normally found on the boat already, like the boom and the mainsheet. There’s a way to use the boom as a short mast of sorts, holding up a cable that is used to lift the mast. A boom used this way is called a gin pole. A spinnaker pole might work if it were strong, though I wouldn’t want to use my expensive spinnaker pole for this kind of job. A push-button or twist-lock whisker pole would not work, because there is a lot of compression on the pole when raising the mast this way.
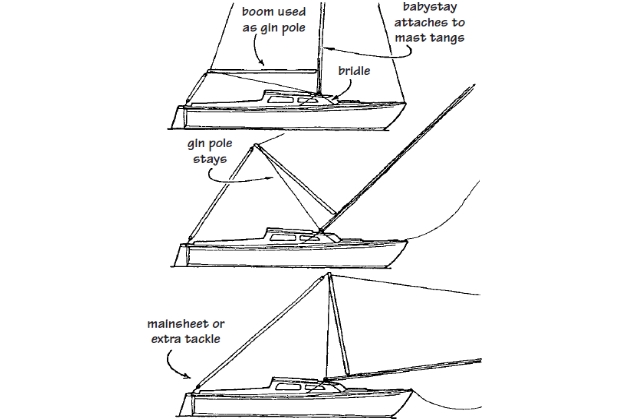
The downside of using a single gin pole is that it needs a bunch of additional hardware to prevent it, or the mast, from flopping over to the side. This is accomplished with babystays, short pieces of low-stretch rope or wire mounted to a solid point on the deck. But the babystays must be anchored along the same axis as the pivot point of the mast. Otherwise, the babystays will either loosen or tighten as the mast goes up. The chainplates would be perfect, except that they are almost never in the correct spot. Some sailboat designs can be improved by adding a permanently attached stainless U-bolt to the deck, as shown in the drawing, but make it strong and caulk it well.
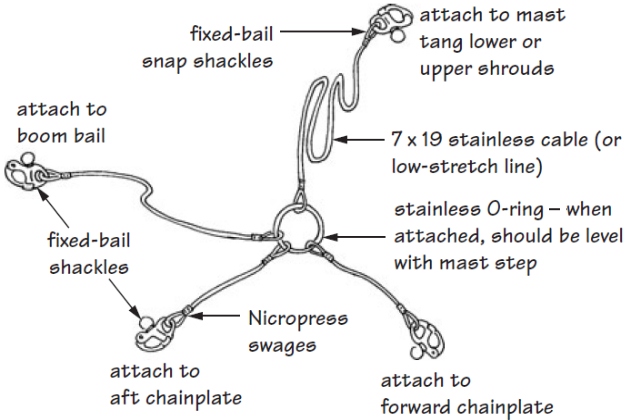
A mast-raising «system» you can make yourself. Fixed-bail snap shackles are strong yet reasonably priced, but make sure your chainplate and tang holes are large enough to fit them. If not, regular shackles with quick-pins can be used. A stainless-steel O-ring forms the center pivot point. For boats with single lower shrouds, you would need to add forward and aft attachment points for the lower bridle.
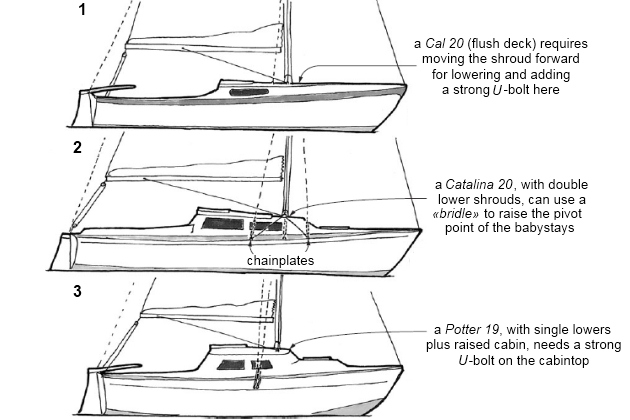
If your boat has a double set of lower shrouds (as on a Catalina 20), you can use a short bridle connected to the chainplates to create a pivot point at the correct spot. Flush-deck designs like the Cal 20 often have the perfect platform for attaching babystay hardware. Unfortunately, very few trailer sailers have flush decks. The venerable Catalina 22, as well as a few others, has double lowers, but single lowers and uppers, located a few feet aft of the mast step, seems to be a more common method of rigging a Buying Trailerable Sailboats: Condition Assessment and Risks trailerable sailboat. You may also need a longer mainsheet or second block and tackle to lower the mast.
Most trailerable sailboats have a raised cabin with a single set of lower shrouds that are swept aft. This is a light, strong, easily rigged, and cost-effective configuration, and that’s why it’s most often used. In order to use a babystay and gin pole system on this type of boat, you need to add a strong attachment point – like a second chainplate or U-bolt – forward at the outside rail or at the cabintop, if the cabin is wide and doesn’t have too much crown. Either way, the anchor point for the babystays should be strongly attached to the deck or hull side, with a large backing plate and plenty of bedding compound.
What’s the Difference between Spinnaker Poles and Whisker Poles? These two pieces of gear have similar jobs, though the job requirements differ. Spinnaker poles are long poles, usually made of aluminum, with special locking hooks at each end. Spinnaker poles are solid not adjustable – and they are used only with spinnakers (though they could be used to «pole out» other headsails when sailing downwind). Rigging a spinnaker requires a host of special gear:
- a topping lift;
- a downhaul;
- a mast ring on a track;
- and three lines for each corner of the spinnaker itself:
- a spinnaker halyard;
- a spinnaker sheet;
- and a spinnaker guy.
Racing sailboats usually have plenty of experienced hands aboard. They set spinnakers all the time, no problem. Cruisers don’t usually set spinnaker gear unless they’ve got a long downwind distance to cover in settled weather. The exception is asymmetrical «cruising spinnakers», which are easier to control and require less hardware.
Cruisers routinely use whisker poles rather than spinnakers for downwind sailing. Whisker poles look much like spinnaker poles, but they’re usually smaller and lighter. They’re often adjustable, using a push-button or twist-lock mechanism. Whisker poles are used to hold the clew of the genoa out when you are running downwind. They reduce the tendency of the headsail to repeatedly fill and collapse, which is hard on the boat. The length of the whisker pole should be the same as the foot of your largest headsail.
Sheerlegs. The gin pole/babystay method works, but it means adding a lot of hardware to the boat. There is another alternative that is somewhat simpler, but it requires some long poles that aren’t normally found aboard the typical boat.
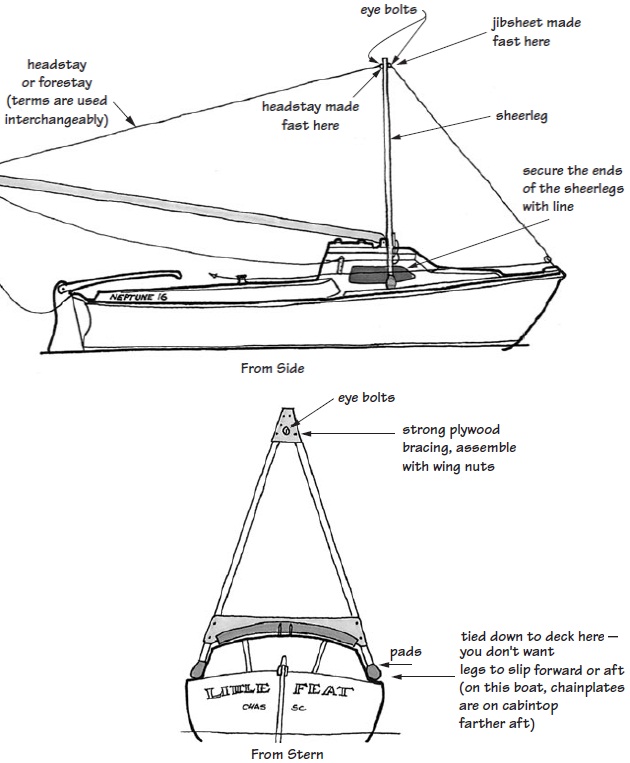
Sheerlegs must be stoutly built of at least 2×2 wood or metal. Do not use electrical conduit tube or PVC; they are not strong enough. Pad the feet well, or you risk scratches or gelcoat cracks. If the sheerlegs are assembled with large wing nuts, they can be disassembled and left with the trailer.
Suppose that, instead of a single gin pole, we used two poles, fastened together at the top and spread out at the bottom, like a giant A-frame. This method is used by steel boatbuilders to move heavy plates without a crane. They’re called sheerlegs, and the principle is pretty simple. Two long, reasonably strong poles are through-bolted near the top. The bottoms of the poles are well padded, and they include a short length of line for securing the sheerlegs to the chainplates, and another line to prevent the legs from spreading too far. The forestay attaches to the top of the sheerlegs, and the sheerlegs are pulled to the deck with the mainsheet.
It will be interesting: Comprehensive Collection of Common Sailboat Rig Types and Designs
This system requires a pair of babystays for the mast, but the sheerlegs are self-supporting. If you have a second person to help with the mast raising, he or she can take the place of the babystays, following along beside (never under) the mast to make sure it doesn’t fall off to one side. Never attempt to raise the mast alone without babystays. As the mast rises higher, the shrouds exert more and more control until the mast is fully raised and the shrouds are tight. Once the mast is up and secured, you’ve got to find a place to store the sheerlegs, which can be a bit of a disadvantage. In practice, sheerlegs are usually left with the trailer on a rack. They must be well secured for highway travel and locked to prevent theft.
Trailer Winch Extension. Another intriguing method for raising the mast is to use a trailer winch extension. This method uses a long 2×6 board or metal pole that extends about 5 feet or more above the deck. The board has a roller on the top, similar to the bow roller. The trailer strap is unhooked from the bow eye, passes over the roller, and is connected to the forestay. Tightening the trailer winch lifts the mast up while a second crewmember guides the mast to prevent it from falling sideways. If you don’t have a second crewmember, you’ll have to use babystays.
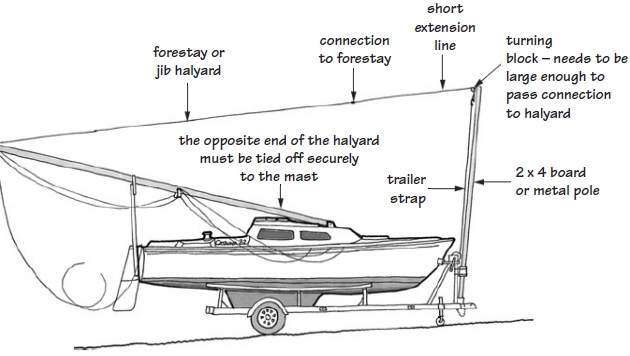
A large, strong pole is used as a crane to haul the mast upright. You need at least two lines to the mast for this to work. The jib halyard could be used to lift the mast and hold it in place while the forestay is connected, or you could raise the mast with the forestay, secure the mast with a jib or spinnaker halyard, then disconnect the forestay from the trailer strap and attach it to the stemhead fitting. Either way, the other end of the halyard must be tied securely to the mast with a bowline. If it were cleated and it slipped off, the results could be disastrous.
Knots and Lines
You can use dozens of different knots on your boat, and there are books full of detailed instructions for various bends, hitches, and macrame. If you like the subject of knots and ropework, I encourage you to get one of those excellent volumes and start tying away. The ability to correctly tie the right knot for a particular job is very seamanlike.
However, you don’t have to know all that stuff in order to safely sail your boat. You do need to learn one essential knot, and that’s the bowline. No way around it, no substitutions allowed; you must learn to tie this knot properly.
The other thing you must know is how to properly cleat a line and secure a coil. Even though you can get by with piling a huge knot of rope on a cleat (many people do; just look at any popular dock and you’ll see plenty of cleats with big blobs of line that are holding Ok), it looks very lubberly. Besides, cleating a line is very simple to learn; you have to learn it because I said so. Same thing with coiling a line – it keeps the boat neater and the line from tangling, which is safer overall. Simple to learn.
Bowline
The bowline is the knot you’ll use 80 percent of the time. What makes this knot so useful is that it can be untied after being put under great strain. This is true for many proper knots. The bowline can be used all over the boat – tying on sheets and halyards, or anytime you need to put a loop in the end of a line. (The sheet bend is similar to the bowline, only it’s used to attach two lines together.) There are two methods for tying a bowline; I’m going to show you only one. The other methods confuse me, and they’ll confuse you, too. I’ll show you the simple, non-Cub-Scout-approved, killer-rabbitin-the-hole method.
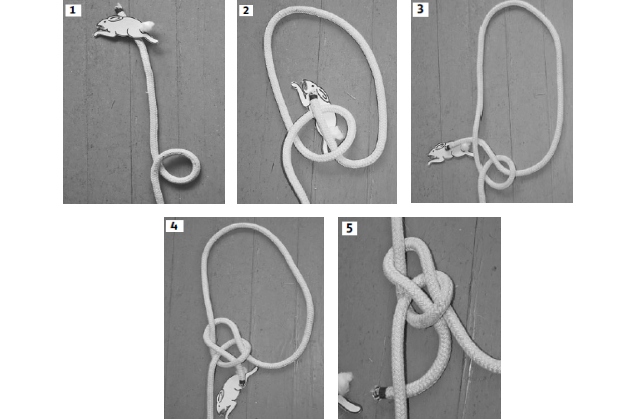
1 – first, we make a cave for the rabbit next to a tree; 2 – the rabbit comes out of the cave; 3 – goes around the tree, taking out a few knights in the process; 4 – and goes back into the cave; 5 – tighten everything down, and don’t leave a tail that’s too short or the knot may come undone
That’s all there is to the bowline. (But don’t get too cocky – some folks can tie this knot one-handed, though that’s mostly for cocktail parties.) The only disadvantage to this knot is that it can occasionally be shaken out if tied in a stiff line. Initially you might have difficulty tying this knot because the loop that we are calling a «cave» has to be formed in a particular way. Compare the figures.
An incorrect setup for tying a bowline, also known as a bad cave. Notice the way the loop is formed. If it’s incorrect, the knot falls apart. The «tree» should come from underneath the loop, and when the rabbit comes out of the cave, he should go behind the tree.
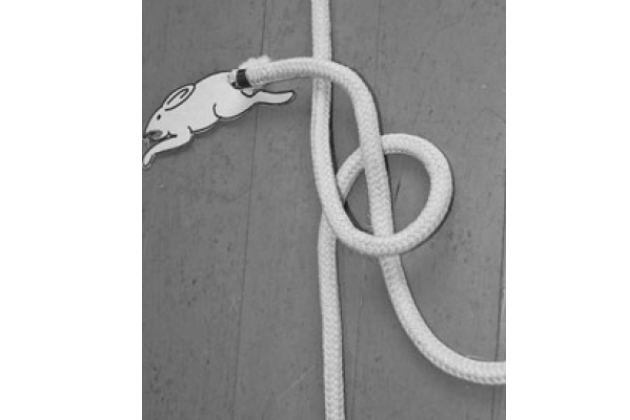
Try again, making sure the loop is formed correctly, as in the previous figures.
Cleating a Line
Properly cleating a line is important because sometimes you need to get a line off a cleat in a hurry. If you’ve improperly cleated a pile of line on a cleat and the line comes under a lot of tension, the only way to quickly remove it is with a sharp knife.
Although this is the method shown in many books, I have come across one writer who argues that the loop is unnecessary, and could be impossible to remove if the line is brought under strain. He claimed that a turn around the base of the cleat, followed by two or three unsecured turns over the top, is just as secure yet always removable. He makes a good argument, but I still cleat my lines as shown in the figures.
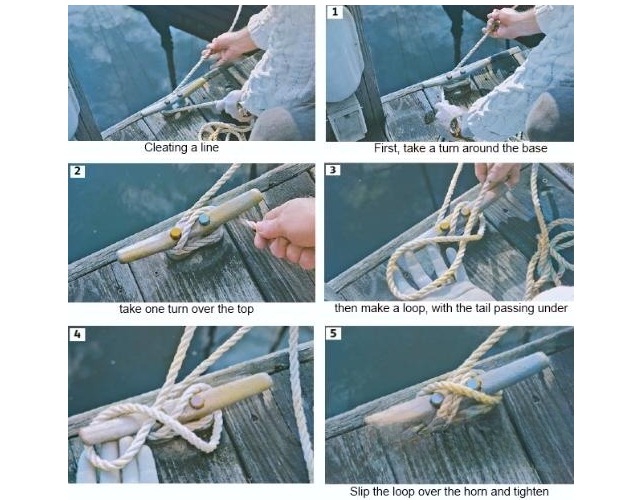
Not securing the end with a loop might be Ok for a few minutes at the fuel dock, but I wouldn’t leave my boat unattended without securing the turns with a final loop.
Coiling and Securing a Line
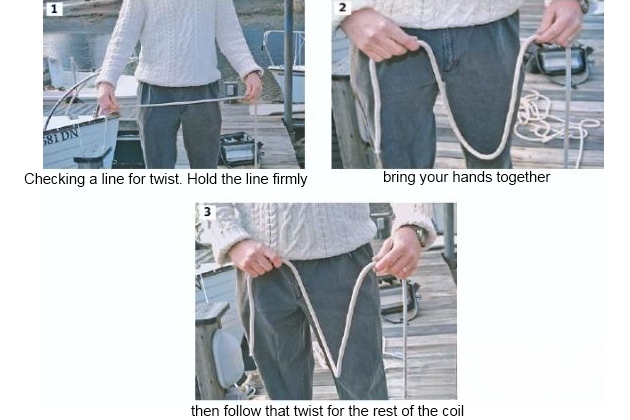
There’s more to coiling a line than you might expect. One thing you shouldn’t do is just wrap the line over your thumb and elbow. More often than not, that creates a tight, kinky coil that is very prone to tangle. A line often has a twist in it, and it will be far easier to create a neat coil if you find out which way the twist goes.
To see what I mean, grab a piece of threestrand rope and, with your hands about 2 feet apart, hold it firmly in both hands. Then, without letting it slip, bring your hands closer together. More often than not, the rope will begin to form a spiral. That’s the direction in which you want to coil it.
To coil the line, reach out and grab about an arm’s length of line with one hand and bring it to your other hand, which is busy gathering the line.
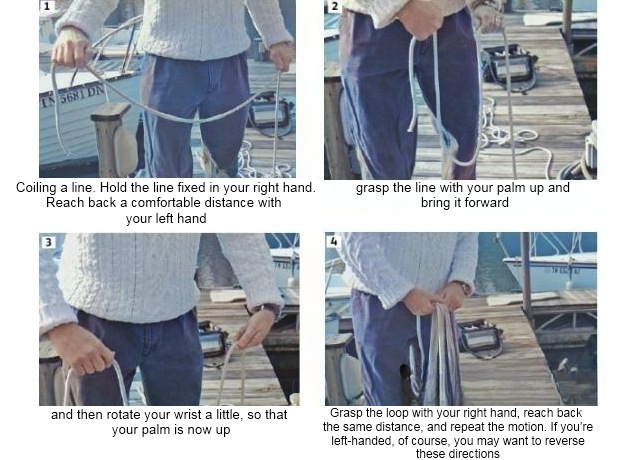
Sometimes there won’t be an obvious twist to the line, so to help the line coil neatly you can add a little twist of your own. You’ll often need to do this when coiling double-braided line. All you have to do is rotate your wrist a little, and the line will twist into a more natural coil.

Don’t let go of the coil in your right hand just yet – you need to secure this nice coil of line you’ve just created. There are several methods for securing a line. The accompanying figure sequence describes one such method.
A coil of line secured this way is ready to stow, and will stay in place until needed.
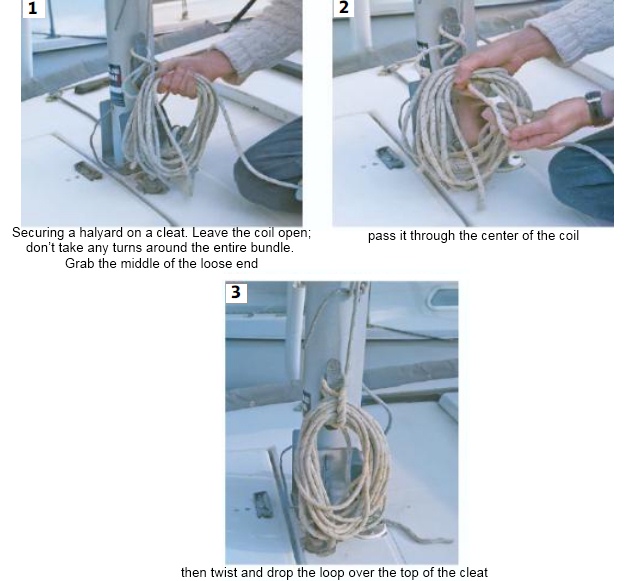
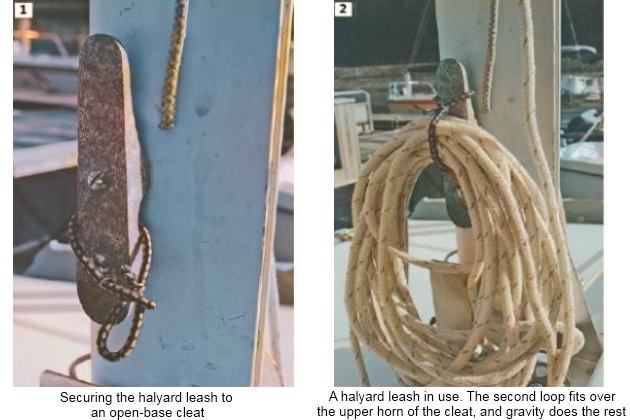
Securing a coiled halyard is similar, but you don’t take three or four turns around the entire bundle. Simply coil the line, then, with the loose end, take a turn or two around the coil and loop the end over the cleat.
If this seems like too much trouble, there is another option. I saw this in Lin and Larry Pardey’s The Cost Conscious Cruiser (the Pardeys are among my favorite authors), who in turn learned it from Hal Roth, aboard Whisper. It’s nothing more than a short length of light line tied to the hollow base of a halyard cleat. When the halyard is coiled up, use the light line to secure the coil – no knots required. Each coil of line needs its own little leash, though, or you’ll get a tangle.
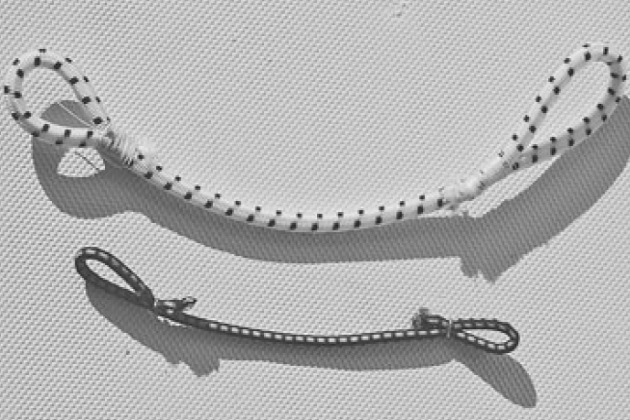
A pair of halyard leashes made from a short length of bungee cord, though regular line works fine, too. The large example was made by seizing the ends with thread; the smaller one was made in about two minutes using bulldog clips, which are normally used in commercial bungee hooks.
These work with closed-base cleats, too, if you can size one of the loops to fit the base of the cleat. Stretch it over the base, and you’re ready to go.
Other Knots
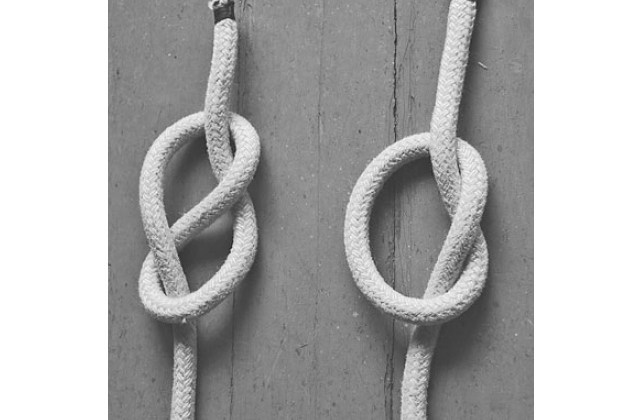
There are a few other important knots, though I use only one on a regular basis. This is the figure-eight, or stopper knot, shaped like a figure eight. It’s easily untied. What you don’t want on your boat is an overhand knot, which is difficult to untie after coming under a strain. If the line is wet, forget it – you’ll never get an overhand knot untied. Stopper knots are used in the ends of the headsail sheets after you’ve rigged them through the sheet lead blocks; they prevent the sheets from being pulled overboard when they dip in the water.
The sheet bend is handy when you need to tie two lines together. It is tied like the bowline. One line is the cave and the tree, the other line is the rabbit. This knot can be made more secure by letting the rabbit go twice around the tree, making a double sheet bend.
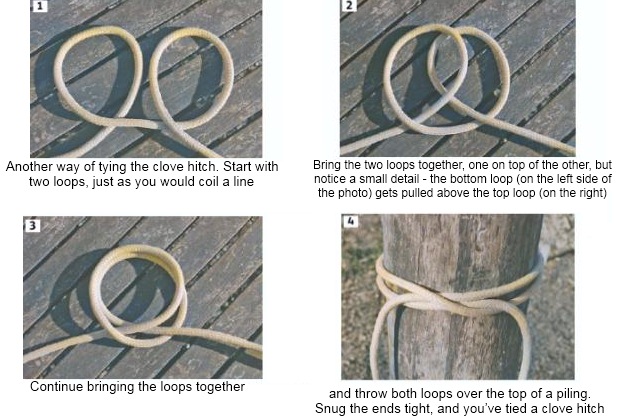
If you need to tie your boat to a piling, you’ll need to know how to tie a clove hitch. It’s a very simple knot: make one turn around the piling, angle the end of the line down, make a second turn, and tuck the end under the middle.
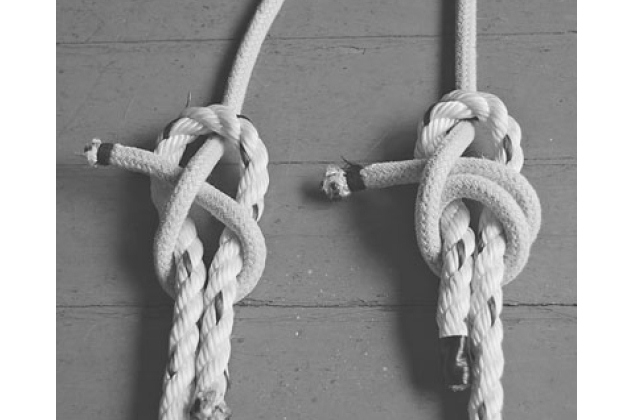
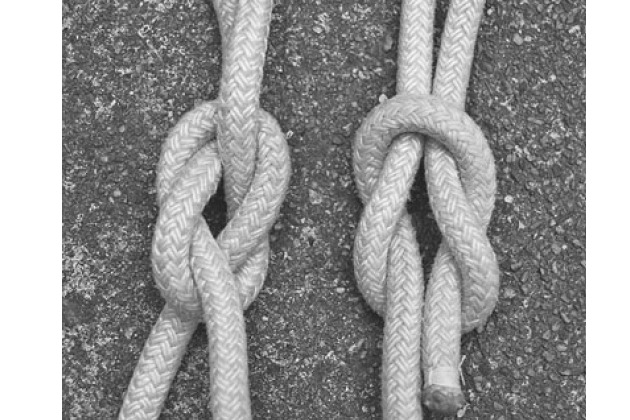
The last knot that’s handy to know is the square knot or reef knot, used when reefing sails.
The most important thing to know about square knots is that a subtle mistake turns them into granny knots. Often your hands seem to naturally tie granny knots because they use a repeated hand motion, but granny knots are not secure – they either slip or jam.
ashore!
Check your square knots carefully after you tie them. When tied correctly, they look like two loops locked together. The ends of the loop stay together. In a granny knot, the ends are apart.

- Everett Collier, The Boatowner’s Guide to Corrosion. International Marine, 2001, hardcover, 314 pages.
- Fernec Mate, Shipshape: The Art of Sailboat Maintenance. Albatross Publishing, 1986, hardcover, 416 pages.
- John Payne, Understanding Boat Corrosion, Lightning Protection, and Interference. Sheridan House, 2005, 90 pages.
- Edwin Sherman, The 12-Volt Bible for Boats. International Marine, 2002, paperback, 208 pages.
- Nigel Warren, Metal Corrosion in Boats. Sheridan House, Inc., 2006, 229 pages.
- Charlie Wing, Boatowner’s Illustrated Electrical Handbook, Second Edition. International Marine, 2006, paperback, 280 pages.
- Don Casey, Canvaswork and Sail Repair. International Marine, 1996, hardcover, 140 pages.
- Jim Grant, The Complete Canvasworker’s Guide, Second Edition. International Marine, 1992, paperback, 186 pages.
- Karen Lipe, The Big Book of Boat Canvas. International Marine, 1988, paperback, 242 pages.
- Emiliano Marino, The Sailmaker’s Apprentice, International Marine, 1994, paperback.
- Philip W. Conkling, Green Islands, Green Sea: A Guide to Foraging on the Islands of Maine. Down East Books, 1980.
- Euell Gibbons, The Beachcombers Handbook. David McKay, 1967, 230 pages.
- Janet Groene, Cooking on the Go. Sail Books, 1980, 234 pages.
- Peter Howorth, Foraging Along the California Coast. Consortium, 1977.
- Ken Neumeyer, Sailing the Farm. Ten Speed Press, 1981, paperback, 256 pages.
- Lin Pardey, The Care and Feeding of the Offshore Crew. Paradise Cay Publications, 1999, 414 pages.
- Linda Frederick Yaffe, Backpack Gourmet. Stackpole Books, 147 pages.
- Peter Hunn, The Old Outboard. International Marine, 2002, paperback, 320 pages.
- Jean-Luc Pallas, Outboard Motors Maintenance and Repair Manual. Sheridan House, 2006, 125 pages.
- Edwin Sherman, Outboard Engines. International Marine, 2008, hardcover, 176 pages.
- W. D. Booth, Upgrading and Refurbishing the Older Fiberglass Sailboat. Cornell Maritime Press, 1988, 287 pages.
- Paul and Myra Butler, Fine Boat Finishes. International Marine, 1987, paperback, 160 pages.
- Paul and Myra Butler, Upgrading the Small Sailboat for Cruising. International Marine, 1988, paperback, 224 pages.
- Nigel Calder, Boatowner’s Mechanical and Electrical Manual. International Marine, 2005, hardcover, 818 pages.
- Don Casey, Sailboat Hull and Deck Repair. International Marine, 1996, hardcover, 128 pages.
- Don Casey, Sailboat Refinishing. International Marine, 1996, paperback, 144 pages.
- Don Casey, This Old Boat, Second Edition. International Marine, 2009, hardcover, 576 pages.
- Fernec Mate, The Finely Fitted Yacht. W. W. Norton & Company Limited, 2005, 606 pages.
- Dan Spurr, Spurr’s Guide to Upgrading Your Cruising Sailboat, Third Edition. International Marine, 2006, hardcover, 400 pages.
- Fred Bingham, Boat Joinery and Cabinetmaking Simplified. International Marine, 1993, paperback, 265 pages.
- Michael Naujok, Boat Interior Construction. Sheridan House, 2002, paperback, 176 pages.
- Larry Brown, Sailing America: A Trailer Sailor’s Guide to North America. Seven Seas Press, 1990, paperback.
- Larry Brown, Sailing on a Micro-Budget. Seven Seas Press, 1985, 163 pages, paperback.
- Robert Burgess, The Handbook of Trailer Sailing. International Marine, 1992, paperback, 227 pages.
- Don Casey and Lew Hackler, Sensible Cruising: The Thoreau Approach. International Marine, 1986, paperback, 364 pages.
- Ronald Florence, The Optimum Sailboat: Racing the Cruiser and Cruising the Racer. Harper and Row, 1986, hardcover, 374 pages.
- Annie Hill, Voyaging on a Small Income. Tiller Publishing, 1993, paperback, 208 pages.
- J. C. Jenkins, The Humanure Handbook: A Guide to Composting Human Manure. Chelsea Green Publishing Co., 2006, 302 pages.
- Elbert Maloney (editor), Chapman’s Piloting, Seamanship, and Small-Boat Handling, (65th edition). Sterling Publishing Company, Inc., 2007, hardcover, 928 pages.
- Tom Neale, All in the Same Boat. International Marine, 1997, hardcover, 376 pages.
- Lin and Larry Pardey, The Capable Cruiser. Pardey Books, 1995, hardcover, 400 pages.
- Lin and Larry Pardey, The Cost-Conscious Cruiser. Pardey Books, 1999, hardcover, 352 pages.
- John Rousmaniere, The Annapolis Book of Seamanship (revised edition). Simon and Schuster, 1989, hardcover, 402 pages.
- Daniel Spurr, Your First Sailboat: How to Find and Sail the Right Boat for You. International Marine, 2004, paperback, 288 pages.
- Donald M. Street, The Ocean Sailing Yacht. W. W. Norton, 1973, hardcover, 703 pages.
- USCG Auxiliary, Boating Skills and Seamanship. International Marine, 2007, paperback, 404 pages.
- Thomas Ask, Handbook of Marine Surveying. Sheridan House, Inc., 2007, 246 pages.
- Don Casey, Inspecting the Aging Sailboat. International Marine, 1996, paperback, 144 pages.
- Andrew Douglas, Practical Sailor’s Practical Boat Buying, 2 volumes. Belvoir Books, 1998, paperback.