Sailing is a beautiful blend of art and science, requiring both technical skill and an intuitive understanding of nature. At its core, sailing involves the mastery of navigating a boat using the wind. This begins with understanding the wind’s direction and strength, which can be read through various visual cues, such as the movement of flags or the ripples on the water’s surface. The sailor must constantly adjust the sails to harness the wind effectively, which requires a keen sense of timing and precision. This dance with the elements is what makes sailing such a unique and rewarding experience.
Enough already, let’s go sailing! Gather up all your stuff and climb aboard. Before you shove off, stow all your gear in its proper place down below. Remember, your boat will be heeling (leaning over) from the force of the wind, so use lockers or netting to keep things secure. Small bungee cords are handy if you’ve got some attachment points where they can be fastened. (Small stainless or bronze eye straps for attaching bungees are easy to add, but go sailing a time or two before you install them. You’ll often discover the perfect location after a little on-the-water experience.)
- Setting Up the Headsail
- Headsail Sizes
- Roller Furling for the Trailer Sailer
- Attaching the Headsail Sheets
- Leaving the Dock
- Stern Swing
- Sailing
- Points of Sail
- Tacking
- Pointing Ability of Sailboats
- Sail Trim
- Mainsail Telltales
- Docking
- Picking Up and Dropping a Mooring
- Anchoring Techniques
- Best Practices for the Prudent Mariner
Something that’s easy to forget is lowering the centerboard. You’ll be reminded as soon as you cast off. Most trailerable boats handle very differently with the centerboard up, and some shallow-draft boats seem to like going sideways better than forward with the board up. Another helpful detail – on many trailerable boats, the keel cable and winch are located inside the cabin. The exit point for the cable is a small hole or tube where the cable enters the boat and leads to the winch. A little water often sloshes up through this tube while motoring or sailing. Not much water, but enough to get your shoes wet if you’re not expecting it. I wrap a small rag around the cable and stuff a little down in the hole. It saves time sponging up the cabin later. Remember to hang the damp rag outside to dry at the end of your sailing day, or it’ll get pretty stinky.
Setting Up the Headsail
If you followed the procedures in the section «Tips on Rigging a Boat and Using Knots in SailingTowing and Rigging Your Boat», you’ve already raised the mast and rigged the mainsail. Now it’s time to bend on the headsail. Find your headsail and attach it to the forestay. If you have more than one headsail, use the standard jib for your first sail. (See section «Headsail Sizes» below for more about the different sizes and names of headsails.) Initially, you may be a little confused about which corner is the head, which corner is the tack, and which corner is the clew. The head is the sharpest point of the sail. You can leave a sheet tied to the clew. All that’s left is the tack, which gets attached to the deck at the stemhead fitting. Or you can take a pencil and write the names on the corners, which will help you remember the proper terms. By the time the graphite fades, you should have the names down pat.
The luff hanks are usually little plastic or bronze clips that snap onto the forestay. Remember, the hanks always face the same direction when you’re putting them on the forestay. Of course, if you have roller furling, you won’t have to worry about any of this stuff. (See section «Roller Furling for the Trailer Sailer» below.) But you’ll pay for the convenience at launch time, since roller-furling headsails are often more complicated and time-consuming to set up initially.
Start at the bow and attach the tack of the jib to the stemhead fitting on the foredeck. My boat uses a pin for this; yours may use a shackle. Then, starting at the bottom, clip the jib hanks onto the forestay, starting with the lowest one and working your way up. Then attach the halyard to the head of the sail. Usually a shackle attached to the jib halyard is used here.
Headsail Sizes
Most trailerable sailboats are rigged as sloops.
What is sloops?
Sloops – this are single-masted rigs featuring a triangular mainsail and headsail. These usually have a single mainsail that can be reduced in size by reefing. But the headsail, being much easier to put on and take off, is changed to suit conditions. Large sails of lightweight cloth are rigged for light winds, while heavier, smaller sails are used when the wind pipes up. These sails can have different names, depending on their size and intended use. Cruising boats can have anywhere from one headsail to several, depending on the desires of the owner. Most racing boats will have many headsails in order to stay competitive.
There is no standard size for headsails – it varies from boat to boat. Half of the key to a particular sailboat’s headsail size is the sail’s LP measurement, which stands for luff perpendicular. To find the LP, measure the distance from the clew of the sail to the luff while holding the tape at a 90-degree angle to the luff. The other half of the key is the J measurement. The J is the distance between the forestay and the mast, measured at the deck.
Headsails are often referred to by number rather than by name. A 100 percent jib is a sail where the LP is equal to the J. You can correctly call this sail a 100 percent jib or, more simply, a «100». This is the easiest way to refer to sails. It’s a lot simpler to say, «Let’s put on the 120» rather than «Let’s put on the №2 genoa». Both refer to the same sail, more or less, but the percentage number is more intuitive. Larger percentage numbers equal bigger sails, but the №2 genoa is smaller than the №1 genoa.
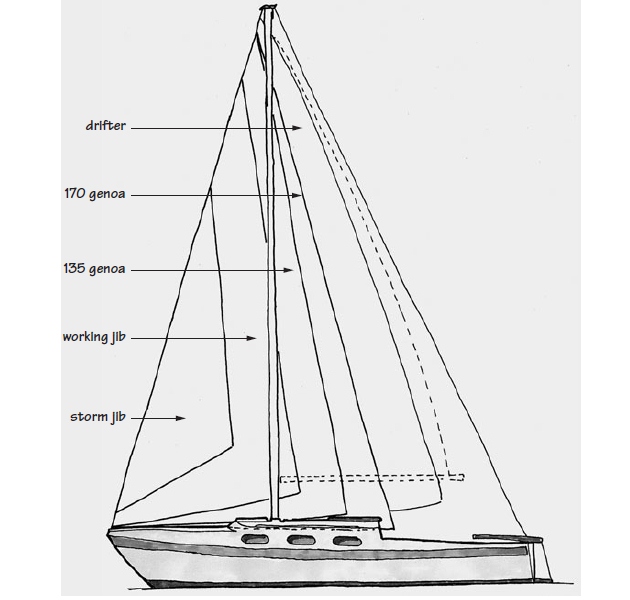
Here are the more common headsails found in the average cruisers’ inventory:
- The jib is the most basic headsail. If sails are included with the boat (not all are), most manufacturers supply a main and a jib. A working jib is usually around 100 percent. You won’t see many jibs smaller than 80 percent.
- Probably the first sail you’ll add to your boat’s inventory is a genoa, for use in lighter air. These are commonly around 150 percent. Technically, genoas overlap the main, so anything over 100 percent could be called a genoa. (Just to confuse the goose, anything that overlaps the mast is also called a lapper.) But there’s very little difference between a 100 and a 110, and not all books agree on the names.
- A really small, tough jib is called a storm jib. If you’re a long-distance voyager, you might want one, but trailer sailers aren’t exactly open-ocean greyhounds. My boat came with a storm jib. As near as I can tell, it’s never been used.
- For really light air, there’s the drifter or reacher. These sails are big, at about 170 percent or larger, and normally are for downwind work. Several fancy terms are also used for very large downwind sails, like big boy, blooper, ghoster, or, my personal favorite, the gollywobbler. While there are subtle differences in these sails, they are rarely seen aboard trailerables, since storage space for specialized sails is limited. (I’d like to get a small one, though, just so I can say «gollywobbler» all the time.)
- Spinnakers are a different beast altogether. They are made of very light, stretchy nylon and are designed to trap air, while other sails are designed to change the way air flows. Spinnakers are tricky to fly, requiring a spinnaker pole to hold them out so they can properly fill, along with a lift and a downhaul for the pole. Spinnakers are symmetrical – they have a head and two identical clews. When you jibe a spinnaker (jibing is turning the boat so the wind crosses the stern; see section below), you swap the lower corners. Since both sides of the sail are identical, you switch the inboard end for the outboard end, and vice versa. You can’t do this with any other sail.
- The cruising spinnaker is primarily for use when the wind is on the beam or behind. Cruising spinnakers are asymmetrical, whereas true spinnakers are symmetrical. There are no luff hanks, and the luff isn’t attached to the forestay, as it is with a conventional jib. Instead, the sail flies from its three corners only. You can use a pole on a cruising spinnaker, but you don’t have to. A particular type of cruising spinnaker is called a code zero. While it sounds like something from a James Bond movie, it’s just a cruising spinnaker cut so it can be flown closer to the wind, at angles of 45 degrees to 100 degrees, in winds of 3 to 6 knots. It’s a little smaller than a regular asymmetrical spinnaker and it’s a free-flying sail – it isn’t attached to the headstay. A code zero could be a useful sail for a trailer sailer, but it isn’t a common part of the average trailer sailer’s inventory. In fact, many race rules impose a penalty for using a code zero sail in the smaller-class boats.
Roller Furling for the Trailer Sailer
If you’ve spent any time on the water, then you’ve probably seen roller-furling headsails in action. There’s a small drum at the base of the forestay with a line around it. To get the headsail down, all one has to do is pull a line and the sail wraps itself neatly around the swiveling forestay. It’s a very handy and efficient system that makes taming a large foresail relatively easy.
But roller-furlers do have their drawbacks. They are primarily designed for larger boats and are usually permanent installations – most roller-furlers require modifications to the headstay and the sails. They aren’t particularly well suited for boats whose masts are raised and lowered all the time, like trailer sailers, and the drums complicate the forestay connection.
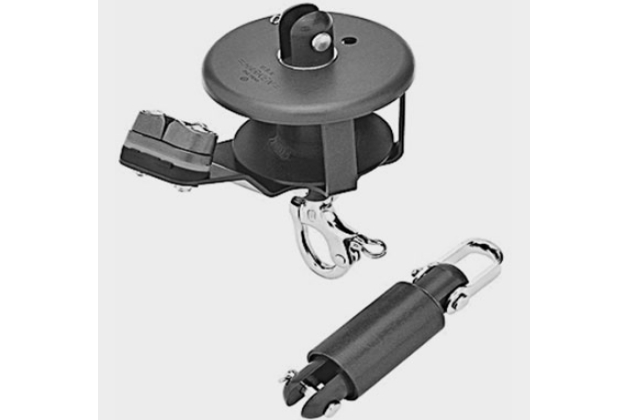
With roller-furlers, the headsail isn’t changed frequently, since the luff of the sail slides into a slotted foil around the stay. Feeding the sail into the foil is more difficult than simply hanking it to the forestay, and you may wish for a bigger sail on those light-winded days.
This isn’t universally true, though. I had an older freestanding roller-furling unit on my Catalina 27. The furler was permanently attached to the 170 headsail, and the whole assembly – rolled-up sail and furling drum – was stored in a sailbag. The sail’s head had a swivel attached, and it had its own luff cable. You raised the rolled-up sail with the halyard and deployed the sail by pulling on the clew. As the sail unrolled, the furling line coiled up the drum (you had to keep a little tension on the furling line or the line would foul).
Once deployed, the big sail could be easily controlled with the furler, though it was impossible to get a very straight luff. The halyard tension was a mere fraction of the normal headstay tension, no matter how tightly the halyard was winched. The luff sagging off to leeward hurt the boat’s pointing ability. Even so, it was great off the wind. These types of furlers are still available from Harken and Schaefer as small-boat furling kits, and they’re specifically made for Buying Trailerable Sailboats: Condition Assessment and Risks trailerable sailboats. Other small-boat furlers are available from Colligo and Fachor.
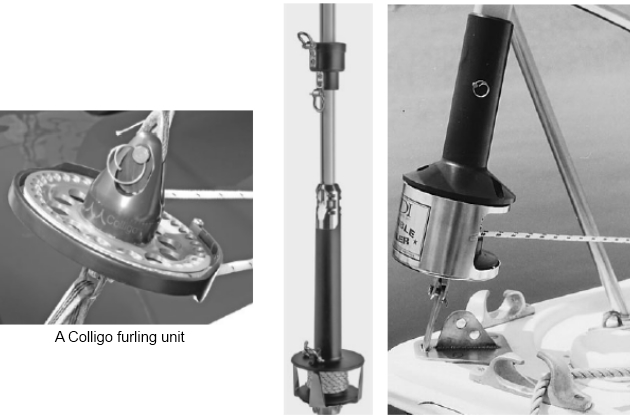
Two furling systems that reportedly work well with trailerables are the CDI Flexible Furler and the Schaefer Snapfurl 500s. These are «around-thestay» systems, using a headstay foil that is more flexible than an aluminum foil. The CDI requires some rigging modification, which increases your cost a bit, while the Schaefer unit attaches to your existing rig without the need to change anything. (Remember, with either type, you’ll still need your sail modified for roller furling.)
A Roller-Furling Alternative. There is an alternative to roller furling – a jib downhaul. This is a much lower-tech way to control the sail from the cockpit. You’ll need cockpit-led halyards for this to work, though.
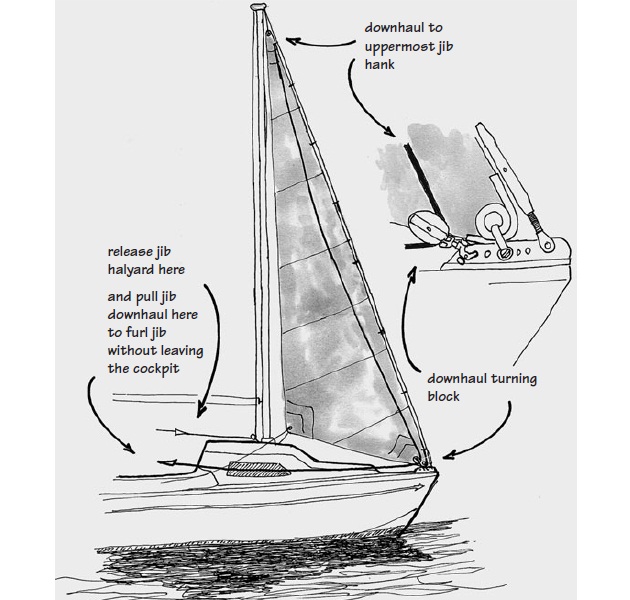
A jib downhaul is simply a light line that’s attached to the head of the jib. The other end of the line runs through a block at the bow and back to the cockpit. To use it, all you do is release the halyard and pull on the downhaul, and the jib is pulled down to the deck. You’ll still need to go forward to unhank and stow the jib, but a downhaul can be put to good use when approaching a dock or an anchorage under sail if you need to depower the boat quickly. Purchasing a Used Boat in CaliforniaCalifornia boatbuilder Jerry Montgomery, builder of the Lyle Hess – designed Montgomery 17, told me that he considered a jib downhaul an essential piece of gear – so much so that he considered raising the price of his boats to make it standard equipment.
Attaching the Headsail Sheets
Two sheets attach to your headsail. Remember – halyards lift sails, sheets pull sails in. Most headsails are rigged with two sheets, one on port and one on starboard. These can form one continous line (see section «Alternative Ways to Attach Headsail Sheets» below), passing through sheet lead blocks and then aft to the cockpit. Only one sheet is used at a time, the downwind or the leeward sheet. The other sheet will be slacked off, and then it’s called the lazy sheet. If it gets too slack, it may dip in the water and trail alongside. (Use the stopper knot you just learned to prevent the sheets from coming out of their blocks. Always check for trailing sheets before you start a motor. They’ll wrap around the prop shaft in the blink of an eye, and you’ll be without maneuverability until you get the mainsail up – if the wind is blowing.)
The sheet lead blocks are usually mounted on tracks outboard, on port and starboard, about one third of the way aft, and are springloaded to stand upright. The position of the sheet lead blocks can be adjusted depending on the sail you’re using and the strength of the wind. Since I’m more of a cruiser, I adjust the sheet lead blocks forward for smaller sails, and slide them back for larger sails. I determine the exact position once I get the sails up and the boat moving.
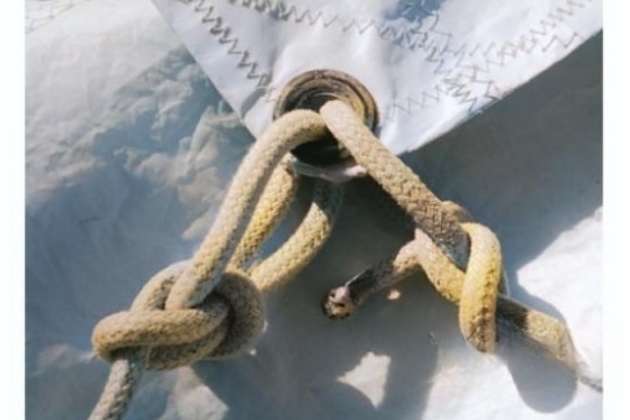
Used boats sometimes have a shackle for connecting the sheet to the clew of the sail. This allows for nice, quick changes of the headsail without rerigging another sheet. It also allows you to get your teeth knocked out when the wind gets up and the sail luffs madly as you try to get the headsail down. If your boat has any sort of shackle or metal clip attached to the headsail sheet, remove it. If the clip can’t be untied, cut it off and buy yourself some nice new headsail sheets. Tie the sheets to the headsail clew using bowlines.
Run the sheet through the sheet lead blocks, toss the line in the cockpit, and tie a figure-eight knot in the very end. I always rig both sails – headsail and mainsail – and have them ready to go before I cast off from a dock or mooring. My sails are my backup plan. If something happens to my motor, then at least I have an option. This happened once when my good friends and crew Mark and Suzanne were with me. We were almost back to the marina, right in the middle of Elliot Cut near Charleston, South Carolina, when the engine quit. Elliot Cut is narrow – the tidal current flows really quickly through it – and it often gets a lot of barge traffic and large powerboats.
Since the sails were ready to go, we got the main up and drawing before our forward momentum completely died away, and we had enough movement through the water for the rudder to work. (If your sailboat ever becomes dead still relative to the water around it, your rudder no longer works. Water has to flow across the blade for it to steer the boat. You’ve lost steerageway, which is the minimum speed needed to steer the boat. You can still be moving with the tide, as we were – at a good 3 to 4 knots, if I remember correctly – heading straight for some tricky bends in the cut.) Mark got the mainsail up, Suz got the anchor ready, and we were able to find a spot out of the way so I could make engine repairs.
Alternative Ways to Attach Headsail Sheets. There are a few alternative methods for attaching headsail sheets that you can try if you want to experiment, and if the idea of learning another knot or two doesn’t make you want to pull your hair out.
For example, some folks – myself included – like to use a single length of line for both sheets, tied in the middle. One advantage is that the knot at the clew can be smaller. (A pair of bowlines, although unlikely to knock you out cold if they whack you when the sail is flogging, will still hurt like hell.) If you don’t mind threading a new sheet every time you bend on a new headsail, you can leave it tied to the sail and stored in the bag. A handy knot for this is a bowline on a bight. A bight in a line is any part between the two ends, but especially a line bent back on itself to form a loop.
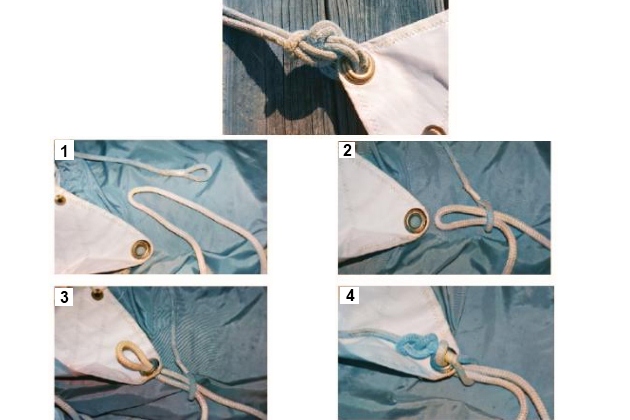
1 – the Dutch shackle is really nothing more than a short length of line with an eye splice at one end; Here’s how it’s used to attach to attach headsail sheets; 2 – first, pass the middle of the sheet through the eye splice. It helps if the eye splice is sized for a snug fit; 3 – next, pass the sheet through the clew of the headsail; 4 – to finish, pass the tail of the eye splice through the loop formed by the middle of the jibsheet, and tie a stopper knot on the other side. To release the shackle, simply push enough of the sheet through the clew until there’s room to pull the stopper knot through
But being able to change the headsail without rerigging the sheets would be handy. Aren’t there any ways to do this without using something metal?
Yes, there are. I learned a couple of neat tricks from an article by Geoffrey Toye in Good Old Boat magazine. A method called a Dutch shackle uses a short length of spliced line attached to a loop spliced into the headsheet. To use a Dutch shackle, you pull the loop through the clew, pass the short line through the loop, and secure it with a stopper knot at the end of the short line. Modifications are certainly allowed, so feel free to experiment.
Geoffrey’s preferred method is a short tail of line spliced to the headsail. This is tied to the middle of the sheet (or the bight, if you prefer) using a double sheet bend.
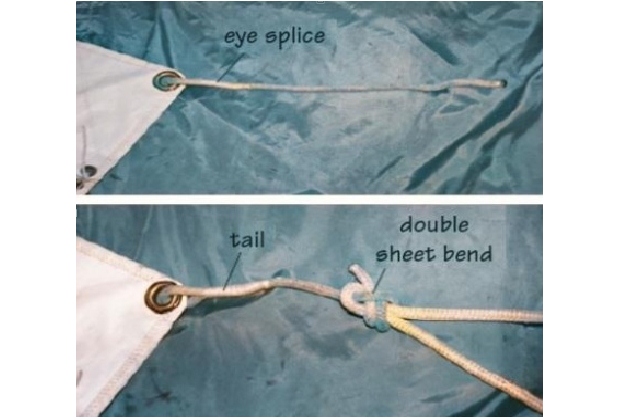
This method is more time-consuming to untie and is less likely to shake out. It’s also lighter in weight – one line is at the clew instead of two – so the sails will set better in very light winds. And the knot that will whack you if the sail is flogging is smaller and farther away from the clew.
Leaving the Dock
Most of the time, leaving the dock is pretty simple. You start the outboard motor and check that it’s operating normally. This means making sure there’s a stream of cooling water coming from the motor head. Check this every time you can; don’t just start the motor, check it once, then forget it. Hopefully your cooling water intake will never get clogged. While you’re still securely tied up and the motor is at idle speed, put the motor in gear and run up the rpms a little bit. More than one motor has died the moment it was put into gear.
If everything checks out Ok, untie the spring lines and stow them, then untie the bow line and toss it aboard. Next I untie the stern line, but I’ll hold the stern against the dock for a moment. This is a good time to glance down at the water to be certain that no lines that might foul the propeller have strayed overboard. Usually, the bow will slowly start to drift away from the dock. When the boat is pointing in the direction I want to go, I release the line and hop aboard with one little shove off the dock. Only after the stern dockline is safely aboard do I put the motor in gear.
This simple little routine can be dangerous if your dockline handlers are careless or inexperienced. You should never allow any part of your body to come between the dock and the boat. Videos of people falling in the water with one leg on a boat and one on the dock are hysterical, but if the boat is at all large and it starts to drift back toward the swimmer – well, just watch what Technical Recommendations for Inspecting Your Boat your boat does to a single fender on a windy day and you can see what might happen to a human body.
Pull in your fenders as soon as you leave the dock unless you’re headed directly for another dock. Don’t leave the fenders lying on deck. Never hang dirty or limp, half-deflated fenders. Stow your docking lines, but keep them in a place that’s accessible – you may need to get to them quickly.
Sometimes, if the conditions are right, you can leave the dock under sail, without starting the motor. Check the current and wind direction before you try this, and make sure you’ve got plenty of room. Sailboats do have the rightof-way over powerboats, but not in a restricted channel or in places where the other vessels are constrained by draft (see section «More Sailing Knowledge and SkillsRules of the Road»). You shouldn’t expect other boats to rush out of your way because you want to try a fancy sailing maneuver at a busy boat ramp. However, if things are calm and the way is clear, by all means give it a try. A trailer sailer is the perfect boat to practice leaving (and even approaching) a dock under sail. Since it’s smaller and lighter than most boats, you’ll be less likely to cause damage if you misjudge something. But many small sailboats react as a big boat would, so you can learn a great deal. If you’re brand new to sailing, I advise taking the boat out several times in various conditions to get a feel for leeway, drift, and so on, before trying anything fancy.
In some situations the boat will do something unexpected when you untie it from the dock. For example, the wind might be blowing you against the dock and the bow will stay snugly against it even when untied. Just to make things interesting, let’s suppose you’re also at a busy fuel dock with boats in front of and behind you. In this case, you’ll have to motor out. You could probably tie an extra fender at the aft corner of the hull and have your crew push the bow out until you get enough clearance to put the motor in forward gear and power out. But be careful – if the wind is strong, it’s going to push you sideways, and you may scrape the boat ahead of you as you power away. If possible, point the bow directly into the wind before powering out.
Safe Procedures for Gasoline Outboard Motors. On larger cruising sailboats, diesel motors are greatly preferred because they are inherently safer. Diesel fumes won’t ignite unless compressed, though they will make you seasick. You don’t get the chance to be seasick from gasoline vapors, because you’d likely blow up long before you’d hurl. Gasoline vapors explode, and a nearly empty fuel container can explode like a bomb. If your bilge collects enough gasoline vapors, all you need is a spark from a less-than-perfect electrical connection to put an end to your on-the-water career.
This is why the Coast Guard has formulated very specific rules for fueling boats, carrying gasoline on board, storing gasoline, and venting compartments. These rules should be followed to the letter – even exceeded if possible. The guidelines given here are not a complete or up-to-date representation of all USCG requirements. If you want to go straight to the source, look up the Code of Federal Regulations, the final word on US maritime law. You’ll get more information than you want. A more readable version of the rules can be found in a general seamanship manual, such as Chapman’s:
- Piloting,
- Seamanship,
- and Small-Boat Handling.
In a nutshell, be very careful when handling gasoline aboard your boat; don’t become cavalier as you become experienced. Here are some basic guidelines.
Secure on-deck tanks so they can’t move about, and of course store fuel in approved containers only. I keep extra fuel for my two-stroke outboard premixed in a 1-gallon fuel tank. The tank is small enough that it doesn’t get in the way, and I can keep it on deck so that fumes don’t collect inside the boat. Not only does this reduce the risk of fire, it also keeps the inside of the boat from smelling like a gas station. Unless you’re motoring down the Mississippi, it’s usually better to carry smaller amounts of fuel rather than huge tanks.
When fueling your boat, close all hatches and ports to prevent fumes from entering below. After fueling, open up the hatches and give the boat a chance to air out before starting the engine. If you have portable tanks of 5 gallons or less, it’s often safer and less expensive to fill them off the boat, at a gas station rather than the marina.
Do not let any fuel get into the water. (Oil spills of any type are illegal, in fact.) Place something around your fuel intake and your vent to catch drips. Fuel-absorbent pads that won’t absorb water are very handy and readily available. Remember, spill-control equipment such as paper towels, rags, and oil-absorbent pads or bilge socks are now required on recreational vessels. (If you do cause any type of fuel spill, you must report it to the National Response Center or the US Coast Guard on VHF Channel 16.)
Keep a fire extinguisher close to your outboard and fuel tank. If you ever need one, you’ll need it really quickly. Buried in the bottom of a locker won’t help. You can now buy fire extinguishers that are not much bigger than a can of spray paint. Although some of these are not USCG approved (so you should also have a primary fire extinguisher), they are perfect for a seat locker. See section «Equipment of a Sailboat: What You Need to Have on Board While SailingUSCG-Required Equipment».
Teach Your Crew about Safety. Do everything you can to instruct your crew about the possibility of injury while sailing a boat. The risks of getting hurt are remote – far fewer people are injured on sailboats than on other types of watercraft. But still, accidents can and do happen, and the captain is in charge.
I mention risks that I know of, but don’t count on this book to tell you all the risks involved, as there are certainly ways to hurt yourself that I can’t predict. You can learn a great deal about boating safety by reading accident reports. These are kept by the US Coast Guard and are available online.
For example, in 2004, there were 676 deaths involving recreational boats. Of these, only 16 happened in either a sailing auxiliary – meaning a boat with a motor, like a trailerable sailboat – or a small sailboat without a motor. Of these 16 deaths, 13 were drownings, and 3 were from other causes. So we can deduce that the biggest risk on board is falling overboard and drowning, and we can reduce that risk with lifelines, safety harnesses, life jackets, personal strobes, locator beacons, and so on.
Some insurance agencies publish boating accident data that we can learn from. One of the best is Boat US, which publishes the quarterly magazine Seaworthy. It’s filled with stories and reports of damage and accidents from their claim files, and it’s very informative.
If those don’t make you cautious, read this lovely little quote I found on a lawyer’s website:
«If you’ve been hurt on a boat or a ferry, you may be able to file a lawsuit against the boat or ferry operator and collect compensation for your pain and suffering – No Fee Until We Win!»
I don’t believe you need to go so far as to have your crew sign a waiver, but you should carefully instruct them about the potential danger of using a foot as a fender. If your boat is large, even getting a finger caught between a cleat and a line can be serious. Be specific about risk when instructing your crew. Have fun, but be safe!
Stern Swing
The first time you take command of a sailboat, you’ll notice something that will take a little getting used to. When you turn a boat, it doesn’t track the same way a car does. A car pivots around its front wheels – all you have to do is turn the wheel and the rest of the car usually follows. But a boat is completely different. Its pivot point is somewhere just aft of the mast. When you turn the rudder, the boat rotates around this pivot point. The bow swings into the direction of your turn, and the stern swings out. If you are maneuvering slowly and making sharper turns, this effect is more pronounced.
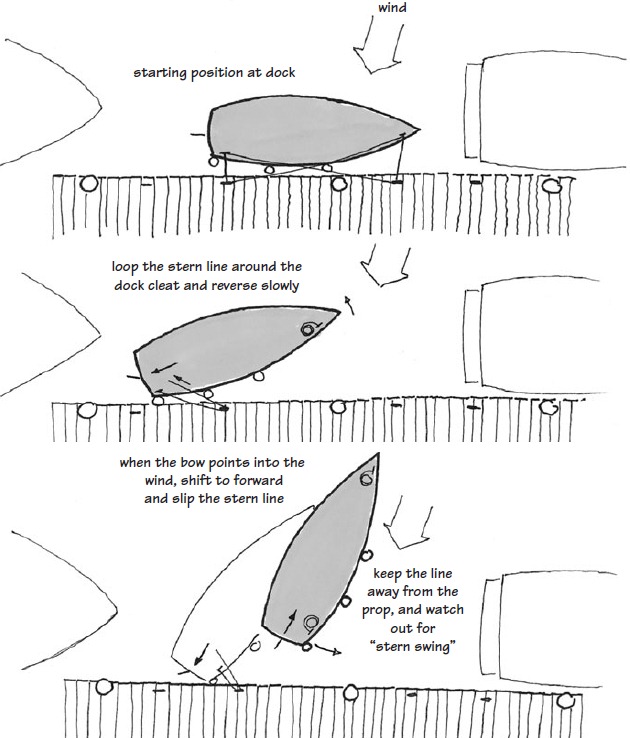
Many new sailors are painfully reminded to allow for stern swing when leaving the dock for the first time, as a sharp turn brings their stern crashing into a piling or, worse, another boat. As luck has it, it’s usually a shiny new one owned by a trial lawyer. Be sure to allow plenty of room for stern swing when entering or leaving a dock, and go very slowly until you get a good feel for how your vessel handles under power.
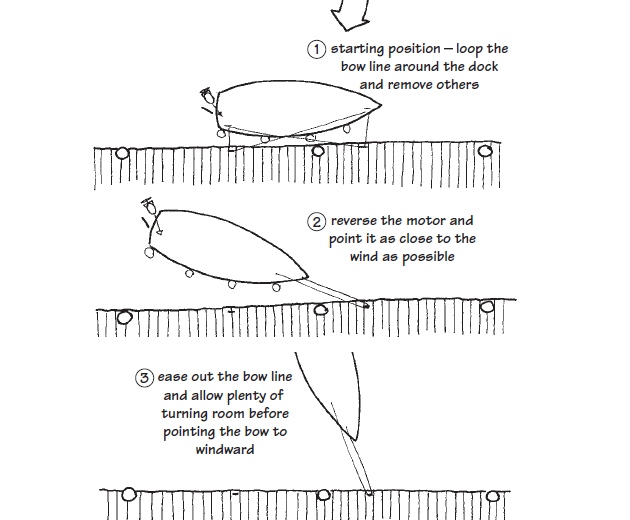
Most trailer sailers have an advantage, and that’s their Boat Outboard Motorsoutboard motor. Often there’s enough clearance to turn the motor quite a bit, and you can use this to fight the force of the wind. You may be able to back out of the dock.
Your boat behaves differently in reverse than it does in forward. Inboard boats (boats with engines mounted below) especially want to go sideways in reverse. On a trailer sailer, you counteract this by aiming the outboard where you want to go, but the boat will still do some odd things. My Montgomery doesn’t like to go in reverse at all, even though the motor can spin 360 degrees on its mount. Try powering in reverse when you’re out in the bay and can’t run into anything, just to see how your boat behaves. It’ll help if you have a piling or marker buoy nearby so you can see exactly where you’re going and how straight your course is.
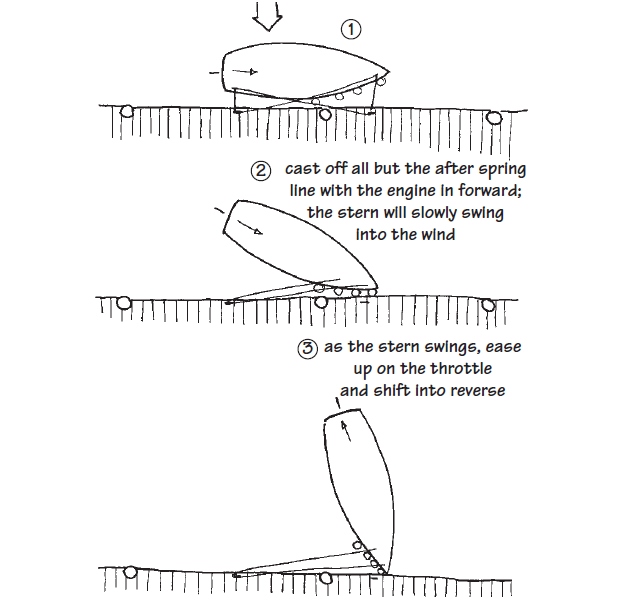
Some boats – inboards, especially – cannot back into a beam wind like an outboard can. In that case, you might have to swing the stern into the wind with the engine in forward gear, using a spring line. Be careful, though – this method requires strong cleats and lines, and precision timing once the stern faces the wind.
Sometimes things at the dock can get really tricky, such as when a tide or current flows one way and the breeze blows another. Conditions can get so difficult that you can’t power out of the dock without hitting something. I lived at a marina on a tidal river for a number of years. When the tide was outgoing, the current would flow into and across my slip at 4 knots. After several very close calls when docking, I finally learned to wait until the tide turned before bringing the boat into the slip; I’d wait at the end of the dock if there was space, or anchor out for a few hours. If you absolutely have to get out of a slip against the tide and wind, the only choices might be to get a tow from a larger vessel or to row out an anchor with your dinghy (trailing the anchor rode behind you), toss it overboard, and pull yourself out using your winches. Having flexible plans has always been a necessary part of the sailing lifestyle.
Sailing
You’ve cleared the dock and are out in the channel. The chart shows plenty of depth around you – you wouldn’t sail without a chart, right? There’s a nice steady breeze. Time to haul up the sails. I usually hoist the main first. Head into the wind and haul away on the main halyard. Raise the sail as far as it will go. You may have a winch on the mast to increase the tension. If you do, take a few turns around it and see if you can get the sail stretched tight. The halyard should be tensioned just enough to get the wrinkles out of the sail. A halyard that isn’t under enough tension usually shows as little wrinkles radiating out from each of the sail slides. If you’ve hauled the main up as far as possible and you still have wrinkles at the luff, then try lowering the boom a little. (You may have a fixed gooseneck bolted to the mast. If so, you’ll have to get the wrinkles out with the halyard alone. If you have a sliding gooseneck, tighten the downhaul until the wrinkles smooth out. The downhaul is a short line at the mast end of the boom that holds the boom down and cleats to the base of the mast.)
Sometimes you can’t get the wrinkles to go away, even though the halyard is tight. This could be a sign of a shrunken boltrope (some shrink with age), or it might mean that your sail is ready for retirement. A sailmaker can tell you whether the boltrope can be restitched or the sail should be replaced. Cruising sailors are notorious for using sails far past their expiration date, while racing sailors are notorious for buying a new sail every season. Occasionally, you can find a race class with the same spar dimensions as yours and try a retired racing sail. Sometimes they’ll work great, but often they’re made with high-tech materials that require special care (such as careful rolling instead of folding), so they don’t always stand up well to the demands of cruising.
Raise the jib next. Haul on the jib halyard as far as it can go, again stretching the luff until the wrinkles smooth out. Turn your boat to either side about 45 degrees from the wind. Pull in the sheets and shut off the motor – you’re sailing.
Points of Sail
If you’re sailing about 45 degrees to the wind, with the wind blowing over the port (left) side of the boat, you’re said to be sailing upwind. To get even more specific, you’re sailing closehauled, on a port tack. (This port tack business will be important later, when we discuss the rules of the road.) For now, just try to remember that port or starboard tack refers to where the wind is coming from. If it helps, drop the tack and tell yourself you’re sailing on port. Just to confuse you, this is also called beating to windward.
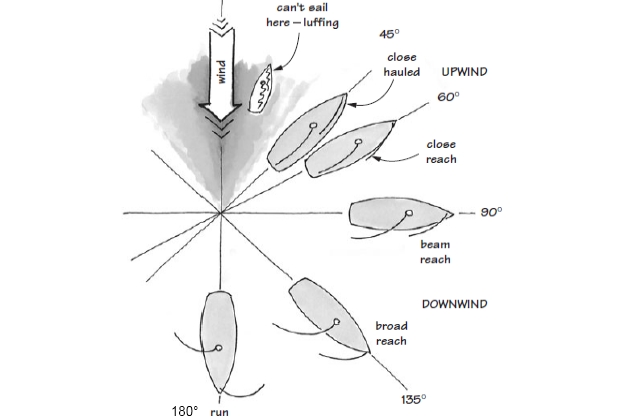
Note: all these examples show a boat on port tack
A few maneuvers will help to illustrate the points of sail. Turn the boat a little more to starboard (to the right). When the wind is coming at an angle of about 60 degrees, you’re sailing on a close reach. You’re still sailing upwind, and you’re still on a port tack. A close reach is one of the fastest points of sail.
If you continue turning to starboard, eventually the wind will come directly on the beam, or at an angle of about 90 degrees. This is a beam reach. You’re still on port, but you’re sailing neither upwind nor downwind. As you turn away from the wind, let your sails out a little – known as easing the sheets. (I’ll talk more about sail trim in a moment.)
Turn a little more and you will start heading downwind. If you turn to starboard until the wind is coming about 45 degrees from the stern, you’re heading downwind on a broad reach. As long as the boom is on the starboard side of the boat, you’re on a port tack. Now it is time to start paying attention to the boom, which could swing across the cockpit unexpectedly. Stay low, and keep letting those sheets out.
Jibing. The last point of sail is a downwind run, where the wind is coming directly from behind, over the stern. When you’re going dead downwind, the position of the boom determines what tack you’re on. If the boom is on the starboard side of the boat, you’re still on a port tack. You can change that by performing a jibe. Before you turn any farther, say to your crew, «Ready to jibe». The crew should stand by the jibsheet. (That’s «stand by» in the figurative, not literal, sense, since the boom is about to sweep the cockpit clean of anyone foolish enough to be standing.) The crew replies, «Ready». Tighten the mainsheet all the way, bringing the boom nearly to the center of the boat. As you turn the helm to port, say, «Jibe-ho!» Continue to turn until the wind catches the after edge of the sail (the leech) and the boom switches to the other side of the boat. The crew will cast off the jibsheet and take up the slack on the other side, which is now the downwind sheet. Since your boom has crossed over to the port side of the boat, you’re now on a starboard tack. You’ve just jibed the boat, which means, in effect, making the wind cross the stern of the boat by turning.
Accidental Jibe. Whenever you’re sailing downwind, there’s a risk of an accidental jibe. This happens when you’re going downwind with the boom out, and then either the wind shifts or the boat turns a little and the boom suddenly swings over to the other side of the boat. If someone is unlucky or inattentive enough to be standing up in the cockpit at the time, the results can vary from an embarrassing knot on the head in very light winds to a serious injury in moderate to strong winds. Sailors have been knocked overboard and drowned this way. Here are some safety steps to take when sailing downwind:
- Keep your crew, and yourself, seated in the cockpit when sailing downwind, especially when running. If someone needs to go forward to tend the jib, they should keep all body parts below the level of the boom. If that isn’t possible, sheet the boom in before they go forward, then let it back out once they reach the foredeck.
- Use a preventer or a boom brake. A preventer is a line that connects the boom to a reinforced point on the rail. Often the boom vang can make a good preventer. A boom brake is a commercial device that uses a drum with a few loose turns of line to slow the speed of the boom down to something a little safer.
- Watch out for the signs of an accidental jibe. The boom will lift (if it isn’t tightened down by a vang or the traveler) and the mainsail leech will start to flutter just before an accidental jibe occurs.
Tacking
You can continue turning to port, going through all the points of sail on the starboard tack, until you’re close-hauled again. Now let’s tack the boat. Tacking means to make the wind cross the bow of the boat by turning. Tacking won’t always work if you don’t have enough momentum, so, if necessary, fall off the wind a little (turn a little bit downwind) to get your speed up. Warn the crew by saying, «Ready about». Again the crew stands by the jibsheet and says, «Ready». As you begin your turn, the helmsman always says, «Helm’s a-lee», meaning the helm has been put to leeward. As you turn the tiller, make your movement nice and steady. If you shove the helm all the way to leeward in a quick movement, you’ll separate the water flow over the rudder blade, and it’ll act like a brake. If everything goes correctly, the boat will turn through the wind and begin to fall off on its new heading.
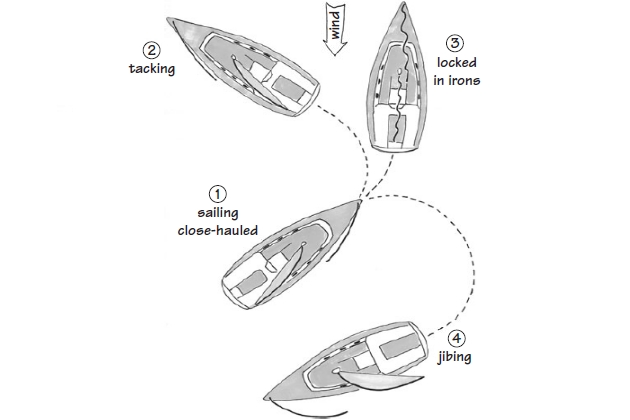
1 – sailing closehauled on a port tack at a nice rate of speed; 2 – a nice, even turn to port – the boom has crossed over to the port side, and we’re sailing along on a starboard tack; 3 – what happens if we try this maneuver without enough speed, or if we slam the rudder over too hard. The boat drifts into the eye of the wind and stays there, like a giant, expensive weather vane. She’ll come to a stop and start to drift backward; 4 – we should jibe if the wind is really light and we don’t have enough speed to tack. By turning the helm to starboard and letting out the sails, we can slowly come around until the boom crosses over – we’ve jibed onto a starboard tack
As the boat passes through the eye of the wind, I uncleat the main and jib and let those sails luff, or flutter in the wind like a flag. As the boat continues to turn, don’t sheet in instantly – let the boat continue to turn a little bit past the close-hauled point, and then sheet in the sails. If you keep the sails sheeted in tightly, there’s a possibility that the boat might weathercock, or point directly into the wind and stay there, much as an old-fashioned weather vane would.
In Irons. If you don’t have enough momentum for tacking, the boat will point directly into the wind and stop. Since no water is flowing across the rudder, trying to turn it has no effect – the boat just sits there, sails fluttering in the breeze. You are locked in irons. Some boats have a bigger problem with this than others. If you’re sailing under the mainsail alone, and/or if your mainsail is old, baggy, and worn out, the boat will get in irons much more readily.
This fluttering or flaglike behavior of the sails is called luffing. Try to minimize the amount of time your sails luff. It’s hard on the fabric, it shocks the rigging, and it creates an overall feeling of havoc. Some luffing is inevitable, though, and it’s certainly no big deal in a light breeze.
Being locked in irons is usually a bigger problem in a light breeze than in a heavy wind, but the first time it happens to you (and it will happen, I promise) can be a little perplexing. The size of trailerables makes it fairly easy to get out of irons. Remember the pushmi-pullyu from the Dr. Doolittle story? That’s what you do. First, push me, meaning you push the boom and the tiller away from you. The boat will start to drift backward and the stern will swing into the wind. Then, pull you, meaning pull your boom and tiller back in, and the boat will be sailing again.
Pointing Ability of Sailboats
When we began our discussion of the points of sail, we started off close-hauled with the wind blowing about 45 degrees from the bow of the boat. Most sailboats can sail at 45 degrees to the wind. Some boats can lie closer to the wind, meaning they can sail at a sharper angle, some as close as 30 to 40 degrees. A boat that can sail closer to the wind is said to have better pointing ability, or it can point higher than other boats.
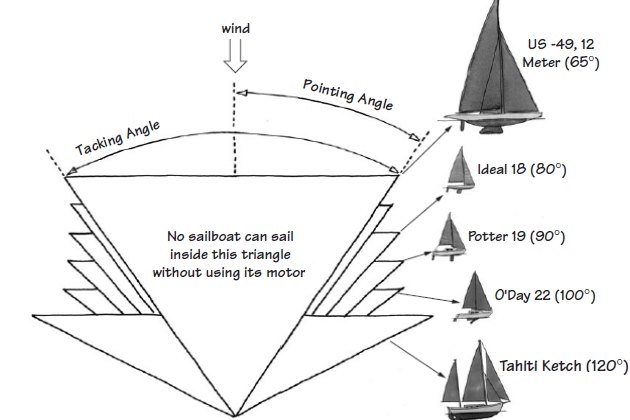
Being able to point high is a desirable feature for a sailboat, and some racing designs can outpoint the typical trailerable sailboat. But that ability comes at a price. Often, high pointing ability requires a deep, high-aspect-ratio keel. Like sails, keels can be high aspect or low aspect. A high-aspect keel will be deep, with a leading edge that is more perpendicular to the waterline, with a lot of weight down low – kind of like an underwater airplane wing. A lowaspect keel is long and shallow, often running the entire length of the boat. In general (but not always), boats with more keel area will point higher than boats with less keel area. Hopefully you did your homework when you first went shopping for a boat. A manufacturer will never say, «Sails like a slug to windward, but just look at all that space below!» It’s up to you to determine how a boat will point, either by examining plans, reading the recommendations of other sailors, or test-sailing the boat.
Pointing ability is often described as the boat’s tacking angle. You can find your boat’s tacking angle with a test. Sheet the sails in hard and sail as close to the wind as possible. Note the heading on the compass, then tack the boat and sail on the opposite tack, again as close to the wind as she’ll go. Note the compass heading again. The angle described by the two headings is the boat’s tacking angle. It varies depending on the wind – a boat can point higher in a good breeze than in a slight zephyr – and a host of other factors. The pointing angle is half the tacking angle.
Read also: How to Load Boat on Trailer and How to Unload It?
Many factors affect your boat’s pointing ability. Many are built into the boat and not easily changed, such as your hull shape or the depth of your keel. But the adjustment of your sails and the tension of your rig can also be a factor. A common problem is a blown-out mainsail. As the cloth ages, it becomes softer and baggy, especially in the center, so you can’t get a good angle to the wind, even when everything is tightened correctly. In this case, buying a new sail is about all you can do.
Heaving To. This technique slows the boat without taking down the sails. It’s great if you’ve got to duck below for a quick cup of coffee or even fix a little lunch. (You are legally required to keep a lookout on deck, however.) You still have the steadying pressure of the breeze in the sails, though the boat will make very little headway. Here’s how it works, as steps 1 to 3 in the drawing illustrate.
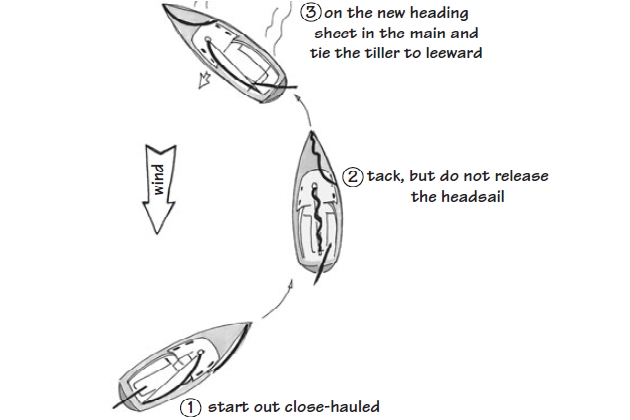
Sail as close to the wind as possible (closehauled). Sheet the main and jib in tight. Tack without touching either of the sheets. The boat should balance, with the backwinded jib canceling out the forward drive of the mainsail. You’ll probably need to trim to get the boat to balance, though, and some boats just plain don’t like to lie this way. I never could get my old MacGregor 222 to heave to – it wouldn’t balance, but wanted to sail on, backwinded jib and all! I might have gotten it to work with some experimentation. If your boat has a centerboard, try raising or lowering it a little or lashing the rudder a certain way. If you can get it to work on your boat, this can be a handy maneuver.
Sail Trim
You can use a huge variety of lines and make infinite adjustments to your sails, all of which have various effects on performance. To be honest, on most trailer sailers, these effects are pretty slight. They are all cumulative, and can add up to a noticeable loss of speed – perhaps even as much as 10 to 20 percent. Learning all of the components for optimal sail trim will take many hours of dedicated study as well as time on the water as you apply these techniques to your particular vessel.
Or not.
If you’re a new sailor and you just want to make the darned thing go, simply remember this three-step procedure for basic sail trim:
- When sailing upwind, let the sails out until they luff.
- Pull them in until they stop luffing.
- If you’re going downwind, make the sails as perpendicular as you can to the breeze.
That’s it. I’m assuming that you know enough to raise the sails before you try this, and you aren’t trying to point directly into the wind. If your boat is lying at least 45 degrees to the wind, this should work unless you have an anchor out. The only situation I can think of where it won’t work is if you’re locked in irons, and you can’t pull the sails in – they’re in all the way and they’re still luffing. If that’s the case, remember the pushmi-pullyu technique – swing the stern out, let the sails luff, then pull ’em in till they stop.
Now, there are plenty of other things we can talk about if you want to sail faster, but none of them will do you a lick of good until you master the basic steps above. While letting sails luff and pulling them in works on most upwind points of sail, it’s actually best when close-hauled to beam reaching. If you’re sailing downwind, present as much sail area to the wind as you can. You have to pull the mainsail in a little, until the boom and sail aren’t touching the shrouds. The constant rubbing will wear a hole in the sailcloth and chew up the boom. Another potential danger is an accidental jibe. If the boom is resting on the shrouds and you get an accidental jibe, your rig can be severely damaged when the boom crashes into the shrouds.
The «let them out, pull them in» strategy works because nearly all new sailors have a tendency to oversheet their sails, or pull them in too far. This causes all sorts of problems that aren’t easily deciphered. The sails will often look nice and full when they’re oversheeted, but you won’t be going very fast. The reason has to do with flow. Sails don’t trap air unless they’re going downwind. They work upwind because the air flows over them.
The precise mechanics of why this is so can be demonstrated with a few chapters of theory, including:
- airplane wings;
- high pressure versus low pressure;
- the Bernoulli principle;
- slot velocity;
- vector diagrams with arrows, dashes, and dots, and so on.
You don’t have to know all the theory in order to sail a boat, and many folks – myself included – get bogged down by too much of it. If you’re interested in sail theory, see the Bibliography for some excellent books on the subject. (And if you really want to learn how to trim sails, here’s a simple way: volunteer to be a part of a race crew. There is often an empty spot or two on race day, and if you explain to the captain that you want to learn as much as you can about trim, you’ll often get more information than you can digest. You’ll need to develop a thick skin, though – there’s a reason Captain Bligh always needed people to help run his ship, and things often get intense during a race.)
From a more practical standpoint, just remember that the wind has to flow over the sails in order to generate the lift needed to go upwind. Good sail trim involves keeping that flow moving as smoothly as possible. If you pull the sails in too tightly, the flow is impeded and your speed drops. If you really pull them in, the sail stalls – the flow is completely stopped on the back side of the sail, replaced instead by swirls and eddies of wind. The sail still looks good, but it’s trapping air instead of redirecting it.
You can do a few more things to improve flow. One is when you’re setting the sail. A sail without many wrinkles is going to flow air better than one that has wrinkles all over the surface. That’s why, when you set the sails, you try to stretch the luff until the wrinkles along the jib hanks and sail slides are pulled out, and the sail sets smoothly. On the boom, the clew of the mainsail is pulled outward by the outhaul. Just like halyards, if you don’t have enough outhaul tension on your mainsail, you may see wrinkles along the foot of the sail. If you can, pull the outhaul until you get the foot of the mainsail as smooth as possible.
In fact, this idea of flow is so important that sails have little bits of yarn sewn into them called telltales. These bits of yarn or tape show the airflow over your sails. There’s one on each side of the sail – a windward telltale and a leeward telltale. Using your telltales to judge sail trim is much more accurate than the let-them-out, pull-them-in method, but it’s a little more complex as well. If you feel like you can’t remember all the details, don’t worry about it – just let the sails out until they luff, and pull them in until they stop. As you gain sailing experience, reading the telltales becomes easier. If your sails don’t have any telltales, install them. You can buy them or make your own. Any strip of lightweight cloth or ribbon will work, though black shows up best; 16 to 20 inches long and a half inch wide will be fine. Even a strip of recording tape from a dead cassette will do, though it won’t last as long as fabric. Sew the ribbon into the sail with a sailmaker’s needle, and tie a knot on either side of the cloth. (You’ll need a real sailmaker’s needle – the sailcloth is amazingly tough.) On the jib, the telltales should be about a foot aft of the luff. Sew in three – one near the head, one near the foot, and one in between the two. A few telltales along the leech are also a good idea.
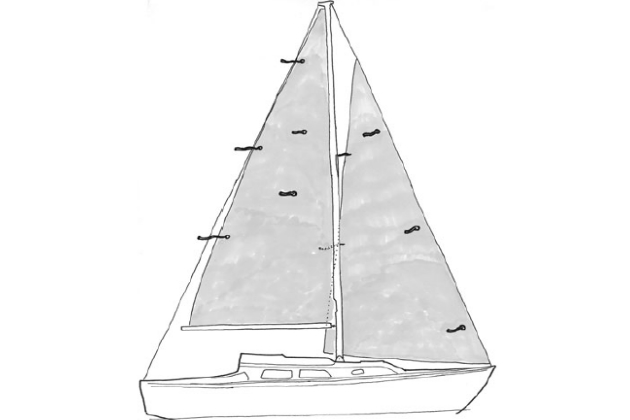
The telltales on the mainsail should be right at the leech – one at each batten pocket – or sew in three, one in the middle of the leech, one a quarter of the way up, and one a quarter of the way down. Install another set of two in the middle of the mainsail, about half and three-quarters of the way up.
Interpreting the telltales is a bit tougher than installing them. Ideally, all the telltales should be streaming aft, but you’ll often get conflicting signals. Some of the telltales will be streaming aft like they’re supposed to, while others will be fluttering in circles or pointing straight up. Different combinations can mean different things.
For example, on the jib, if the lower telltalesflutter but the top telltales stream correctly, then the jibsheet lead block is too far forward. Try adjusting it aft on the track. Conversely, if the top telltales flutter while the lower ones stream correctly, the sheet lead is too far aft. If you can’t figure out what the heck they’re doing and you suspect the jibsheet lead is out of position, you can try another method. Watch the upper telltales on the windward side of the jib as you slowly turn into the wind. At some point, one of the telltales will «break», meaning it’ll stop streaming aft and start to lift and flutter. See which one breaks first – if it’s the lower telltale, move the jibsheet lead block aft. If the upper one breaks first, move the sheet lead block forward. If they break at the same time, the sheet lead block is in the correct spot.
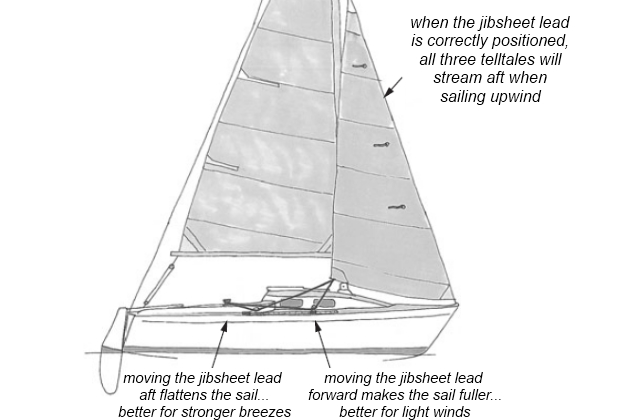
If the lower windward jib telltale breaks (flutters) first (before the upper telltales) as you turn upwind, move the jibsheet block aft. If the upper telltale flutters first, slide the jibsheet block forward on its track. Playing with these adjustments in various winds will help you become a better sailor.
When you are sailing upwind, both the windward and leeward jib telltales close to the luff should stream aft. If the leeward telltales are fluttering but the windward telltales are all flowing smoothly, your jib is overtrimmed (trimmed in too tightly). Either let the sail out a little or turn into the wind a little. In the opposite case, all the windward telltales are fluttering but the leeward telltales are streaming; the jibsheet is eased out too far. Sheet in a touch, or fall off, meaning turn downwind a little. Always turn away from, or trim toward, a fluttering telltale. (See section «The Barber Hauler» below and the drawing for a nifty way to adjust sheeting angle.) If you are sailing downwind, telltales won’t help you too much.
The Barber Hauler. According to Carl Eichenlaub (winner of the Lightning Internationals, Star, and Snipe championships), the best sailors on Mission Bay in the 1960s were the Barber twins, Manning and Merrit. Merrit invented a neat way to adjust the sheeting angle of jibs without a track.
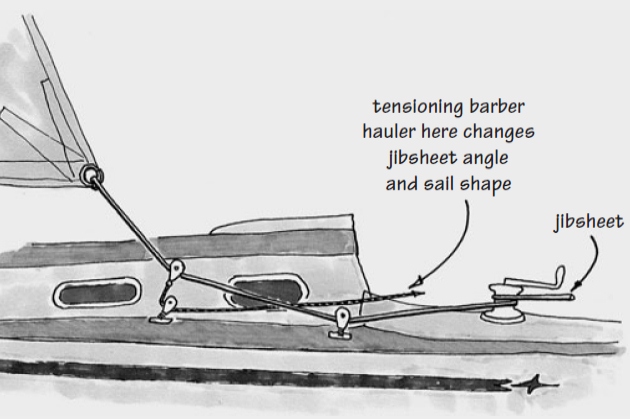
It’s still commonly used on racing boats. The advantage is that it’s a simple system that can be adjusted from the cockpit, and it’s easily adapted to boats with a jib track.
Mainsail Telltales
The telltales on the main are a bit different than those on the jib, but the theory is the same. Again, telltales are most helpful when sailing upwind for maintaining proper airflow across the sail surface.
The telltales on the main can help you adjust for the proper sail shape. Watch the top telltale; if it sneaks around behind the sail, that’s an indication that there’s not enough twist in the main and you need to ease the mainsheet a little. If you have a boom vang and/or a traveler, those may need adjustment as well. Ease the vang, and if that’s not enough, pull the traveler more to windward to increase the twist and reduce the downward pull on the boom.
The telltales below are there to give you an overall indication of the sail’s shape. If the middle telltales are not streaming aft (assuming a wind of about 5 knots and an upwind point of sail), then your mainsail is shaped too full. If your sails are old or have seen a lot of sailing hours, there’s a good chance that the fabric has been stretched out of shape. All your telltale readings will be a bit screwy. Try a little tension on the cunningham. Racers will add a little mast bend by increasing their backstay tension, but I prefer to keep the mast straight. My boat’s mast has a permanent curve aft from overzealous backstay tension, probably to compensate for a blown-out mainsail. Another possible cause of fluttering lower mainsail telltales is an overtrimmed jib. Try easing the jibsheet to see if that helps.
There are lots of subtleties to telltale readings that vary with different Recommendations for Choosing the Type of Boatboat types, wind strengths, and points of sail, and even vary with some conflicting advice. (Some captains like telltales near the luff of the main, for example, while others say that leech telltales are the only ones that should be installed.) Again, racing skippers are the experts here, and observing some of their comments online, in books, or in person can be helpful if you want to get the best possible speed from the wind.
Up to now, we’ve been talking about sail trim mainly as it relates to the position of the sails in relation to the wind. Getting the angle of the sail right is a big part of boat speed. But another factor of sail trim relates to the shape of the sails themselves. When you start adjusting the actual shape of the sails, you’re getting into some pretty fancy stuff, because there are lots of variations that can have different effects on how well the boat sails. If the sail shape is wrong, it can result in more heeling force on the boat (see section «Heeling on a Sailboat» below). Sail shape can be summarized as follows:
- High winds need flatter sails.
- Light winds need fuller sails.
The jib is flattened primarily by adjusting the jibsheet lead – farther back for high winds, farther forward for light winds. A second way to flatten the jib is by increasing the headstay tension, but this is possible (while underway) only on boats with adjustable backstays. If you don’t have them, you might tighten your rigging a little if you’re setting the boat up on a windy day, but don’t overdo it.
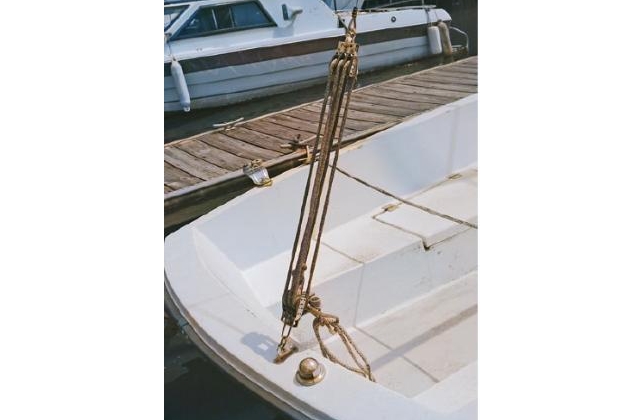
They are powerful blocks that can exert a lot of force on a rig. This particular one is a bad design – the only thing keeping the mast on the boat is that little cam cleat. If it were released accidentally on a run in a breeze, the entire rig could go overboard.
The mainsail can be flattened for high winds in several ways. Increasing the outhaul tension will flatten the lower third of the sail, and bending the mast aft (again, on boats with adjustable backstays) will flatten the upper twothirds of the sail. Some boats have a boom vang, which is a pair of blocks on a line connecting the mast base with the boom. It’s used to pull the boom down, reducing the amount of twist in the mainsail. The boom vang can be used along with the telltales to get just the right amount of twist for your heading and, with the right vang tension, get all your telltales streaming aft.
Another way to flatten the mainsail is by using a cunningham. You may notice an extra grommet near the tack of the mainsail but a little farther from the edge of the sail. That’s the cunningham. It’s usually adjusted with a line running through it and back down to the deck. It can be thought of as a sail flattener, though it really alters the draft of the sail by moving it forward.
So, what is the draft of a sail? The draft is the curve that the sail forms as the wind blows across the surface. Just as hulls are designed for different sea conditions, so are sails. A sail with more draft – a full sail – gives the boat more power to help it drive through choppy water, but this type of sail loses efficiency as the wind speed increases. A sail with less draft – a flat sail – will point higher and sail faster and is more efficient in higher winds.
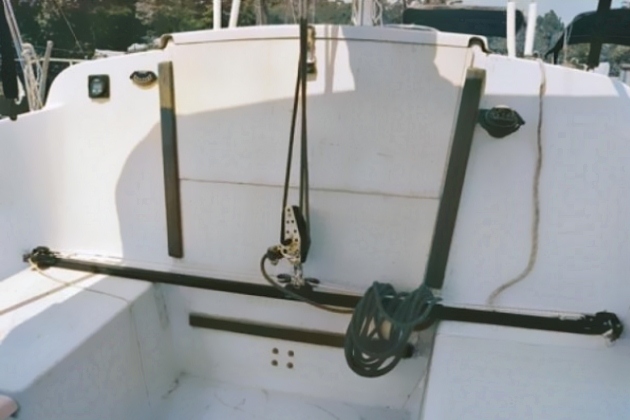
The traveler, if your boat has one, can be used to adjust the angle of the sail while keeping its shape. By letting out the traveler car instead of the mainsheet, you can keep the correct tension on the leech of the sail and make small corrections for course or changes in wind direction.
The Leech Line. Most mainsails (and some headsails) have a small line sewn into the fold of the leech that is secured by a small cleat or buttons on the sail. This is the leech line. You use it to tension the leech to prevent the leech from fluttering. If it’s too tight, though, the leech will hook to windward and you’ll have more heeling force and less forward drive. To adjust the leech, give it just enough tension to stop fluttering but not enough to cause a hook.
Heeling on a Sailboat. The term heeling describes the way a sailboat leans as a result of the wind on the sails. All sailboats heel, but how much they heel can vary a great deal, depending on:
- the type of boat;
- draft;
- ballast;
- sail shape, and other factors.
A catamaran will heel very little at first, because the wide base of her two hulls provides a lot of stability. As the wind gets stronger, a catamaran will lift one of her hulls clear out of the water. At this point, a catamaran will fly like a spooked greyhound – it absolutely smokes across the water since its water resistance has been essentially cut in half. But it’s about as stable as a spooked greyhound as well, and the skipper has to be very careful with the mainsheet and tiller or she’ll capsize the boat. Catamarans like the famous Hobie are an adrenaline rush to sail, but they’re not great for cruising or relaxing.
Let’s compare this to a monohull, like our trailer sailer. Initially, when the wind blows, most monohulls lean right over. Some boats do this very easily in a light wind – they’re termed «tender». Often, tender boats have a relatively narrow hull with plenty of ballast.
A «stiff» boat will resist heeling at first. Two main factors determine stiffness – hull shape and keel type. A wide, beamy hull with a reasonably flat bottom makes a stiff boat without a lot of additional weight, which is good for a trailer sailer. A deep keel with a lot of lead in it also makes a boat stiff, but heavy.
The trade-off between hull shape and keel weight comes as the wind increases. Many heavy-displacement sailboats are very tender initially but quickly settle into an angle of heel and become rock-solid. The more the wind blows, the greater they resist further heeling.
Newer wide-body lightweight designs are super in light air, but as the wind kicks up, their ability to resist heeling decreases and they are easier to knock down. Add some really big waves and a complete rollover is possible.
Trailerable sailboats are usually more like the latter example – they don’t have a huge amount of ballast (so they can be pulled with an average car or truck), and they have a retractable keel that can be lifted into the hull for trailering. This is one reason why most trailerable sailboats don’t make good long-distance cruisers. They can be poor choices for storm sailing. There are a few exceptions, of course – a Cal 20 has sailed to Hawaii, and Montgomery 17s to Mexico and through the Panama Canal, but neither of these designs was intended for that kind of sailing.
Docking
Returning to the dock or a slip after a day of sailing can be a little tense the first few times, but it gets easier with practice. You can dock under sail, though it’s especially tricky if you’re alone, since you’ll need to be in several places at once. Most folks approach the dock under power. Here’s how it should go.
If at all possible, approach a dock from downwind. If there’s room and no other boats are around, a practice run isn’t a bad idea. Pull up near the dock, but keep about a boat length or two away. Allow more distance if conditions are tricky. Shift the motor into neutral, noting the speed and the effects of wind and current on your boat. Some boats will glide for a long time before they stop, and it’s good to know what to expect. Notice the boat’s drift, her response to the helm, and how these combine with the current and the wind. When you’ve got a good feel for the conditions, place the motor in gear, loop around, and try again.
Place your fenders near the widest point of your hull, tying them to cleats or stanchion bases. Don’t let any lines trail in the water. For docking, you’ll need a bow line, a stern line, and two spring lines. (See section «Equipment of a Sailboat: What You Need to Have on Board While SailingLifelines, Harnesses, Tethers, and Jacklines» for a rundown of this equipment.) Station a crewmember on the bow with a long line secured to the bow cleat. This will be the bow line. Remember that it will need to run underneath the lifelines. If you’re by yourself, run the line from the bow cleat, outside the lifelines and stanchions, and back to the cockpit so that you can throw the line from the stern.
Quick tip – if you regularly come alongside pilings that seem to evade your fenders, you might try a long swim noodle. Get the fattest one you can find, run a light line through the center, and hang it horizontally along the widest part of your hull. It won’t replace your fenders, but it could add a little extra protection against bumps and scratches.
Approach the dock slowly. Outboard motors commonly die when they’re needed most, and if you’re depending on yours to deliver a quick burst of reverse, then that’s the time it’ll run out of fuel or foul a line. Too many people think it’s impressive to power into the dock, slam the boat into reverse at the last minute, and stop on a dime. It is impressive when everything works, but it causes impressive amounts of damage, and possibly even injuries, when things don’t go as expected.
Remember that a sailboat’s turning axis is around the center of the boat. As you turn, the bow swings into the turn and the stern swings out. Ideally, you want to turn just at the right moment, so the bow doesn’t crash into the dock but the midsection of the boat gets as close as possible. If you get it right, you’ll coast into the dock with a gentle bump of the fenders.
Step off the boat with the bow line and go directly to a cleat. Loop the line over the cleat and let it slip until the boat is where you want it, then stop the boat by pulling upward against the cleat. Don’t try to stop the boat by tugging on the line. That works fine for wrangling calves, but try that with a large boat and it’ll just pull you in the water. Again, never put any part of yourself between the boat and the dock. (See section «Leaving the Dock» above.)
If the boat is moving forward and the bow line is stopped, the stern will swing out. This is especially a problem when coming into a slip, since you’ve got to stop and you don’t want to crash sideways into the boat next to you. Placing a fender on the opposite side of the boat and on the stern corner can save the day. If the finger pier on the slip is long enough, you can stop the boat with the stern line, or if your crew is experienced they can go ashore with two lines, one for the bow and one for the stern.
Picking Up and Dropping a Mooring
Picking up a mooring, like docking, is fairly easy with a little practice. Approach slowly and have a crewmember at the bow ready with the boathook. There should be a pickup float attached to the buoy or to a chain beneath it; snag the float with the boathook and bring it aboard. Make the line fast to your bow cleat. Some skippers will toss out a stern anchor to control the swing, or tie off to a second mooring astern.
Probably the biggest hazard to watch out for is fouling a line with the prop. Keep a sharp lookout for stray lines from other moorings or boats as you approach and leave a mooring. If conditions are settled and it’s not crowded, try it under sail!
Anchoring Techniques
Anchoring techniques are the same for a small vessel as they are for a large one. You can use smaller anchors, naturally, which are much easier to handle and more affordable. (See section «Equipment of a Sailboat: What You Need to Have on Board While SailingOptional Equipment» for a description of the different types of anchors and the conditions for which each is designed.)
First, you’ve got to pick a good spot to anchor for the night. A good anchorage will have protection from the wind and waves on several sides, be deep enough for your boat, and have a goodholding bottom so the anchor can bite. Your chart is probably your best bet for finding a good spot, though a place that appears ideal on the chart can turn out to be a bit of a dog. After all, the chart doesn’t list a factory that’s particularly smelly, and there’s no chart symbol for mosquitoes. A local cruising guide can be a big help in guiding you – and sometimes lots of other people – to a particular anchorage. If there’s a cruising guide for your area, bring it along and add your own notes. You might even wish to try writing your own someday!
Any anchorage needs depth and swinging room. You’ll want to remain floating during your stay unless you want to scrub your bottom. Make sure you can get out when the tide goes down, too. How much swinging room you need refers to the amount of anchor rode you have out, which in turn depends on the depth. Your anchor scope is the length of rode out at a given time, usually expressed as a ratio. For a rope and chain rode, a 7:1 scope is generally considered the minimum you should have out, meaning if the water is 10 feet deep at high tide, you should have 70 feet of rode out. In a blow, 12:1 isn’t too much, and 15:1 provides about the maximum benefit. For an average trailerable, a 3/8-inch-diameter rode with 20 feet of 1/4-inch or larger chain is a pretty good combination. Some say that you should have half the length of the boat in anchor chain; others say the chain should equal the length of the boat.
It’s the weight of the chain in front of the anchor that helps the anchor hold. An anchor sentinel or kellet is a heavy weight that slides down the middle of the rode and lowers the angle of the rode closer to the bottom, giving a better grip. The rode must be protected from chafe.
Another idea is an anchor buoy. It holds the bow of the boat up, allowing it to ride over the waves rather than pulling it downward.
A nice plus for an anchorage is two landmarks that are visible in the dark so you can check whether you’re dragging during the night.
You’ve settled on where to anchor; now how do you do it? The basic method is to bring your bow to the precise spot you want your anchor to lie and then stop your forward progress by putting the motor in reverse. As the boat starts to go backward, slowly lower the anchor over the bow until it touches the bottom crown first, then slowly pay out the line until you have the proper scope. Oh, by the way – you did tie the bitter end of the anchor rode off to something before you tossed it overboard, didn’t you? Plenty of anchors have been lost by not doing this. And I don’t need to warn you to keep your feet clear of the rode as it pays out, do I? It sounds like a funny situation, but the forces on the rode can be pretty strong. When you have enough scope out, quickly take a turn around a mooring cleat and snub it up tight to set the anchor. Hopefully the anchor will bite and stop the boat. The anchor should be able to take full reverse power without moving. Check the set of the anchor by sighting a landmark across some part of the boat. You can also check the rode with your hand to feel for any vibration from the dragging anchor. If the boat shows any indication of moving, haul up the dragging anchor and try resetting it.
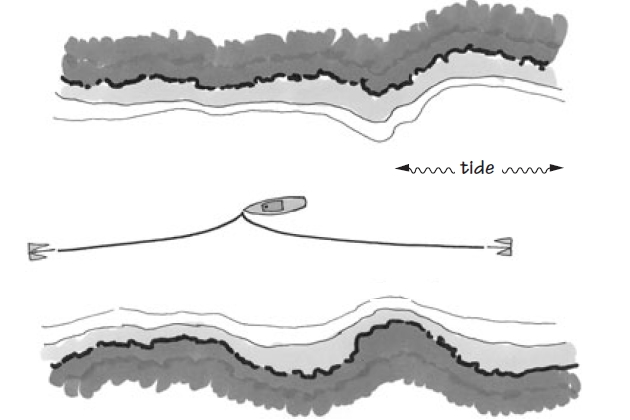
Sometimes you’ll want to lie at two anchors from the bow. This is called a Bahamian moor, and it works well for anchoring in a tidal stream. The two rodes sometimes twist together and make a monstrous snarl, though. The only way to prevent it is to check the rodes at each change of the tide and re-cleat them if necessary.
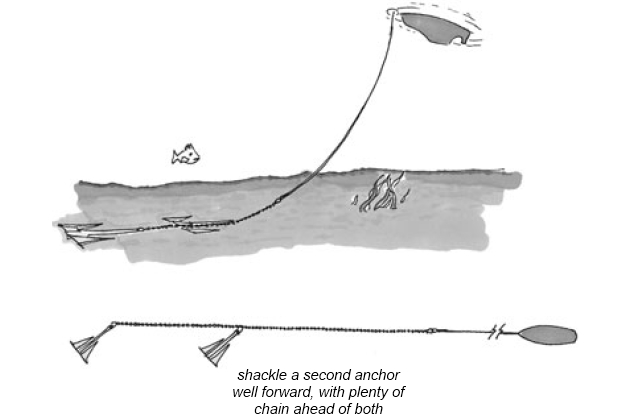
In storm conditions, two anchors on a single rode will often hold better than the same two anchors on their own rodes. Perhaps the extra weight of the forward anchor acts as a kellet. But it’s easy enough to try, and it’s a good way to use a smaller anchor in a storm.
Keeping your small lunch hook ready to go at the stern can be a real lifesaver. If you secure the coil of line with rubber bands and keep the bitter end attached to a cleat somewhere, you can toss the whole assembly overboard. The anchor’s weight breaks the rubber bands, deploying the line and stopping the boat without having to leave the helm. A stern anchor might be the only way to approach a dock in a strong tailwind.
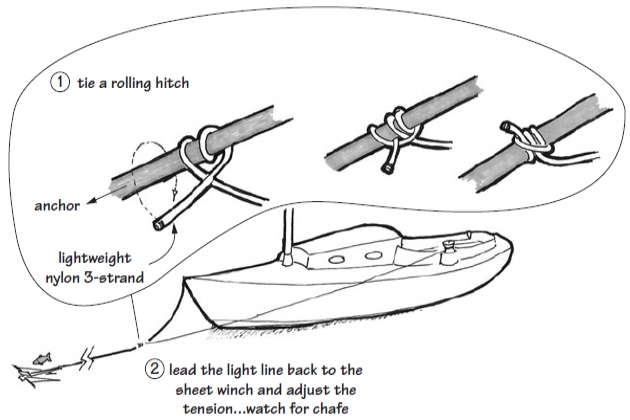
One nifty trick has worked well for me in a storm: you can buy rubber snubbers for the anchor rode that act as shock absorbers, dampening some of the shock loading caused when the boat pitches in the waves. Or you can use light nylon line, about 1/4 inch, to do the same job. Tie the line to the rode 20 to 30 feet before the end of the rode, then lead it to the sheet winches. Tie it on using a rolling hitch. Crank on a few turns until the main rode has a little slack in it. The nylon is very stretchy and acts like a giant rubber band. You can make adjustments with the winch as the night goes on, tightening or loosening as necessary. You need to watch carefully for chafe, though, if you lead the line through the bow cleat.
When you anchor for the night in normal conditions, take a few bearings of some prominent landmarks before you go to bed. You’ll want to check your position a few times during the night to make sure you’re not dragging, especially after a tide change or if the wind picks up. If the anchorage is completely featureless, then a small float tied to the anchor on a separate line can show whether you’re dragging.
If you’re sailing with friends, you may want to anchor together. It’s easy if you take a few precautions – see section «Rafting Up» below.
Rafting Up. Rafting up or tying your boat alongside another can be lots of fun. It’s best to keep the total number of boats tied together low, say three or four, though people will raft up more. The procedure is fairly easy. One boat – the largest – serves as the host and places its largest anchor off the bow, making certain it’s well set. Then the other boats, with plenty of fenders out, slowly come alongside and pass bow and stern lines to the host. The host boat is the only anchored vessel; the others just hang on for the ride. Naturally you need settled weather, plenty of swinging room, and good holding ground. As you tie up to the host boat, look up. You don’t want your spreaders to tangle, so use the lines to bring your boat forward or aft as necessary.
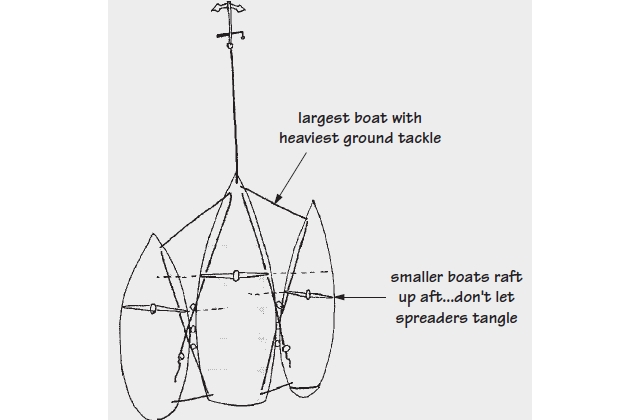
Make certain that if the wind kicks up, you can get clear quickly and have an alternative anchorage nearby. Keep your ground tackle ready to go while you’re rafting. When it’s time to turn in for the night, break up the raft and lie at your own anchor.
Best Practices for the Prudent Mariner
All captains, with time and experience, develop their own boating methods, procedures, and rules to live by. The following guidelines are by nature highly opinionated and personal, but they work. Consider them with an open mind.
A good captain rarely yells unless he or she needs to be heard above the wind. In some cases, like raising or lowering the anchor, the foredeck can communicate with the helm with prearranged hand signals. If, however, your crew is not taking a safety situation seriously, by all means yell to keep them out of harm’s way.
«Swearing like a sailor» generally referred to the lower deck. Good captains rarely required crude language for the usual operation of the ship.
Never frighten a child (or anyone) who might become a sailor. Long before I knew her, my wife went sailing as an eighteen year old with a hotshot Hobie sailor. Eager to show off his manly prowess, he insisted on flying one of the hulls. It wasn’t long before they capsized, throwing my wife into the rigging and inflicting a long and painful gash in her leg, which still bears the scar. She has never really enjoyed sailing since.
It will be interesting: Performance Characteristics of Boat Trailers
If the work of sailing your boat is segregated into men’s jobs and women’s jobs, it won’t take long before they all become your jobs. Sailing a boat should be gender-neutral. Unless you like sailing alone, rotate the jobs of:
- helmsman;
- sheet trimmer;
- anchor hauler;
- cook;
- galley cleanup, and so on.
A good captain involves her crew in decision making whenever she can, yet is always ready to take command instantly if the situation requires it.
Never embarrass any member of your crew in front of others.
When you start out for the day, always sail upwind first. If you’re sailing in tidal waters, know the times for high and low tide before you set out so you can take advantage of favorable tidal currents.
All of your lines should be whipped, without unraveled ends or fluffy tails. A proper whipping, with thread, is better (and slightly safer) than ends with a turn of masking tape and a big blob of melted line on the end. (See section «Tips on Rigging a Boat and Using Knots in SailingKnots and Lines» for more on whipping.)
Tension your halyards appropriately. Besides looking sloppy, a sail with a scalloped luff is inefficient.
Learn to dress your halyard tails correctly. This is as much a matter of safety as keeping your decks neat. Sometimes you will need to get your sails down in a hurry. A Gordian knot of a halyard, dangling halfway up the mast, has to be experienced in a blow to be fully appreciated. The consequences can range from comical to downright dangerous.
Don’t run a loud generator or crank up the tunes when sharing an anchorage with others. Respect their privacy and do not anchor too closely. If another boat is first at an anchorage and lays out excessive scope, there’s little you can do besides anchor in another location.
If you must fly flags or ensigns, learn how to fly them correctly. Flags aren’t decorative – they have specific purposes and meanings, even if misunderstood by most people. Don’t fly a flag that’s dirty or worn out.
Always operate your boat in a safe, conservative manner. Ask yourself, What if this maneuver doesn’t go as planned? Always look for options and alternative plans of action.
Always be polite and respectful of dockside personnel. Never try to impress anyone with the size of your boat or the size of your purse – there’s always going to be a bigger one. How well you treat others is the only impression worth leaving.
Remember the three rules of sailing:
- Keep the water out of the boat.
- Keep the people out of the water.
- Keep the boat on the water.
